Introduction
Wasmtime is a standalone runtime for WebAssembly, WASI, and the Component Model by the Bytecode Alliance.
WebAssembly (abbreviated Wasm) is a binary instruction format that is designed
to be a portable compilation target for programming languages. Wasm binaries
typically have a .wasm file extension. In this documentation, we'll also use
the textual representation of the binary files, which have a .wat file
extension.
WASI (the WebAssembly System Interface) defines interfaces that provide a secure and portable way to access several operating-system-like features such as filesystems, networking, clocks, and random numbers.
The Component Model is a Wasm architecture that provides a binary format for portable, cross-language composition. More specifically, it supports the use of interfaces via which components can communicate with each other. WASI is defined in terms of component model interfaces.
Wasmtime runs WebAssembly code outside of the Web, and can be used both as a command-line utility or as a library embedded in a larger application. It strives to be
- Fast: Wasmtime is built on the optimizing Cranelift code generator.
- Secure: Wasmtime's development is strongly focused on correctness and security.
- Configurable: Wasmtime uses sensible defaults, but can also be configured to provide more fine-grained control over things like CPU and memory consumption.
- Standards Compliant: Wasmtime passes the official WebAssembly test suite and the Wasmtime developers are intimately engaged with the WebAssembly standards process.
This documentation is intended to serve a number of purposes and within you'll find:
- How to use Wasmtime from a number of languages
- How to install and use the
wasmtimeCLI - Information about stability and security in Wasmtime.
- Documentation about contributing to Wasmtime.
... and more! The source for this guide lives on GitHub and contributions are welcome!
Using the wasmtime CLI
In addition to the embedding API which allows you to use Wasmtime as a
library, the Wasmtime project also provides a wasmtime CLI tool to conveniently
execute WebAssembly modules from the command line.
This section will provide a guide to the wasmtime CLI and major functionality
that it contains. In short, however, you can execute a WebAssembly file
(actually doing work as part of the start function) like so:
wasmtime foo.wasm
Or similarly if you want to invoke a "start" function, such as with WASI modules, you can execute
wasmtime --invoke _start foo.wasm
For more information be sure to check out how to install the CLI, the list of options you can pass, and how to enable logging.
Installing wasmtime
Here we'll show you how to install the wasmtime command line tool. Note that
this is distinct from embedding the Wasmtime project into another, for that
you'll want to consult the embedding documentation.
The easiest way to install the wasmtime CLI tool is through our installation
script. Linux and macOS users can execute the following:
curl https://wasmtime.dev/install.sh -sSf | bash
This will download a precompiled version of wasmtime, place it in
$HOME/.wasmtime, and update your shell configuration to place the right
directory in PATH.
Windows users will want to visit our releases page and can download
the MSI installer (wasmtime-dev-x86_64-windows.msi for example) and use that
to install.
You can confirm your installation works by executing:
$ wasmtime -V
wasmtime 30.0.0 (ede663c2a 2025-02-19)
And now you're off to the races! Be sure to check out the various CLI options as well.
Download Precompiled Binaries
If you'd prefer to not use an installation script, or you're perhaps
orchestrating something in CI, you can also download one of our precompiled
binaries of wasmtime. We have two channels of releases right now for
precompiled binaries:
- Each tagged release will have a full set of release artifacts on the GitHub releases page.
- The
devrelease is also continuously updated with the latest build of themainbranch. If you want the latest-and-greatest and don't mind a bit of instability, this is the release for you.
When downloading binaries you'll likely want one of the following archives (for
the dev release)
- Linux users -
wasmtime-dev-x86_64-linux.tar.xz - macOS users -
wasmtime-dev-aarch64-macos.tar.xz - Windows users -
wasmtime-dev-x86_64-windows.zip
Each of these archives has a wasmtime binary placed inside which can be
executed normally as the CLI would.
Install via Cargo
If you have Rust and Cargo available in your system, you can build and install an official wasmtime release from its crates.io source:
cargo install wasmtime-cli
This compiles and installs wasmtime into your Cargo bin directory (typically $HOME/.cargo/bin). Make sure that directory is in your PATH before running wasmtime. For example, add the following line to ~/.bashrc or ~/.zshrc:
export PATH="$HOME/.cargo/bin:$PATH"
You can also use binstall to automatically find and install the correct wasmtime binary for your system, matching a candidate from GitHub Releases:
cargo binstall wasmtime-cli
Compiling from Source
If you'd prefer to compile the wasmtime CLI from source, you'll want to
consult the contributing documentation for building.
Be sure to use a --release build if you're curious to do benchmarking!
CLI Options for wasmtime
The wasmtime CLI is organized into a few subcommands. If no subcommand is
provided it'll assume run, which is to execute a wasm file. The subcommands
supported by wasmtime are:
help
This is a general subcommand used to print help information to the terminal. You can execute any number of the following:
wasmtime help
wasmtime --help
wasmtime -h
wasmtime help run
wasmtime run -h
When in doubt, try running the help command to learn more about functionality!
run
This is the wasmtime CLI's main subcommand, and it's also the default if no
other subcommand is provided. The run command will execute a WebAssembly
module. This means that the module will be compiled to native code,
instantiated, and then optionally have an export executed.
The wasmtime CLI will automatically hook up any WASI-related imported
functionality, but at this time, if your module imports anything else, it will
fail instantiation.
The run command takes one positional argument, which is the name of the module to run:
wasmtime run foo.wasm
wasmtime foo.wasm
Note that the wasmtime CLI can take both a binary WebAssembly file (*.wasm)
as well as the text format for WebAssembly (*.wat):
wasmtime foo.wat
Running WebAssembly CLI programs
WebAssembly modules or components can behave like a CLI program which means
they're intended to look like a normal OS executable with a main function and
run once to completion. This is the default mode of running a wasm provided to
Wasmtime.
For core WebAssembly modules this means that the function exported as an empty
string, or the _start export, is invoked. For WebAssembly components this
means that the wasi:cli/run interface is executed.
For both core modules and components, CLI arguments are passed via WASI. Core modules receive arguments via WASIp1 APIs and components receive arguments via WASIp2 or later APIs. Arguments, flags, etc., are passed to the WebAssembly file after the file itself. For example,
wasmtime foo.wasm --bar baz
Will pass ["foo.wasm", "--bar", "baz"] as the list of arguments to the module.
Note that flags for Wasmtime must be passed before the WebAssembly file, not
afterwards. For example,
wasmtime foo.wasm --dir .
Will pass --dir . to the foo.wasm program, not Wasmtime. If you want to
mount the current directory you instead need to invoke
wasmtime --dir . foo.wasm
All Wasmtime options must come before the WebAssembly file provided. All arguments afterwards are passed to the WebAssembly file itself.
Running Custom Module exports
If you're not running a "command" but want to run a specific export of a
WebAssembly core module you can use the --invoke argument:
wasmtime run --invoke initialize foo.wasm
This will invoke the initialize export of the foo.wasm module.
When invoking a WebAssembly function arguments to the function itself are parsed
from CLI arguments. For example an i32 argument to a WebAssembly module is
parsed as a CLI argument for the module:
wasmtime run --invoke add add.wasm 1 2
Note though that this syntax is unstable at this time and may change in the future. If you'd like to rely on this please open an issue, otherwise we request that you please don't rely on the exact output here.
Running Custom Component exports
Like core modules Wasmtime supports invoking arbitrary component exports.
Components can export typed interfaces defined by the component
model. The
--invoke argument is supported to skip calling wasi:cli/run and invoke a
specific typed export instead. Arguments are passed with
WAVE
,a human-oriented text encoding of Wasm Component Model values. For example:
wasmtime run --invoke 'initialize()' foo.wasm
You will notice that (when using WAVE) the exported function's name and exported
function's parentheses are both enclosed in one set of single quotes, i.e.
'initialize()'. This treats the exported function as a single argument in a
Unix shell and prevents issues with shell interpretation and signifies function
invocation (as apposed to the function name just being referenced). Using WAVE
(when calling exported functions of Wasm components) helps to distinguish
function calls from other kinds of string arguments. Below are some more
examples:
If your function takes a string argument, you surround the string argument in double quotes:
wasmtime run --invoke 'initialize("hello")' foo.wasm
And each individual argument within the parentheses is separated by a comma:
wasmtime run --invoke 'initialize("Pi", 3.14)' foo.wasm
wasmtime run --invoke 'add(1, 2)' foo.wasm
Please note: If you enclose your whole function call using double quotes, your string argument will require its double quotes to be escaped (escaping quotes is more complicated and harder to read and therefore not ideal). For example:
wasmtime run - invoke "initialize(\"hello\")" foo.wasm
serve
The serve subcommand runs a WebAssembly component in the wasi:http/proxy
world via the WASI HTTP API, which is available since Wasmtime 18.0.0. The goal
of this world is to support sending and receiving HTTP requests.
The serve command takes one positional argument which is the name of the
component to run:
wasmtime serve foo.wasm
Furthermore, an address can be specified via:
wasmtime serve --addr=0.0.0.0:8081 foo.wasm
At the time of writing, the wasi:http/proxy world is still experimental and
requires setup of some wit dependencies. For more information, see
the hello-wasi-http example.
wast
The wast command executes a *.wast file which is the test format for the
official WebAssembly spec test suite. This subcommand will execute the script
file which has a number of directives supported to instantiate modules, link
tests, etc.
Executing this looks like:
wasmtime wast foo.wast
config
This subcommand is used to control and edit local Wasmtime configuration settings. The primary purpose of this currently is to configure how Wasmtime's code caching works. You can create a new configuration file for you to edit with:
wasmtime config new
And that'll print out the path to the file you can edit.
completion
This subcommand generates shell completion scripts for the wasmtime CLI.
Shells install completion scripts in different locations, so refer to your
shell's documentation for the right place to store or evaluate the generated
output.
For example, to install completions for the fish shell:
wasmtime completion fish > ~/.config/fish/completions/wasmtime.fish
For shells such as zsh, the generated script can also be evaluated directly:
eval "$(wasmtime completion zsh)"
compile
This subcommand is used to Ahead-Of-Time (AOT) compile a WebAssembly module to produce a "compiled wasm" (.cwasm) file.
The wasmtime run subcommand can then be used to run a AOT-compiled WebAssembly module:
wasmtime compile foo.wasm
wasmtime foo.cwasm
AOT-compiled modules can be run from hosts that are compatible with the target environment of the AOT-completed module.
settings
This subcommand is used to print the available Cranelift settings for a given target.
When run without options, it will print the settings for the host target and also display what Cranelift settings are inferred for the host:
wasmtime settings
explore
This subcommand can be used to explore a *.cwasm file and see how it connects
to the original wasm file in a web browser. This will compile an input wasm
file and emit an HTML file that can be opened in a web browser:
$ wasmtime explore foo.wasm
Exploration written to foo.explore.html
The output HTML file can be used to compare what WebAssembly instruction
compiles to what native instruction. Compilation options can be passed to
wasmtime explore to see the effect of compilation options on generated code.
objdump
Primarily intended as a debugging utility the objdump subcommand can be used
to explore a *.cwasm file locally on your terminal. This is roughly modeled
after native objdump binaries themselves:
$ wasmtime objdump foo.cwasm
wasm[0]::function[0]:
            stp     x29, x30, [sp, #-0x10]!
            mov     x29, sp
            ldr     x5, [x2, #0x50]
            lsl     w6, w4, #2
            ldr     w2, [x5, w6, uxtw]
            ldp     x29, x30, [sp], #0x10
            ret
You can also pass various options to configure and annotate the output:
$ wasmtime objdump foo.cwasm --addresses --bytes --addrma
00000000 wasm[0]::function[0]:
         0: fd 7b bf a9                  stp     x29, x30, [sp, #-0x10]!
         4: fd 03 00 91                  mov     x29, sp
         8: 45 28 40 f9                  ldr     x5, [x2, #0x50]
                                          ╰─╼ addrmap: 0x23
         c: 86 74 1e 53                  lsl     w6, w4, #2
                                          ╰─╼ addrmap: 0x22
        10: a2 48 66 b8                  ldr     w2, [x5, w6, uxtw]
                                          ╰─╼ addrmap: 0x23
        14: fd 7b c1 a8                  ldp     x29, x30, [sp], #0x10
                                          ╰─╼ addrmap: 0x26
        18: c0 03 5f d6                  ret
Additional options
Many of the above subcommands also take additional options. For example,
- run
- serve
- compile
- explore
- wast
are all subcommands which can take additional CLI options of the format
Options:
  -O, --optimize <KEY[=VAL[,..]]>
          Optimization and tuning related options for wasm performance, `-O help` to see all

  -C, --codegen <KEY[=VAL[,..]]>
          Codegen-related configuration options, `-C help` to see all

  -D, --debug <KEY[=VAL[,..]]>
          Debug-related configuration options, `-D help` to see all

  -W, --wasm <KEY[=VAL[,..]]>
          Options for configuring semantic execution of WebAssembly, `-W help` to see all

  -S, --wasi <KEY[=VAL[,..]]>
          Options for configuring WASI and its proposals, `-S help` to see all
For example, adding --optimize opt-level=0 to a wasmtime compile subcommand
will turn off most optimizations for the generated code.
CLI options using TOML file
Most key-value options that can be provided using the --optimize, --codegen,
--debug, --wasm, and --wasi flags can also be provided using a TOML
file using the --config <FILE> cli flag, by putting the key-value inside a TOML
table with the same name.
For example, with a TOML file like this
[optimize]
opt-level = 0
the command
wasmtime compile --config config.toml
would be the same as
wasmtime compile --optimize opt-level=0
assuming the TOML file is called config.toml. Of course you can put as many
key-value pairs as you want in the TOML file.
Options on the CLI take precedent over options specified in a configuration file, meaning they're allowed to shadow configuration values in a TOML configuration file.
Logging in the wasmtime CLI
Wasmtime's libraries use Rust's log crate to log diagnostic
information, and the wasmtime CLI executable uses tracing-subscriber
for displaying this information on the console.
Basic logging is controlled by the WASMTIME_LOG environment variable. For example,
To enable logging of WASI system calls, similar to the strace command on Linux,
set WASMTIME_LOG=wasmtime_wasi=trace. For more information on specifying
filters, see tracing-subscriber's EnvFilter docs.
$ WASMTIME_LOG=wasmtime_wasi=trace wasmtime hello.wasm
[...]
TRACE wiggle abi{module="wasi_snapshot_preview1" function="fd_write"} wasmtime_wasi::preview1::wasi_snapshot_preview1                     > fd=Fd(1) iovs=*guest 0x14/1
Hello, world!
TRACE wiggle abi{module="wasi_snapshot_preview1" function="fd_write"}: wasmtime_wasi::preview1::wasi_snapshot_preview1: result=Ok(14)
TRACE wiggle abi{module="wasi_snapshot_preview1" function="proc_exit"}: wasmtime_wasi::preview1::wasi_snapshot_preview1: rval=1
TRACE wiggle abi{module="wasi_snapshot_preview1" function="proc_exit"}: wasmtime_wasi::preview1::wasi_snapshot_preview1: result=Exited with i32 exit status 1
Wasmtime can also redirect the log messages into log files, with the
-D log-to-files option. It creates one file per thread within Wasmtime, with
the files named wasmtime.dbg.*.
Additional environment variables that work with WASMTIME_LOG (not -D log-to-files):
WASMTIME_LOG_NO_CONTEXT: if set to1, removes the time, level and target from output.
Cache Configuration of wasmtime
The configuration file uses the toml format. You can create a configuration file at the default location with:
wasmtime config new
It will print the location regardless of the success.
Please refer to the --help message for using a custom location.
All settings are optional. If the setting is not specified, the default value is used. Thus, if you don't know what values to use, don't specify them. The default values might be tuned in the future.
Wasmtime assumes all the options are in the cache section.
Example config:
[cache]
directory = "/nfs-share/wasmtime-cache/"
cleanup-interval = "30m"
files-total-size-soft-limit = "1Gi"
Please refer to the cache system section to learn how it works.
If you think some default value should be tuned, some new settings should be introduced or some behavior should be changed, you are welcome to discuss it and contribute to the Wasmtime repository.
Setting directory
- type: string (path)
- default: look up
cache_dirin directories crate
Specifies where the cache directory is. Must be an absolute path.
Setting worker-event-queue-size
- type: string (SI prefix)
- format:
"{integer}(K | M | G | T | P)?" - default:
"16"
Size of cache worker event queue. If the queue is full, incoming cache usage events will be dropped.
Setting baseline-compression-level
- type: integer
- default:
3, the default zstd compression level
Compression level used when a new cache file is being written by the cache system. Wasmtime uses zstd compression.
Setting optimized-compression-level
- type: integer
- default:
20
Compression level used when the cache worker decides to recompress a cache file. Wasmtime uses zstd compression.
Setting optimized-compression-usage-counter-threshold
- type: string (SI prefix)
- format:
"{integer}(K | M | G | T | P)?" - default:
"256"
One of the conditions for the cache worker to recompress a cache file is to have usage count of the file exceeding this threshold.
Setting cleanup-interval
- type: string (duration)
- format:
"{integer}(s | m | h | d)" - default:
"1h"
When the cache worker is notified about a cache file being updated by the cache system and this interval has already passed since last cleaning up, the worker will attempt a new cleanup.
Please also refer to allowed-clock-drift-for-files-from-future.
Setting optimizing-compression-task-timeout
- type: string (duration)
- format:
"{integer}(s | m | h | d)" - default:
"30m"
When the cache worker decides to recompress a cache file, it makes sure that
no other worker has started the task for this file within the last
optimizing-compression-task-timeout interval.
If some worker has started working on it, other workers are skipping this task.
Please also refer to the allowed-clock-drift-for-files-from-future section.
Setting allowed-clock-drift-for-files-from-future
- type: string (duration)
- format:
"{integer}(s | m | h | d)" - default:
"1d"
Locks
When the cache worker attempts acquiring a lock for some task, it checks if some other worker has already acquired such a lock. To be fault tolerant and eventually execute every task, the locks expire after some interval. However, because of clock drifts and different timezones, it would happen that some lock was created in the future. This setting defines a tolerance limit for these locks. If the time has been changed in the system (i.e. two years backwards), the cache system should still work properly. Thus, these locks will be treated as expired (assuming the tolerance is not too big).
Cache files
Similarly to the locks, the cache files or their metadata might have modification time in distant future. The cache system tries to keep these files as long as possible. If the limits are not reached, the cache files will not be deleted. Otherwise, they will be treated as the oldest files, so they might survive. If the user actually uses the cache file, the modification time will be updated.
Setting file-count-soft-limit
- type: string (SI prefix)
- format:
"{integer}(K | M | G | T | P)?" - default:
"65536"
Soft limit for the file count in the cache directory.
This doesn't include files with metadata. To learn more, please refer to the cache system section.
Setting files-total-size-soft-limit
- type: string (disk space)
- format:
"{integer}(K | Ki | M | Mi | G | Gi | T | Ti | P | Pi)?" - default:
"512Mi"
Soft limit for the total size* of files in the cache directory.
This doesn't include files with metadata. To learn more, please refer to the cache system section.
*this is the file size, not the space physically occupied on the disk.
Setting file-count-limit-percent-if-deleting
- type: string (percent)
- format:
"{integer}%" - default:
"70%"
If file-count-soft-limit is exceeded and the cache worker performs the cleanup task,
then the worker will delete some cache files, so after the task,
the file count should not exceed
file-count-soft-limit * file-count-limit-percent-if-deleting.
This doesn't include files with metadata. To learn more, please refer to the cache system section.
Setting files-total-size-limit-percent-if-deleting
- type: string (percent)
- format:
"{integer}%" - default:
"70%"
If files-total-size-soft-limit is exceeded and cache worker performs the cleanup task,
then the worker will delete some cache files, so after the task,
the files total size should not exceed
files-total-size-soft-limit * files-total-size-limit-percent-if-deleting.
This doesn't include files with metadata. To learn more, please refer to the cache system section.
How does the cache work?
This is an implementation detail and might change in the future. Information provided here is meant to help understanding the big picture and configuring the cache.
There are two main components - the cache system and the cache worker.
Cache system
Handles GET and UPDATE cache requests.
- GET request - simply loads the cache from disk if it is there.
- UPDATE request - compresses received data with zstd and
baseline-compression-level, then writes the data to the disk.
In case of successful handling of a request, it notifies the cache worker about this
event using the queue.
The queue has a limited size of worker-event-queue-size. If it is full, it will drop
new events until the cache worker pops some event from the queue.
Cache worker
The cache worker runs in a single thread with lower priority and pops events from the queue in a loop handling them one by one.
On GET request
-
Read the statistics file for the cache file, increase the usage counter and write it back to the disk.
-
Attempt recompressing the cache file if all of the following conditions are met:
- usage counter exceeds
optimized-compression-usage-counter-threshold, - the file is compressed with compression level lower than
optimized-compression-level, - no other worker has started working on this particular task within the last
optimizing-compression-task-timeoutinterval.
When recompressing,
optimized-compression-levelis used as a compression level. - usage counter exceeds
On UPDATE request
- Write a fresh statistics file for the cache file.
- Clean up the cache if no worker has attempted to do this within the last
cleanup-interval. During this task:- all unrecognized files and expired task locks in cache directory will be deleted
- if
file-count-soft-limitorfiles-total-size-soft-limitis exceeded, then recognized files will be deleted according tofile-count-limit-percent-if-deletingandfiles-total-size-limit-percent-if-deleting. Wasmtime uses Least Recently Used (LRU) cache replacement policy and requires that the filesystem maintains proper mtime (modification time) of the files. Files with future mtimes are treated specially - more details inallowed-clock-drift-for-files-from-future.
Metadata files
- every cached WebAssembly module has its own statistics file
- every lock is a file
Using the Wasmtime API
Wasmtime can be used as a library to embed WebAssembly execution support within applications. Wasmtime is written in Rust, but bindings are available through a C API for a number of other languages too. This chapter has a number of examples which come from the Wasmtime repository itself and showcase the Rust, C, and C++ embedding APIs.
Officially supported bindings
The following languages are all developed in the Wasmtime repository itself and have tests/documentation in the main repository itself.
Rust
Wasmtime is itself written in Rust and is available as the wasmtime crate on
crates.io. API reference documentation for Wasmtime can be found on
docs.rs and includes a number of examples throughout
the documentation.
C
Wasmtime provides a C API through libwasmtime.a, for example. The C API is
developed/tested in the Wasmtime repository itself and is the main entrypoint of
all other language support for Wasmtime other than Rust. Note that the C API is
not always in perfect parity with the Rust API and can lag behind in terms of
features. This is not intentional, however, and with sufficient development
resources the two APIs will be kept in-sync.
Documentation for the C API can be found at docs.wasmtime.dev/c-api. Documentation on how to build the C API can be found in the README of the C API. Building the C API uses CMake to orchestrate the build and Cargo under the hood to build the Rust code.
The C API can also be installed through *-c-api-* release artifacts.
C++
Wasmtime supports C++ as a header-based library layered on top of the C API. The
C++ API header use the *.hh extension and are installed alongside the C API
meaning that if you install the C API you've got the C++ API as well. The C++
API is focused on automating resource management of the C API and providing an
easier-to-use API on top.
Bash
Wasmtime is available in Bash through the wasmtime CLI executable
and its various subcommands. Source for the wasmtime executable is developed
in the same repository as Wasmtime itself. Installation of wasmtime can be
found in this documentation.
External bindings to Wasmtime
The following language bindings are all developed outside of the Wasmtime repository. Consequently they are not officially supported and may have varying levels of support and activity. Note that many of these bindings are in the bytecodealliance GitHub organization but are still not tested/developed in-sync with the main repository.
Python
Python bindings for Wasmtime are developed in the wasmtime-py repository. These bindings are built on the C API and developed externally from the main Wasmtime repository so updates can lag behind the main repository sometimes in terms of release schedule and features.
Python bindings are published to the
wasmtime package on PyPI.
Go
Go bindings for Wasmtime are developed in the wasmtime-go repository. These bindings are built on the C API and developed externally from the main Wasmtime repository so updates can lag behind the main repository sometimes in terms of release schedule and features.
Documentation for the Go API bindings can be found on pkg.go.dev, and be sure to use the version-picker to pick the latest major version which tracks Wasmtime's own major versions.
.NET
The Wasmtime NuGet package can be used to programmatically interact with WebAssembly modules and requires .NET Core SDK 3.0 SDK or later installed as well.
The .NET embedding of Wasmtime repository contains the source code for the Wasmtime NuGet package and the repository also has more examples as well.
Ruby
Wasmtime is available on RubyGems and can be used programmatically to interact with Wasm modules. To learn more, check out the more advanced examples and the API documentation. If you have any questions, do not hesitate to open an issue on the GitHub repository.
Elixir
Wasmtime is available on Hex and can be used programmatically to interact with Wasm modules. To learn more, check out an another example and the API documentation. If you have any questions, do not hesitate to open an issue on the GitHub repository.
Hello, world!
You can also browse this source code online and clone the wasmtime repository to run the example locally:
This example shows off how to instantiate a simple wasm module and interact with it.
Wasm Source
(module
  (func $hello (import "" "hello"))
  (func (export "run") (call $hello))
)
Host Source
//! Small example of how to instantiate a wasm module that imports one function,
//! showing how you can fill in host functionality for a wasm module.

// You can execute this example with `cargo run --example hello`

use wasmtime::*;

struct MyState {
    name: String,
    count: usize,
}

fn main() -> Result<()> {
    // First the wasm module needs to be compiled. This is done with a global
    // "compilation environment" within an `Engine`. Note that engines can be
    // further configured through `Config` if desired instead of using the
    // default like this is here.
    println!("Compiling module...");
    let engine = Engine::default();
    let module = Module::from_file(&engine, "examples/hello.wat")?;

    // After a module is compiled we create a `Store` which will contain
    // instantiated modules and other items like host functions. A Store
    // contains an arbitrary piece of host information, and we use `MyState`
    // here.
    println!("Initializing...");
    let mut store = Store::new(
        &engine,
        MyState {
            name: "hello, world!".to_string(),
            count: 0,
        },
    );

    // Our wasm module we'll be instantiating requires one imported function.
    // the function takes no parameters and returns no results. We create a host
    // implementation of that function here, and the `caller` parameter here is
    // used to get access to our original `MyState` value.
    println!("Creating callback...");
    let hello_func = Func::wrap(&mut store, |mut caller: Caller<'_, MyState>| {
        println!("Calling back...");
        println!("> {}", caller.data().name);
        caller.data_mut().count += 1;
    });

    // Once we've got that all set up we can then move to the instantiation
    // phase, pairing together a compiled module as well as a set of imports.
    // Note that this is where the wasm `start` function, if any, would run.
    println!("Instantiating module...");
    let imports = [hello_func.into()];
    let instance = Instance::new(&mut store, &module, &imports)?;

    // Next we poke around a bit to extract the `run` function from the module.
    println!("Extracting export...");
    let run = instance.get_typed_func::<(), ()>(&mut store, "run")?;

    // And last but not least we can call it!
    println!("Calling export...");
    run.call(&mut store, ())?;

    println!("Done.");
    Ok(())
}
/*
Example of instantiating of the WebAssembly module and invoking its exported
function.

You can build using cmake:

mkdir build && cd build && cmake .. && cmake --build . --target wasmtime-hello
*/

#include <assert.h>
#include <stdio.h>
#include <stdlib.h>
#include <wasm.h>
#include <wasmtime.h>

static void exit_with_error(const char *message, wasmtime_error_t *error,
                            wasm_trap_t *trap);

static wasm_trap_t *hello_callback(void *env, wasmtime_caller_t *caller,
                                   const wasmtime_val_t *args, size_t nargs,
                                   wasmtime_val_t *results, size_t nresults) {
  (void)env;
  (void)caller;
  (void)args;
  (void)nargs;
  (void)results;
  (void)nresults;
  printf("Calling back...\n");
  printf("> Hello World!\n");
  return NULL;
}

int main() {
  int ret = 0;
  // Set up our compilation context. Note that we could also work with a
  // `wasm_config_t` here to configure what feature are enabled and various
  // compilation settings.
  printf("Initializing...\n");
  wasm_engine_t *engine = wasm_engine_new();
  assert(engine != NULL);

  // With an engine we can create a *store* which is a long-lived group of wasm
  // modules. Note that we allocate some custom data here to live in the store,
  // but here we skip that and specify NULL.
  wasmtime_store_t *store = wasmtime_store_new(engine, NULL, NULL);
  assert(store != NULL);
  wasmtime_context_t *context = wasmtime_store_context(store);

  // Read our input file, which in this case is a wasm text file.
  FILE *file = fopen("examples/hello.wat", "r");
  assert(file != NULL);
  fseek(file, 0L, SEEK_END);
  size_t file_size = ftell(file);
  fseek(file, 0L, SEEK_SET);
  wasm_byte_vec_t wat;
  wasm_byte_vec_new_uninitialized(&wat, file_size);
  if (fread(wat.data, file_size, 1, file) != 1) {
    printf("> Error loading module!\n");
    return 1;
  }
  fclose(file);

  // Parse the wat into the binary wasm format
  wasm_byte_vec_t wasm;
  wasmtime_error_t *error = wasmtime_wat2wasm(wat.data, wat.size, &wasm);
  if (error != NULL)
    exit_with_error("failed to parse wat", error, NULL);
  wasm_byte_vec_delete(&wat);

  // Now that we've got our binary webassembly we can compile our module.
  printf("Compiling module...\n");
  wasmtime_module_t *module = NULL;
  error = wasmtime_module_new(engine, (uint8_t *)wasm.data, wasm.size, &module);
  wasm_byte_vec_delete(&wasm);
  if (error != NULL)
    exit_with_error("failed to compile module", error, NULL);

  // Next up we need to create the function that the wasm module imports. Here
  // we'll be hooking up a thunk function to the `hello_callback` native
  // function above. Note that we can assign custom data, but we just use NULL
  // for now).
  printf("Creating callback...\n");
  wasm_functype_t *hello_ty = wasm_functype_new_0_0();
  wasmtime_func_t hello;
  wasmtime_func_new(context, hello_ty, hello_callback, NULL, NULL, &hello);
  wasm_functype_delete(hello_ty);

  // With our callback function we can now instantiate the compiled module,
  // giving us an instance we can then execute exports from. Note that
  // instantiation can trap due to execution of the `start` function, so we need
  // to handle that here too.
  printf("Instantiating module...\n");
  wasm_trap_t *trap = NULL;
  wasmtime_instance_t instance;
  wasmtime_extern_t import;
  import.kind = WASMTIME_EXTERN_FUNC;
  import.of.func = hello;
  error = wasmtime_instance_new(context, module, &import, 1, &instance, &trap);
  if (error != NULL || trap != NULL)
    exit_with_error("failed to instantiate", error, trap);

  // Lookup our `run` export function
  printf("Extracting export...\n");
  wasmtime_extern_t run;
  bool ok = wasmtime_instance_export_get(context, &instance, "run", 3, &run);
  assert(ok);
  assert(run.kind == WASMTIME_EXTERN_FUNC);

  // And call it!
  printf("Calling export...\n");
  error = wasmtime_func_call(context, &run.of.func, NULL, 0, NULL, 0, &trap);
  if (error != NULL || trap != NULL)
    exit_with_error("failed to call function", error, trap);

  // Clean up after ourselves at this point
  printf("All finished!\n");
  ret = 0;

  wasmtime_module_delete(module);
  wasmtime_store_delete(store);
  wasm_engine_delete(engine);
  return ret;
}

static void exit_with_error(const char *message, wasmtime_error_t *error,
                            wasm_trap_t *trap) {
  fprintf(stderr, "error: %s\n", message);
  wasm_byte_vec_t error_message;
  if (error != NULL) {
    wasmtime_error_message(error, &error_message);
    wasmtime_error_delete(error);
  } else {
    wasm_trap_message(trap, &error_message);
    wasm_trap_delete(trap);
  }
  fprintf(stderr, "%.*s\n", (int)error_message.size, error_message.data);
  wasm_byte_vec_delete(&error_message);
  exit(1);
}
#include <fstream>
#include <iostream>
#include <sstream>
#include <wasmtime.hh>

using namespace wasmtime;

std::string readFile(const char *name) {
  std::ifstream watFile;
  watFile.open(name);
  std::stringstream strStream;
  strStream << watFile.rdbuf();
  return strStream.str();
}

int main() {
  // First the wasm module needs to be compiled. This is done with a global
  // "compilation environment" within an `Engine`. Note that engines can be
  // further configured through `Config` if desired instead of using the
  // default like this is here.
  std::cout << "Compiling module\n";
  Engine engine;
  auto module =
      Module::compile(engine, readFile("examples/hello.wat")).unwrap();

  // After a module is compiled we create a `Store` which will contain
  // instantiated modules and other items like host functions. A Store
  // contains an arbitrary piece of host information, and we use `MyState`
  // here.
  std::cout << "Initializing...\n";
  Store store(engine);

  // Our wasm module we'll be instantiating requires one imported function.
  // the function takes no parameters and returns no results. We create a host
  // implementation of that function here.
  std::cout << "Creating callback...\n";
  Func host_func =
      Func::wrap(store, []() { std::cout << "Calling back...\n"; });

  // Once we've got that all set up we can then move to the instantiation
  // phase, pairing together a compiled module as well as a set of imports.
  // Note that this is where the wasm `start` function, if any, would run.
  std::cout << "Instantiating module...\n";
  auto instance = Instance::create(store, module, {host_func}).unwrap();

  // Next we poke around a bit to extract the `run` function from the module.
  std::cout << "Extracting export...\n";
  auto run = std::get<Func>(*instance.get(store, "run"));

  // And last but not least we can call it!
  std::cout << "Calling export...\n";
  run.call(store, {}).unwrap();

  std::cout << "Done\n";
}
Calculating the GCD
You can also browse this source code online and clone the wasmtime repository to run the example locally:
This example shows off how run a wasm program which calculates the GCD of two numbers.
Wasm Source
(module
  (func $gcd (param i32 i32) (result i32)
    (local i32)
    block  ;; label = @1
      block  ;; label = @2
        local.get 0
        br_if 0 (;@2;)
        local.get 1
        local.set 2
        br 1 (;@1;)
      end
      loop  ;; label = @2
        local.get 1
        local.get 0
        local.tee 2
        i32.rem_u
        local.set 0
        local.get 2
        local.set 1
        local.get 0
        br_if 0 (;@2;)
      end
    end
    local.get 2
  )
  (export "gcd" (func $gcd))
)
Host Source
//! Example of instantiating of the WebAssembly module and invoking its exported
//! function.

// You can execute this example with `cargo run --example gcd`

use wasmtime::*;

fn main() -> Result<()> {
    // Load our WebAssembly (parsed WAT in our case), and then load it into a
    // `Module` which is attached to a `Store` cache. After we've got that we
    // can instantiate it.
    let mut store = Store::<()>::default();
    let module = Module::from_file(store.engine(), "examples/gcd.wat")?;
    let instance = Instance::new(&mut store, &module, &[])?;

    // Invoke `gcd` export
    let gcd = instance.get_typed_func::<(i32, i32), i32>(&mut store, "gcd")?;

    println!("gcd(6, 27) = {}", gcd.call(&mut store, (6, 27))?);
    Ok(())
}
/*
Example of instantiating of the WebAssembly module and invoking its exported
function.

You can build using cmake:

mkdir build && cd build && cmake .. && cmake --build . --target wasmtime-gcd
*/

#include <assert.h>
#include <stdio.h>
#include <stdlib.h>
#include <wasm.h>
#include <wasmtime.h>

static void exit_with_error(const char *message, wasmtime_error_t *error,
                            wasm_trap_t *trap);

int main() {
  int ret = 0;
  // Set up our context
  wasm_engine_t *engine = wasm_engine_new();
  assert(engine != NULL);
  wasmtime_store_t *store = wasmtime_store_new(engine, NULL, NULL);
  assert(store != NULL);
  wasmtime_context_t *context = wasmtime_store_context(store);

  // Load our input file to parse it next
  FILE *file = fopen("examples/gcd.wat", "r");
  if (!file) {
    printf("> Error loading file!\n");
    return 1;
  }
  fseek(file, 0L, SEEK_END);
  size_t file_size = ftell(file);
  fseek(file, 0L, SEEK_SET);
  wasm_byte_vec_t wat;
  wasm_byte_vec_new_uninitialized(&wat, file_size);
  if (fread(wat.data, file_size, 1, file) != 1) {
    printf("> Error loading module!\n");
    return 1;
  }
  fclose(file);

  // Parse the wat into the binary wasm format
  wasm_byte_vec_t wasm;
  wasmtime_error_t *error = wasmtime_wat2wasm(wat.data, wat.size, &wasm);
  if (error != NULL)
    exit_with_error("failed to parse wat", error, NULL);
  wasm_byte_vec_delete(&wat);

  // Compile and instantiate our module
  wasmtime_module_t *module = NULL;
  error = wasmtime_module_new(engine, (uint8_t *)wasm.data, wasm.size, &module);
  if (module == NULL)
    exit_with_error("failed to compile module", error, NULL);
  wasm_byte_vec_delete(&wasm);

  wasm_trap_t *trap = NULL;
  wasmtime_instance_t instance;
  error = wasmtime_instance_new(context, module, NULL, 0, &instance, &trap);
  if (error != NULL || trap != NULL)
    exit_with_error("failed to instantiate", error, trap);

  // Lookup our `gcd` export function
  wasmtime_extern_t gcd;
  bool ok = wasmtime_instance_export_get(context, &instance, "gcd", 3, &gcd);
  assert(ok);
  assert(gcd.kind == WASMTIME_EXTERN_FUNC);

  // And call it!
  int a = 6;
  int b = 27;
  wasmtime_val_t params[2];
  params[0].kind = WASMTIME_I32;
  params[0].of.i32 = a;
  params[1].kind = WASMTIME_I32;
  params[1].of.i32 = b;
  wasmtime_val_t results[1];
  error =
      wasmtime_func_call(context, &gcd.of.func, params, 2, results, 1, &trap);
  if (error != NULL || trap != NULL)
    exit_with_error("failed to call gcd", error, trap);
  assert(results[0].kind == WASMTIME_I32);

  printf("gcd(%d, %d) = %d\n", a, b, results[0].of.i32);

  // Clean up after ourselves at this point
  ret = 0;

  wasmtime_module_delete(module);
  wasmtime_store_delete(store);
  wasm_engine_delete(engine);
  return ret;
}

static void exit_with_error(const char *message, wasmtime_error_t *error,
                            wasm_trap_t *trap) {
  fprintf(stderr, "error: %s\n", message);
  wasm_byte_vec_t error_message;
  if (error != NULL) {
    wasmtime_error_message(error, &error_message);
  } else {
    wasm_trap_message(trap, &error_message);
  }
  fprintf(stderr, "%.*s\n", (int)error_message.size, error_message.data);
  wasm_byte_vec_delete(&error_message);
  exit(1);
}
#include <fstream>
#include <iostream>
#include <sstream>
#include <wasmtime.hh>

using namespace wasmtime;

std::string readFile(const char *name) {
  std::ifstream watFile;
  watFile.open(name);
  std::stringstream strStream;
  strStream << watFile.rdbuf();
  return strStream.str();
}

int main() {
  // Load our WebAssembly (parsed WAT in our case), and then load it into a
  // `Module` which is attached to a `Store`. After we've got that we
  // can instantiate it.
  Engine engine;
  Store store(engine);
  auto module = Module::compile(engine, readFile("examples/gcd.wat")).unwrap();
  auto instance = Instance::create(store, module, {}).unwrap();

  // Invoke `gcd` export
  auto gcd = std::get<Func>(*instance.get(store, "gcd"));
  auto results = gcd.call(store, {6, 27}).unwrap();

  std::cout << "gcd(6, 27) = " << results[0].i32() << "\n";
}
Using linear memory
You can also browse this source code online and clone the wasmtime repository to run the example locally:
This example shows off how to interact with wasm memory in a module. Be sure to
read the documentation for Memory as well.
Wasm Source
(module
  (memory (export "memory") 2 3)

  (func (export "size") (result i32) (memory.size))
  (func (export "load") (param i32) (result i32)
    (i32.load8_s (local.get 0))
  )
  (func (export "store") (param i32 i32)
    (i32.store8 (local.get 0) (local.get 1))
  )

  (data (i32.const 0x1000) "\01\02\03\04")
)
Host Source
//! An example of how to interact with wasm memory.
//!
//! Here a small wasm module is used to show how memory is initialized, how to
//! read and write memory through the `Memory` object, and how wasm functions
//! can trap when dealing with out-of-bounds addresses.

// You can execute this example with `cargo run --example memory`

use wasmtime::*;

fn main() -> Result<()> {
    // Create our `store_fn` context and then compile a module and create an
    // instance from the compiled module all in one go.
    let mut store: Store<()> = Store::default();
    let module = Module::from_file(store.engine(), "examples/memory.wat")?;
    let instance = Instance::new(&mut store, &module, &[])?;

    // load_fn up our exports from the instance
    let memory = instance
        .get_memory(&mut store, "memory")
        .ok_or(wasmtime::format_err!("failed to find `memory` export"))?;
    let size = instance.get_typed_func::<(), i32>(&mut store, "size")?;
    let load_fn = instance.get_typed_func::<i32, i32>(&mut store, "load")?;
    let store_fn = instance.get_typed_func::<(i32, i32), ()>(&mut store, "store")?;

    println!("Checking memory...");
    assert_eq!(memory.size(&store), 2);
    assert_eq!(memory.data_size(&store), 0x20000);
    assert_eq!(memory.data_mut(&mut store)[0], 0);
    assert_eq!(memory.data_mut(&mut store)[0x1000], 1);
    assert_eq!(memory.data_mut(&mut store)[0x1003], 4);

    assert_eq!(size.call(&mut store, ())?, 2);
    assert_eq!(load_fn.call(&mut store, 0)?, 0);
    assert_eq!(load_fn.call(&mut store, 0x1000)?, 1);
    assert_eq!(load_fn.call(&mut store, 0x1003)?, 4);
    assert_eq!(load_fn.call(&mut store, 0x1ffff)?, 0);
    assert!(load_fn.call(&mut store, 0x20000).is_err()); // out of bounds trap

    println!("Mutating memory...");
    memory.data_mut(&mut store)[0x1003] = 5;

    store_fn.call(&mut store, (0x1002, 6))?;
    assert!(store_fn.call(&mut store, (0x20000, 0)).is_err()); // out of bounds trap

    assert_eq!(memory.data(&store)[0x1002], 6);
    assert_eq!(memory.data(&store)[0x1003], 5);
    assert_eq!(load_fn.call(&mut store, 0x1002)?, 6);
    assert_eq!(load_fn.call(&mut store, 0x1003)?, 5);

    // Grow memory.
    println!("Growing memory...");
    memory.grow(&mut store, 1)?;
    assert_eq!(memory.size(&store), 3);
    assert_eq!(memory.data_size(&store), 0x30000);

    assert_eq!(load_fn.call(&mut store, 0x20000)?, 0);
    store_fn.call(&mut store, (0x20000, 0))?;
    assert!(load_fn.call(&mut store, 0x30000).is_err());
    assert!(store_fn.call(&mut store, (0x30000, 0)).is_err());

    assert!(memory.grow(&mut store, 1).is_err());
    assert!(memory.grow(&mut store, 0).is_ok());

    println!("Creating stand-alone memory...");
    let memorytype = MemoryType::new(5, Some(5));
    let memory2 = Memory::new(&mut store, memorytype)?;
    assert_eq!(memory2.size(&store), 5);
    assert!(memory2.grow(&mut store, 1).is_err());
    assert!(memory2.grow(&mut store, 0).is_ok());

    Ok(())
}
/*
Example of instantiating of the WebAssembly module and invoking its exported
function.

You can build using cmake:

mkdir build && cd build && cmake .. && cmake --build . --target wasmtime-memory

Also note that this example was taken from
https://github.com/WebAssembly/wasm-c-api/blob/master/example/memory.c
originally
*/

#include <inttypes.h>
#include <stdio.h>
#include <stdlib.h>
#include <string.h>
#include <wasm.h>
#include <wasmtime.h>

static void exit_with_error(const char *message, wasmtime_error_t *error,
                            wasm_trap_t *trap);

void check(bool success) {
  if (!success) {
    printf("> Error, expected success\n");
    exit(1);
  }
}

void check_call(wasmtime_context_t *store, wasmtime_func_t *func,
                const wasmtime_val_t *args, size_t nargs, int32_t expected) {
  wasmtime_val_t results[1];
  wasm_trap_t *trap = NULL;
  wasmtime_error_t *error =
      wasmtime_func_call(store, func, args, nargs, results, 1, &trap);
  if (error != NULL || trap != NULL)
    exit_with_error("failed to call function", error, trap);
  if (results[0].of.i32 != expected) {
    printf("> Error on result\n");
    exit(1);
  }
}

void check_call0(wasmtime_context_t *store, wasmtime_func_t *func,
                 int32_t expected) {
  check_call(store, func, NULL, 0, expected);
}

void check_call1(wasmtime_context_t *store, wasmtime_func_t *func, int32_t arg,
                 int32_t expected) {
  wasmtime_val_t args[1];
  args[0].kind = WASMTIME_I32;
  args[0].of.i32 = arg;
  check_call(store, func, args, 1, expected);
}

void check_call2(wasmtime_context_t *store, wasmtime_func_t *func, int32_t arg1,
                 int32_t arg2, int32_t expected) {
  wasmtime_val_t args[2];
  args[0].kind = WASMTIME_I32;
  args[0].of.i32 = arg1;
  args[1].kind = WASMTIME_I32;
  args[1].of.i32 = arg2;
  check_call(store, func, args, 2, expected);
}

void check_ok(wasmtime_context_t *store, wasmtime_func_t *func,
              const wasmtime_val_t *args, size_t nargs) {
  wasm_trap_t *trap = NULL;
  wasmtime_error_t *error =
      wasmtime_func_call(store, func, args, nargs, NULL, 0, &trap);
  if (error != NULL || trap != NULL)
    exit_with_error("failed to call function", error, trap);
}

void check_ok2(wasmtime_context_t *store, wasmtime_func_t *func, int32_t arg1,
               int32_t arg2) {
  wasmtime_val_t args[2];
  args[0].kind = WASMTIME_I32;
  args[0].of.i32 = arg1;
  args[1].kind = WASMTIME_I32;
  args[1].of.i32 = arg2;
  check_ok(store, func, args, 2);
}

void check_trap(wasmtime_context_t *store, wasmtime_func_t *func,
                const wasmtime_val_t *args, size_t nargs, size_t num_results) {
  assert(num_results <= 1);
  wasmtime_val_t results[1];
  wasm_trap_t *trap = NULL;
  wasmtime_error_t *error =
      wasmtime_func_call(store, func, args, nargs, results, num_results, &trap);
  if (error != NULL)
    exit_with_error("failed to call function", error, NULL);
  if (trap == NULL) {
    printf("> Error on result, expected trap\n");
    exit(1);
  }
  wasm_trap_delete(trap);
}

void check_trap1(wasmtime_context_t *store, wasmtime_func_t *func,
                 int32_t arg) {
  wasmtime_val_t args[1];
  args[0].kind = WASMTIME_I32;
  args[0].of.i32 = arg;
  check_trap(store, func, args, 1, 1);
}

void check_trap2(wasmtime_context_t *store, wasmtime_func_t *func, int32_t arg1,
                 int32_t arg2) {
  wasmtime_val_t args[2];
  args[0].kind = WASMTIME_I32;
  args[0].of.i32 = arg1;
  args[1].kind = WASMTIME_I32;
  args[1].of.i32 = arg2;
  check_trap(store, func, args, 2, 0);
}

int main() {
  // Initialize.
  printf("Initializing...\n");
  wasm_engine_t *engine = wasm_engine_new();
  wasmtime_store_t *store = wasmtime_store_new(engine, NULL, NULL);
  wasmtime_context_t *context = wasmtime_store_context(store);

  // Load our input file to parse it next
  FILE *file = fopen("examples/memory.wat", "r");
  if (!file) {
    printf("> Error loading file!\n");
    return 1;
  }
  fseek(file, 0L, SEEK_END);
  size_t file_size = ftell(file);
  fseek(file, 0L, SEEK_SET);
  wasm_byte_vec_t wat;
  wasm_byte_vec_new_uninitialized(&wat, file_size);
  if (fread(wat.data, file_size, 1, file) != 1) {
    printf("> Error loading module!\n");
    return 1;
  }
  fclose(file);

  // Parse the wat into the binary wasm format
  wasm_byte_vec_t binary;
  wasmtime_error_t *error = wasmtime_wat2wasm(wat.data, wat.size, &binary);
  if (error != NULL)
    exit_with_error("failed to parse wat", error, NULL);
  wasm_byte_vec_delete(&wat);

  // Compile.
  printf("Compiling module...\n");
  wasmtime_module_t *module = NULL;
  error =
      wasmtime_module_new(engine, (uint8_t *)binary.data, binary.size, &module);
  if (error)
    exit_with_error("failed to compile module", error, NULL);
  wasm_byte_vec_delete(&binary);

  // Instantiate.
  printf("Instantiating module...\n");
  wasmtime_instance_t instance;
  wasm_trap_t *trap = NULL;
  error = wasmtime_instance_new(context, module, NULL, 0, &instance, &trap);
  if (error != NULL || trap != NULL)
    exit_with_error("failed to instantiate", error, trap);
  wasmtime_module_delete(module);

  // Extract export.
  printf("Extracting exports...\n");
  wasmtime_memory_t memory;
  wasmtime_func_t size_func, load_func, store_func;
  wasmtime_extern_t item;
  bool ok;
  ok = wasmtime_instance_export_get(context, &instance, "memory",
                                    strlen("memory"), &item);
  assert(ok && item.kind == WASMTIME_EXTERN_MEMORY);
  memory = item.of.memory;
  ok = wasmtime_instance_export_get(context, &instance, "size", strlen("size"),
                                    &item);
  assert(ok && item.kind == WASMTIME_EXTERN_FUNC);
  size_func = item.of.func;
  ok = wasmtime_instance_export_get(context, &instance, "load", strlen("load"),
                                    &item);
  assert(ok && item.kind == WASMTIME_EXTERN_FUNC);
  load_func = item.of.func;
  ok = wasmtime_instance_export_get(context, &instance, "store",
                                    strlen("store"), &item);
  assert(ok && item.kind == WASMTIME_EXTERN_FUNC);
  store_func = item.of.func;

  // Check initial memory.
  printf("Checking memory...\n");
  check(wasmtime_memory_size(context, &memory) == 2);
  check(wasmtime_memory_data_size(context, &memory) == 0x20000);
  check(wasmtime_memory_data(context, &memory)[0] == 0);
  check(wasmtime_memory_data(context, &memory)[0x1000] == 1);
  check(wasmtime_memory_data(context, &memory)[0x1003] == 4);

  check_call0(context, &size_func, 2);
  check_call1(context, &load_func, 0, 0);
  check_call1(context, &load_func, 0x1000, 1);
  check_call1(context, &load_func, 0x1003, 4);
  check_call1(context, &load_func, 0x1ffff, 0);
  check_trap1(context, &load_func, 0x20000);

  // Mutate memory.
  printf("Mutating memory...\n");
  wasmtime_memory_data(context, &memory)[0x1003] = 5;
  check_ok2(context, &store_func, 0x1002, 6);
  check_trap2(context, &store_func, 0x20000, 0);

  check(wasmtime_memory_data(context, &memory)[0x1002] == 6);
  check(wasmtime_memory_data(context, &memory)[0x1003] == 5);
  check_call1(context, &load_func, 0x1002, 6);
  check_call1(context, &load_func, 0x1003, 5);

  // Grow memory.
  printf("Growing memory...\n");
  uint64_t old_size;
  error = wasmtime_memory_grow(context, &memory, 1, &old_size);
  if (error != NULL)
    exit_with_error("failed to grow memory", error, trap);
  check(wasmtime_memory_size(context, &memory) == 3);
  check(wasmtime_memory_data_size(context, &memory) == 0x30000);

  check_call1(context, &load_func, 0x20000, 0);
  check_ok2(context, &store_func, 0x20000, 0);
  check_trap1(context, &load_func, 0x30000);
  check_trap2(context, &store_func, 0x30000, 0);

  error = wasmtime_memory_grow(context, &memory, 1, &old_size);
  assert(error != NULL);
  wasmtime_error_delete(error);
  error = wasmtime_memory_grow(context, &memory, 0, &old_size);
  if (error != NULL)
    exit_with_error("failed to grow memory", error, trap);

  // Create stand-alone memory.
  printf("Creating stand-alone memory...\n");
  wasm_limits_t limits = {5, 5};
  wasm_memorytype_t *memorytype = wasm_memorytype_new(&limits);
  wasmtime_memory_t memory2;
  error = wasmtime_memory_new(context, memorytype, &memory2);
  if (error != NULL)
    exit_with_error("failed to create memory", error, trap);
  wasm_memorytype_delete(memorytype);
  check(wasmtime_memory_size(context, &memory2) == 5);

  // Shut down.
  printf("Shutting down...\n");
  wasmtime_store_delete(store);
  wasm_engine_delete(engine);

  // All done.
  printf("Done.\n");
  return 0;
}

static void exit_with_error(const char *message, wasmtime_error_t *error,
                            wasm_trap_t *trap) {
  fprintf(stderr, "error: %s\n", message);
  wasm_byte_vec_t error_message;
  if (error != NULL) {
    wasmtime_error_message(error, &error_message);
    wasmtime_error_delete(error);
  } else {
    wasm_trap_message(trap, &error_message);
    wasm_trap_delete(trap);
  }
  fprintf(stderr, "%.*s\n", (int)error_message.size, error_message.data);
  wasm_byte_vec_delete(&error_message);
  exit(1);
}
#undef NDEBUG

#include <fstream>
#include <iostream>
#include <sstream>
#include <wasmtime.hh>

using namespace wasmtime;

std::string readFile(const char *name) {
  std::ifstream watFile;
  watFile.open(name);
  std::stringstream strStream;
  strStream << watFile.rdbuf();
  return strStream.str();
}

int main() {
  // Create our `store` context and then compile a module and create an
  // instance from the compiled module all in one go.
  Engine engine;
  Module module =
      Module::compile(engine, readFile("examples/memory.wat")).unwrap();
  Store store(engine);
  Instance instance = Instance::create(store, module, {}).unwrap();

  // load_fn up our exports from the instance
  auto memory = std::get<Memory>(*instance.get(store, "memory"));
  auto size = std::get<Func>(*instance.get(store, "size"));
  auto load_fn = std::get<Func>(*instance.get(store, "load"));
  auto store_fn = std::get<Func>(*instance.get(store, "store"));

  std::cout << "Checking memory...\n";
  assert(memory.size(store) == 2);
  auto data = memory.data(store);
  assert(data.size() == 0x20000);
  assert(data[0] == 0);
  assert(data[0x1000] == 1);
  assert(data[0x1003] == 4);

  assert(size.call(store, {}).unwrap()[0].i32() == 2);
  assert(load_fn.call(store, {0}).unwrap()[0].i32() == 0);
  assert(load_fn.call(store, {0x1000}).unwrap()[0].i32() == 1);
  assert(load_fn.call(store, {0x1003}).unwrap()[0].i32() == 4);
  assert(load_fn.call(store, {0x1ffff}).unwrap()[0].i32() == 0);
  load_fn.call(store, {0x20000}).err(); // out of bounds trap

  std::cout << "Mutating memory...\n";
  memory.data(store)[0x1003] = 5;

  store_fn.call(store, {0x1002, 6}).unwrap();
  store_fn.call(store, {0x20000, 0}).err(); // out of bounds trap

  assert(memory.data(store)[0x1002] == 6);
  assert(memory.data(store)[0x1003] == 5);
  assert(load_fn.call(store, {0x1002}).unwrap()[0].i32() == 6);
  assert(load_fn.call(store, {0x1003}).unwrap()[0].i32() == 5);

  // Grow memory.
  std::cout << "Growing memory...\n";
  memory.grow(store, 1).unwrap();
  assert(memory.size(store) == 3);
  assert(memory.data(store).size() == 0x30000);

  assert(load_fn.call(store, {0x20000}).unwrap()[0].i32() == 0);
  store_fn.call(store, {0x20000, 0}).unwrap();
  load_fn.call(store, {0x30000}).err();
  store_fn.call(store, {0x30000, 0}).err();

  memory.grow(store, 1).err();
  memory.grow(store, 0).ok();

  std::cout << "Creating stand-alone memory...\n";
  MemoryType ty(5, 5);
  Memory memory2 = Memory::create(store, ty).unwrap();
  assert(memory2.size(store) == 5);
  memory2.grow(store, 1).err();
  memory2.grow(store, 0).ok();
}
Linking modules
You can also browse this source code online and clone the wasmtime repository to run the example locally:
This example shows off how to compile and instantiate modules which link
together. Be sure to read the API documentation for Linker as well.
Wasm: linking1.wat
(module
  (import "linking2" "double" (func $double (param i32) (result i32)))
  (import "linking2" "log" (func $log (param i32 i32)))
  (import "linking2" "memory" (memory 1))
  (import "linking2" "memory_offset" (global $offset i32))

  (func (export "run")
    ;; Call into the other module to double our number, and we could print it
    ;; here but for now we just drop it
    i32.const 2
    call $double
    drop

    ;; Our `data` segment initialized our imported memory, so let's print the
    ;; string there now.
    global.get $offset
    i32.const 14
    call $log
  )

  (data (global.get $offset) "Hello, world!\n")
)
Wasm: linking2.wat
(module
  (type $fd_write_ty (func (param i32 i32 i32 i32) (result i32)))
  (import "wasi_snapshot_preview1" "fd_write" (func $fd_write (type $fd_write_ty)))

  (func (export "double") (param i32) (result i32)
    local.get 0
    i32.const 2
    i32.mul
  )

  (func (export "log") (param i32 i32)
    ;; store the pointer in the first iovec field
    i32.const 4
    local.get 0
    i32.store

    ;; store the length in the first iovec field
    i32.const 4
    local.get 1
    i32.store offset=4

    ;; call the `fd_write` import
    i32.const 1     ;; stdout fd
    i32.const 4     ;; iovs start
    i32.const 1     ;; number of iovs
    i32.const 0     ;; where to write nwritten bytes
    call $fd_write
    drop
  )

  (memory (export "memory") 2)
  (global (export "memory_offset") i32 (i32.const 65536))
)
Host Source
//! Example of instantiating two modules which link to each other.

// You can execute this example with `cargo run --example linking`

use wasmtime::*;
use wasmtime_wasi::WasiCtx;

fn main() -> Result<()> {
    let engine = Engine::default();

    // First set up our linker which is going to be linking modules together. We
    // want our linker to have wasi available, so we set that up here as well.
    let mut linker = Linker::new(&engine);
    wasmtime_wasi::p1::add_to_linker_sync(&mut linker, |s| s)?;

    // Load and compile our two modules
    let linking1 = Module::from_file(&engine, "examples/linking1.wat")?;
    let linking2 = Module::from_file(&engine, "examples/linking2.wat")?;

    // Configure WASI and insert it into a `Store`
    let wasi = WasiCtx::builder().inherit_stdio().inherit_args().build_p1();
    let mut store = Store::new(&engine, wasi);

    // Instantiate our first module which only uses WASI, then register that
    // instance with the linker since the next linking will use it.
    let linking2 = linker.instantiate(&mut store, &linking2)?;
    linker.instance(&mut store, "linking2", linking2)?;

    // And with that we can perform the final link and the execute the module.
    let linking1 = linker.instantiate(&mut store, &linking1)?;
    let run = linking1.get_typed_func::<(), ()>(&mut store, "run")?;
    run.call(&mut store, ())?;
    Ok(())
}
/*
Example of compiling, instantiating, and linking two WebAssembly modules
together.

You can build using cmake:

mkdir build && cd build && cmake .. && cmake --build . --target wasmtime-linking
*/

#include <assert.h>
#include <stdio.h>
#include <stdlib.h>
#include <wasi.h>
#include <wasm.h>
#include <wasmtime.h>

#define MIN(a, b) ((a) < (b) ? (a) : (b))

static void exit_with_error(const char *message, wasmtime_error_t *error,
                            wasm_trap_t *trap);
static void read_wat_file(wasm_byte_vec_t *bytes, const char *file);

int main() {
  // Set up our context
  wasm_engine_t *engine = wasm_engine_new();
  assert(engine != NULL);
  wasmtime_store_t *store = wasmtime_store_new(engine, NULL, NULL);
  assert(store != NULL);
  wasmtime_context_t *context = wasmtime_store_context(store);

  wasm_byte_vec_t linking1_wasm, linking2_wasm;
  read_wat_file(&linking1_wasm, "examples/linking1.wat");
  read_wat_file(&linking2_wasm, "examples/linking2.wat");

  // Compile our two modules
  wasmtime_error_t *error;
  wasmtime_module_t *linking1_module = NULL;
  wasmtime_module_t *linking2_module = NULL;
  error = wasmtime_module_new(engine, (uint8_t *)linking1_wasm.data,
                              linking1_wasm.size, &linking1_module);
  if (error != NULL)
    exit_with_error("failed to compile linking1", error, NULL);
  error = wasmtime_module_new(engine, (uint8_t *)linking2_wasm.data,
                              linking2_wasm.size, &linking2_module);
  if (error != NULL)
    exit_with_error("failed to compile linking2", error, NULL);
  wasm_byte_vec_delete(&linking1_wasm);
  wasm_byte_vec_delete(&linking2_wasm);

  // Configure WASI and store it within our `wasmtime_store_t`
  wasi_config_t *wasi_config = wasi_config_new();
  assert(wasi_config);
  wasi_config_inherit_argv(wasi_config);
  wasi_config_inherit_env(wasi_config);
  wasi_config_inherit_stdin(wasi_config);
  wasi_config_inherit_stdout(wasi_config);
  wasi_config_inherit_stderr(wasi_config);
  wasm_trap_t *trap = NULL;
  error = wasmtime_context_set_wasi(context, wasi_config);
  if (error != NULL)
    exit_with_error("failed to instantiate wasi", NULL, trap);

  // Create our linker which will be linking our modules together, and then add
  // our WASI instance to it.
  wasmtime_linker_t *linker = wasmtime_linker_new(engine);
  error = wasmtime_linker_define_wasi(linker);
  if (error != NULL)
    exit_with_error("failed to link wasi", error, NULL);

  // Instantiate `linking2` with our linker.
  wasmtime_instance_t linking2;
  error = wasmtime_linker_instantiate(linker, context, linking2_module,
                                      &linking2, &trap);
  if (error != NULL || trap != NULL)
    exit_with_error("failed to instantiate linking2", error, trap);

  // Register our new `linking2` instance with the linker
  error = wasmtime_linker_define_instance(linker, context, "linking2",
                                          strlen("linking2"), &linking2);
  if (error != NULL)
    exit_with_error("failed to link linking2", error, NULL);

  // Instantiate `linking1` with the linker now that `linking2` is defined
  wasmtime_instance_t linking1;
  error = wasmtime_linker_instantiate(linker, context, linking1_module,
                                      &linking1, &trap);
  if (error != NULL || trap != NULL)
    exit_with_error("failed to instantiate linking1", error, trap);

  // Lookup our `run` export function
  wasmtime_extern_t run;
  bool ok = wasmtime_instance_export_get(context, &linking1, "run", 3, &run);
  assert(ok);
  assert(run.kind == WASMTIME_EXTERN_FUNC);
  error = wasmtime_func_call(context, &run.of.func, NULL, 0, NULL, 0, &trap);
  if (error != NULL || trap != NULL)
    exit_with_error("failed to call run", error, trap);

  // Clean up after ourselves at this point
  wasmtime_linker_delete(linker);
  wasmtime_module_delete(linking1_module);
  wasmtime_module_delete(linking2_module);
  wasmtime_store_delete(store);
  wasm_engine_delete(engine);
  return 0;
}

static void read_wat_file(wasm_byte_vec_t *bytes, const char *filename) {
  wasm_byte_vec_t wat;
  // Load our input file to parse it next
  FILE *file = fopen(filename, "r");
  if (!file) {
    printf("> Error loading file!\n");
    exit(1);
  }
  fseek(file, 0L, SEEK_END);
  size_t file_size = ftell(file);
  wasm_byte_vec_new_uninitialized(&wat, file_size);
  fseek(file, 0L, SEEK_SET);
  if (fread(wat.data, file_size, 1, file) != 1) {
    printf("> Error loading module!\n");
    exit(1);
  }
  fclose(file);

  // Parse the wat into the binary wasm format
  wasmtime_error_t *error = wasmtime_wat2wasm(wat.data, wat.size, bytes);
  if (error != NULL)
    exit_with_error("failed to parse wat", error, NULL);
  wasm_byte_vec_delete(&wat);
}

static void exit_with_error(const char *message, wasmtime_error_t *error,
                            wasm_trap_t *trap) {
  fprintf(stderr, "error: %s\n", message);
  wasm_byte_vec_t error_message;
  if (error != NULL) {
    wasmtime_error_message(error, &error_message);
    wasmtime_error_delete(error);
  } else {
    wasm_trap_message(trap, &error_message);
    wasm_trap_delete(trap);
  }
  fprintf(stderr, "%.*s\n", (int)error_message.size, error_message.data);
  wasm_byte_vec_delete(&error_message);
  exit(1);
}
#include <fstream>
#include <iostream>
#include <sstream>
#include <wasmtime.hh>

using namespace wasmtime;

template <typename T, typename E> T unwrap(Result<T, E> result) {
  if (result) {
    return result.ok();
  }
  std::cerr << "error: " << result.err().message() << "\n";
  std::abort();
}

std::string readFile(const char *name) {
  std::ifstream watFile;
  watFile.open(name);
  std::stringstream strStream;
  strStream << watFile.rdbuf();
  return strStream.str();
}

int main() {
  Engine engine;
  Store store(engine);

  // Read our input `*.wat` files into `std::string`s
  std::string linking1_wat = readFile("examples/linking1.wat");
  std::string linking2_wat = readFile("examples/linking2.wat");

  // Compile our two modules
  Module linking1_module = Module::compile(engine, linking1_wat).unwrap();
  Module linking2_module = Module::compile(engine, linking2_wat).unwrap();

  // Configure WASI and store it within our `wasmtime_store_t`
  WasiConfig wasi;
  wasi.inherit_argv();
  wasi.inherit_env();
  wasi.inherit_stdin();
  wasi.inherit_stdout();
  wasi.inherit_stderr();
  store.context().set_wasi(std::move(wasi)).unwrap();

  // Create our linker which will be linking our modules together, and then add
  // our WASI instance to it.
  Linker linker(engine);
  linker.define_wasi().unwrap();

  // Instantiate our first module which only uses WASI, then register that
  // instance with the linker since the next linking will use it.
  Instance linking2 = linker.instantiate(store, linking2_module).unwrap();
  linker.define_instance(store, "linking2", linking2).unwrap();

  // And with that we can perform the final link and the execute the module.
  Instance linking1 = linker.instantiate(store, linking1_module).unwrap();
  Func f = std::get<Func>(*linking1.get(store, "run"));
  f.call(store, {}).unwrap();
}
Working with anyref
You can also browse this source code online and clone the wasmtime repository to run the example locally:
This example demonstrates using anyref values.
Wasm Source
(module
  (table $table (export "table") 10 anyref)

  (global $global (export "global") (mut anyref) (ref.null any))

  (func (export "take_anyref") (param anyref)
    nop
  )

  (func (export "return_anyref") (result anyref)
    i32.const 42
    ref.i31
  )
)
Host Source
//! Small example of how to use `anyref`s.

// You can execute this example with `cargo run --example anyref`

use wasmtime::*;

fn main() -> Result<()> {
    println!("Initializing...");
    let mut config = Config::new();
    config.wasm_reference_types(true);
    config.wasm_function_references(true);
    config.wasm_gc(true);
    let engine = Engine::new(&config)?;
    let mut store = Store::new(&engine, ());

    println!("Compiling module...");
    let module = Module::from_file(&engine, "examples/anyref.wat")?;

    println!("Instantiating module...");
    let instance = Instance::new(&mut store, &module, &[])?;

    println!("Creating new `anyref` from i31...");
    let i31 = I31::wrapping_u32(1234);
    let anyref = AnyRef::from_i31(&mut store, i31);
    assert!(anyref.is_i31(&store)?);
    assert_eq!(anyref.as_i31(&store)?, Some(i31));

    println!("Touching `anyref` table...");
    let table = instance.get_table(&mut store, "table").unwrap();
    table.set(&mut store, 3, anyref.into())?;
    let elem = table
        .get(&mut store, 3)
        .unwrap() // assert in bounds
        .unwrap_any() // assert it's an anyref table
        .copied()
        .unwrap(); // assert the anyref isn't null
    assert!(Rooted::ref_eq(&store, &elem, &anyref)?);

    println!("Touching `anyref` global...");
    let global = instance.get_global(&mut store, "global").unwrap();
    global.set(&mut store, Some(anyref).into())?;
    let global_val = global.get(&mut store).unwrap_anyref().copied().unwrap();
    assert!(Rooted::ref_eq(&store, &global_val, &anyref)?);

    println!("Passing `anyref` into func...");
    let func = instance.get_typed_func::<Option<Rooted<AnyRef>>, ()>(&mut store, "take_anyref")?;
    func.call(&mut store, Some(anyref))?;

    println!("Getting `anyref` from func...");
    let func =
        instance.get_typed_func::<(), Option<Rooted<AnyRef>>>(&mut store, "return_anyref")?;
    let ret = func.call(&mut store, ())?;
    assert!(ret.is_some());
    assert_eq!(ret.unwrap().unwrap_i31(&store)?, I31::wrapping_u32(42));

    println!("GCing within the store...");
    store.gc(None)?;

    println!("Done.");
    Ok(())
}
/*
Example of using `anyref` values.

You can build using cmake:

mkdir build && cd build && cmake .. && \
  cmake --build . --target wasmtime-anyref
*/

#include <assert.h>
#include <stdio.h>
#include <stdlib.h>
#include <string.h>
#include <wasm.h>
#include <wasmtime.h>

static void exit_with_error(const char *message, wasmtime_error_t *error,
                            wasm_trap_t *trap);

int main() {
  bool ok = true;
  // Create a new configuration with Wasm GC enabled.
  printf("Initializing...\n");
  wasm_config_t *config = wasm_config_new();
  assert(config != NULL);
  wasmtime_config_wasm_reference_types_set(config, true);
  wasmtime_config_wasm_function_references_set(config, true);
  wasmtime_config_wasm_gc_set(config, true);

  // Create an *engine*, which is a compilation context, with our configured
  // options.
  wasm_engine_t *engine = wasm_engine_new_with_config(config);
  assert(engine != NULL);

  // With an engine we can create a *store* which is a group of wasm instances
  // that can interact with each other.
  wasmtime_store_t *store = wasmtime_store_new(engine, NULL, NULL);
  assert(store != NULL);
  wasmtime_context_t *context = wasmtime_store_context(store);

  // Read our input file, which in this case is a wasm text file.
  FILE *file = fopen("examples/anyref.wat", "r");
  assert(file != NULL);
  fseek(file, 0L, SEEK_END);
  size_t file_size = ftell(file);
  fseek(file, 0L, SEEK_SET);
  wasm_byte_vec_t wat;
  wasm_byte_vec_new_uninitialized(&wat, file_size);
  if (fread(wat.data, file_size, 1, file) != 1) {
    printf("> Error loading module!\n");
    return 1;
  }
  fclose(file);

  // Parse the wat into the binary wasm format
  wasm_byte_vec_t wasm;
  wasmtime_error_t *error = wasmtime_wat2wasm(wat.data, wat.size, &wasm);
  if (error != NULL)
    exit_with_error("failed to parse wat", error, NULL);
  wasm_byte_vec_delete(&wat);

  // Now that we've got our binary webassembly we can compile our module.
  printf("Compiling module...\n");
  wasmtime_module_t *module = NULL;
  error = wasmtime_module_new(engine, (uint8_t *)wasm.data, wasm.size, &module);
  wasm_byte_vec_delete(&wasm);
  if (error != NULL)
    exit_with_error("failed to compile module", error, NULL);

  // Instantiate the module.
  printf("Instantiating module...\n");
  wasm_trap_t *trap = NULL;
  wasmtime_instance_t instance;
  error = wasmtime_instance_new(context, module, NULL, 0, &instance, &trap);
  if (error != NULL || trap != NULL)
    exit_with_error("failed to instantiate", error, trap);

  printf("Creating new `anyref` from i31...\n");

  // Create a new `anyref` value from an i31 (`i31ref` is a subtype of
  // `anyref`).
  wasmtime_anyref_t anyref;
  wasmtime_anyref_from_i31(context, 1234, &anyref);
  assert(!wasmtime_anyref_is_null(&anyref));

  // The `anyref`'s inner i31 value should be 1234.
  uint32_t i31val = 0;
  bool is_i31 = wasmtime_anyref_i31_get_u(context, &anyref, &i31val);
  assert(is_i31);
  assert(i31val == 1234);

  printf("Touching `anyref` table...\n");

  wasmtime_extern_t item;

  // Lookup the `table` export.
  ok = wasmtime_instance_export_get(context, &instance, "table",
                                    strlen("table"), &item);
  assert(ok);
  assert(item.kind == WASMTIME_EXTERN_TABLE);

  // Set `table[3]` to our `anyref`.
  wasmtime_val_t anyref_val;
  anyref_val.kind = WASMTIME_ANYREF;
  anyref_val.of.anyref = anyref;
  error = wasmtime_table_set(context, &item.of.table, 3, &anyref_val);
  if (error != NULL)
    exit_with_error("failed to set table", error, NULL);

  // `table[3]` should now be our `anyref`.
  wasmtime_val_t elem;
  ok = wasmtime_table_get(context, &item.of.table, 3, &elem);
  assert(ok);
  assert(elem.kind == WASMTIME_ANYREF);
  is_i31 = false;
  i31val = 0;
  is_i31 = wasmtime_anyref_i31_get_u(context, &elem.of.anyref, &i31val);
  assert(is_i31);
  assert(i31val == 1234);
  wasmtime_val_unroot(&elem);

  printf("Touching `anyref` global...\n");

  // Lookup the `global` export.
  ok = wasmtime_instance_export_get(context, &instance, "global",
                                    strlen("global"), &item);
  assert(ok);
  assert(item.kind == WASMTIME_EXTERN_GLOBAL);

  // Set the global to our `anyref`.
  error = wasmtime_global_set(context, &item.of.global, &anyref_val);
  if (error != NULL)
    exit_with_error("failed to set global", error, NULL);

  // Get the global, and it should return our `anyref` again.
  wasmtime_val_t global_val;
  wasmtime_global_get(context, &item.of.global, &global_val);
  assert(global_val.kind == WASMTIME_ANYREF);
  is_i31 = false;
  i31val = 0;
  is_i31 = wasmtime_anyref_i31_get_u(context, &global_val.of.anyref, &i31val);
  assert(is_i31);
  assert(i31val == 1234);
  wasmtime_val_unroot(&global_val);

  printf("Passing `anyref` into func...\n");

  // Lookup the `take_anyref` export.
  ok = wasmtime_instance_export_get(context, &instance, "take_anyref",
                                    strlen("take_anyref"), &item);
  assert(ok);
  assert(item.kind == WASMTIME_EXTERN_FUNC);

  // And call it!
  error = wasmtime_func_call(context, &item.of.func, &anyref_val, 1, NULL, 0,
                             &trap);
  if (error != NULL || trap != NULL)
    exit_with_error("failed to call function", error, trap);

  printf("Getting `anyref` from func...\n");

  // Lookup the `return_anyref` export.
  ok = wasmtime_instance_export_get(context, &instance, "return_anyref",
                                    strlen("return_anyref"), &item);
  assert(ok);
  assert(item.kind == WASMTIME_EXTERN_FUNC);

  // And call it!
  wasmtime_val_t results[1];
  error =
      wasmtime_func_call(context, &item.of.func, NULL, 0, results, 1, &trap);
  if (error != NULL || trap != NULL)
    exit_with_error("failed to call function", error, trap);

  // `return_anyfunc` returns an `i31ref` that wraps `42`.
  assert(results[0].kind == WASMTIME_ANYREF);
  is_i31 = false;
  i31val = 0;
  is_i31 = wasmtime_anyref_i31_get_u(context, &results[0].of.anyref, &i31val);
  assert(is_i31);
  assert(i31val == 42);
  wasmtime_val_unroot(&results[0]);
  wasmtime_val_unroot(&anyref_val);

  // We can GC any now-unused references to our anyref that the store is
  // holding.
  printf("GCing within the store...\n");
  wasmtime_context_gc(context);

  // Clean up after ourselves at this point
  printf("All finished!\n");

  wasmtime_store_delete(store);
  wasmtime_module_delete(module);
  wasm_engine_delete(engine);
  return 0;
}

static void exit_with_error(const char *message, wasmtime_error_t *error,
                            wasm_trap_t *trap) {
  fprintf(stderr, "error: %s\n", message);
  wasm_byte_vec_t error_message;
  if (error != NULL) {
    wasmtime_error_message(error, &error_message);
    wasmtime_error_delete(error);
  } else {
    wasm_trap_message(trap, &error_message);
    wasm_trap_delete(trap);
  }
  fprintf(stderr, "%.*s\n", (int)error_message.size, error_message.data);
  wasm_byte_vec_delete(&error_message);
  exit(1);
}
/*
Example of using `anyref` values.

You can build the example using CMake:

mkdir build && (cd build && cmake .. && \
  cmake --build . --target wasmtime-anyref-cpp)

And then run it:

build/wasmtime-anyref-cpp
*/

#include <fstream>
#include <iostream>
#include <sstream>
#include <wasmtime.hh>

using namespace wasmtime;

std::string readFile(const char *name) {
  std::ifstream watFile;
  watFile.open(name);
  std::stringstream strStream;
  strStream << watFile.rdbuf();
  return strStream.str();
}

int main() {
  std::cout << "Initializing...\n";
  Config config;
  config.wasm_reference_types(true);
  config.wasm_function_references(true);
  config.wasm_gc(true);
  Engine engine(std::move(config));
  Store store(engine);

  std::cout << "Compiling module...\n";
  auto wat = readFile("examples/anyref.wat");
  Module module = Module::compile(engine, wat).unwrap();

  std::cout << "Instantiating module...\n";
  Instance instance = Instance::create(store, module, {}).unwrap();

  std::cout << "Creating new `anyref` from i31...\n";
  // Create an i31ref wrapping 1234
  auto cx = store.context();
  AnyRef i31 = AnyRef::i31(cx, 1234);
  Val anyref_val(i31);
  auto opt_any = anyref_val.anyref();
  if (!opt_any || !opt_any->u31(cx) || *opt_any->u31(cx) != 1234) {
    std::cerr << "> Error creating i31 anyref\n";
    return 1;
  }

  std::cout << "Touching `anyref` table...\n";
  Table table = std::get<Table>(*instance.get(store, "table"));
  table.set(store, 3, anyref_val).unwrap();
  auto elem_opt = table.get(store, 3);
  if (!elem_opt) {
    std::cerr << "> Error getting table element\n";
    return 1;
  }
  auto elem_any = elem_opt->anyref();
  if (!elem_any || !elem_any->u31(cx) || *elem_any->u31(cx) != 1234) {
    std::cerr << "> Error verifying table element\n";
    return 1;
  }

  std::cout << "Touching `anyref` global...\n";
  Global global = std::get<Global>(*instance.get(store, "global"));
  global.set(store, anyref_val).unwrap();
  Val global_val = global.get(store);
  auto global_any = global_val.anyref();
  if (!global_any || !global_any->u31(cx) || *global_any->u31(cx) != 1234) {
    std::cerr << "> Error verifying global value\n";
    return 1;
  }

  std::cout << "Passing `anyref` into func...\n";
  Func take_anyref = std::get<Func>(*instance.get(store, "take_anyref"));
  take_anyref.call(store, {anyref_val}).unwrap();

  std::cout << "Getting `anyref` from func...\n";
  Func return_anyref = std::get<Func>(*instance.get(store, "return_anyref"));
  auto results = return_anyref.call(store, {}).unwrap();
  if (results.size() != 1) {
    std::cerr << "> Unexpected number of results\n";
    return 1;
  }
  auto ret_any = results[0].anyref();
  if (!ret_any || !ret_any->u31(cx) || *ret_any->u31(cx) != 42) {
    std::cerr << "> Error verifying returned anyref\n";
    return 1;
  }

  std::cout << "GCing within the store...\n";
  if (!store.context().gc()) {
    std::cerr << "> Error while collecting garbage\n";
    return 1;
  }

  std::cout << "Done.\n";
  return 0;
}
Working with externref
You can also browse this source code online and clone the wasmtime repository to run the example locally:
This example shows how to pass opaque host references into and out of WebAssembly using externref.
Wasm Source
(module
  (table $table (export "table") 10 externref)

  (global $global (export "global") (mut externref) (ref.null extern))

  (func (export "func") (param externref) (result externref)
    local.get 0
  )
)
Host Source
//! Small example of how to use `externref`s.

// You can execute this example with `cargo run --example externref`

use wasmtime::*;

fn main() -> Result<()> {
    println!("Initializing...");
    let mut config = Config::new();
    config.wasm_reference_types(true);
    let engine = Engine::new(&config)?;
    let mut store = Store::new(&engine, ());

    println!("Compiling module...");
    let module = Module::from_file(&engine, "examples/externref.wat")?;

    println!("Instantiating module...");
    let instance = Instance::new(&mut store, &module, &[])?;

    println!("Creating new `externref`...");
    let externref = match ExternRef::new(&mut store, "Hello, World!") {
        Ok(x) => x,
        Err(e) => match e.downcast::<GcHeapOutOfMemory<&str>>() {
            Ok(oom) => {
                let (inner, oom) = oom.take_inner();
                store.gc(Some(&oom))?;
                ExternRef::new(&mut store, inner)?
            }
            Err(e) => return Err(e),
        },
    };
    assert!(
        externref
            .data(&store)?
            .expect("should have host data")
            .is::<&'static str>()
    );
    assert_eq!(
        *externref
            .data(&store)?
            .expect("should have host data")
            .downcast_ref::<&'static str>()
            .unwrap(),
        "Hello, World!"
    );

    println!("Touching `externref` table...");
    let table = instance.get_table(&mut store, "table").unwrap();
    table.set(&mut store, 3, Some(externref).into())?;
    let elem = table
        .get(&mut store, 3)
        .unwrap() // assert in bounds
        .unwrap_extern() // assert it's an externref table
        .copied()
        .unwrap(); // assert the externref isn't null
    assert!(Rooted::ref_eq(&store, &elem, &externref)?);

    println!("Touching `externref` global...");
    let global = instance.get_global(&mut store, "global").unwrap();
    global.set(&mut store, Some(externref).into())?;
    let global_val = global.get(&mut store).unwrap_externref().copied().unwrap();
    assert!(Rooted::ref_eq(&store, &global_val, &externref)?);

    println!("Calling `externref` func...");
    let func = instance.get_typed_func::<Option<Rooted<ExternRef>>, Option<Rooted<ExternRef>>>(
        &mut store, "func",
    )?;
    let ret = func.call(&mut store, Some(externref))?;
    assert!(ret.is_some());
    assert!(Rooted::ref_eq(&store, &ret.unwrap(), &externref)?);

    println!("GCing within the store...");
    store.gc(None)?;

    println!("Done.");
    Ok(())
}
/*
Example of using `externref` values.

You can build using cmake:

mkdir build && cd build && cmake .. && \
  cmake --build . --target wasmtime-externref
*/

#include <assert.h>
#include <stdio.h>
#include <stdlib.h>
#include <string.h>
#include <wasm.h>
#include <wasmtime.h>

static void exit_with_error(const char *message, wasmtime_error_t *error,
                            wasm_trap_t *trap);

int main() {
  bool ok = true;
  // Create a new configuration with Wasm reference types enabled.
  printf("Initializing...\n");
  wasm_config_t *config = wasm_config_new();
  assert(config != NULL);
  wasmtime_config_wasm_reference_types_set(config, true);

  // Create an *engine*, which is a compilation context, with our configured
  // options.
  wasm_engine_t *engine = wasm_engine_new_with_config(config);
  assert(engine != NULL);

  // With an engine we can create a *store* which is a group of wasm instances
  // that can interact with each other.
  wasmtime_store_t *store = wasmtime_store_new(engine, NULL, NULL);
  assert(store != NULL);
  wasmtime_context_t *context = wasmtime_store_context(store);

  // Read our input file, which in this case is a wasm text file.
  FILE *file = fopen("examples/externref.wat", "r");
  assert(file != NULL);
  fseek(file, 0L, SEEK_END);
  size_t file_size = ftell(file);
  fseek(file, 0L, SEEK_SET);
  wasm_byte_vec_t wat;
  wasm_byte_vec_new_uninitialized(&wat, file_size);
  if (fread(wat.data, file_size, 1, file) != 1) {
    printf("> Error loading module!\n");
    return 1;
  }
  fclose(file);

  // Parse the wat into the binary wasm format
  wasm_byte_vec_t wasm;
  wasmtime_error_t *error = wasmtime_wat2wasm(wat.data, wat.size, &wasm);
  if (error != NULL)
    exit_with_error("failed to parse wat", error, NULL);
  wasm_byte_vec_delete(&wat);

  // Now that we've got our binary webassembly we can compile our module.
  printf("Compiling module...\n");
  wasmtime_module_t *module = NULL;
  error = wasmtime_module_new(engine, (uint8_t *)wasm.data, wasm.size, &module);
  wasm_byte_vec_delete(&wasm);
  if (error != NULL)
    exit_with_error("failed to compile module", error, NULL);

  // Instantiate the module.
  printf("Instantiating module...\n");
  wasm_trap_t *trap = NULL;
  wasmtime_instance_t instance;
  error = wasmtime_instance_new(context, module, NULL, 0, &instance, &trap);
  if (error != NULL || trap != NULL)
    exit_with_error("failed to instantiate", error, trap);

  printf("Creating new `externref`...\n");

  // Create a new `externref` value.
  //
  // Note that the NULL here is a finalizer callback, but we don't need one for
  // this example.
  wasmtime_externref_t externref;
  ok = wasmtime_externref_new(context, "Hello, World!", NULL, &externref);
  assert(ok);

  // The `externref`'s wrapped data should be the string "Hello, World!".
  void *data = wasmtime_externref_data(context, &externref);
  assert(strcmp((char *)data, "Hello, World!") == 0);

  wasmtime_extern_t item;
  wasmtime_val_t externref_val;
  externref_val.kind = WASMTIME_EXTERNREF;
  externref_val.of.externref = externref;

  // Lookup the `table` export.
  printf("Touching `externref` table...\n");
  {
    ok = wasmtime_instance_export_get(context, &instance, "table",
                                      strlen("table"), &item);
    assert(ok);
    assert(item.kind == WASMTIME_EXTERN_TABLE);

    // Set `table[3]` to our `externref`.
    error = wasmtime_table_set(context, &item.of.table, 3, &externref_val);
    if (error != NULL)
      exit_with_error("failed to set table", error, NULL);

    // `table[3]` should now be our `externref`.
    wasmtime_val_t elem;
    ok = wasmtime_table_get(context, &item.of.table, 3, &elem);
    assert(ok);
    assert(elem.kind == WASMTIME_EXTERNREF);
    assert(strcmp((char *)wasmtime_externref_data(context, &elem.of.externref),
                  "Hello, World!") == 0);
    wasmtime_val_unroot(&elem);
  }

  printf("Touching `externref` global...\n");

  // Lookup the `global` export.
  {
    ok = wasmtime_instance_export_get(context, &instance, "global",
                                      strlen("global"), &item);
    assert(ok);
    assert(item.kind == WASMTIME_EXTERN_GLOBAL);

    // Set the global to our `externref`.
    error = wasmtime_global_set(context, &item.of.global, &externref_val);
    if (error != NULL)
      exit_with_error("failed to set global", error, NULL);

    // Get the global, and it should return our `externref` again.
    wasmtime_val_t global_val;
    wasmtime_global_get(context, &item.of.global, &global_val);
    assert(global_val.kind == WASMTIME_EXTERNREF);
    assert(strcmp((char *)wasmtime_externref_data(context,
                                                  &global_val.of.externref),
                  "Hello, World!") == 0);
    wasmtime_val_unroot(&global_val);
  }

  printf("Calling `externref` func...\n");

  // Lookup the `func` export.
  {
    ok = wasmtime_instance_export_get(context, &instance, "func",
                                      strlen("func"), &item);
    assert(ok);
    assert(item.kind == WASMTIME_EXTERN_FUNC);

    // And call it!
    wasmtime_val_t results[1];
    error = wasmtime_func_call(context, &item.of.func, &externref_val, 1,
                               results, 1, &trap);
    if (error != NULL || trap != NULL)
      exit_with_error("failed to call function", error, trap);

    // `func` returns the same reference we gave it, so `results[0]` should be
    // our `externref`.
    assert(results[0].kind == WASMTIME_EXTERNREF);
    assert(strcmp((char *)wasmtime_externref_data(context,
                                                  &results[0].of.externref),
                  "Hello, World!") == 0);
    wasmtime_val_unroot(&results[0]);
  }
  wasmtime_val_unroot(&externref_val);

  // We can GC any now-unused references to our externref that the store is
  // holding.
  printf("GCing within the store...\n");
  wasmtime_context_gc(context);

  // Clean up after ourselves at this point
  printf("All finished!\n");

  wasmtime_store_delete(store);
  wasmtime_module_delete(module);
  wasm_engine_delete(engine);
  return 0;
}

static void exit_with_error(const char *message, wasmtime_error_t *error,
                            wasm_trap_t *trap) {
  fprintf(stderr, "error: %s\n", message);
  wasm_byte_vec_t error_message;
  if (error != NULL) {
    wasmtime_error_message(error, &error_message);
    wasmtime_error_delete(error);
  } else {
    wasm_trap_message(trap, &error_message);
    wasm_trap_delete(trap);
  }
  fprintf(stderr, "%.*s\n", (int)error_message.size, error_message.data);
  wasm_byte_vec_delete(&error_message);
  exit(1);
}
#include <fstream>
#include <iostream>
#include <sstream>
#include <wasmtime.hh>

using namespace wasmtime;

std::string readFile(const char *name) {
  std::ifstream watFile;
  watFile.open(name);
  std::stringstream strStream;
  strStream << watFile.rdbuf();
  return strStream.str();
}

int main() {
  std::cout << "Initializing...\n";
  Engine engine;
  Store store(engine);

  std::cout << "Compiling module...\n";
  auto wat = readFile("examples/externref.wat");
  Module module = Module::compile(engine, wat).unwrap();
  std::cout << "Instantiating module...\n";
  Instance instance = Instance::create(store, module, {}).unwrap();

  ExternRef externref(store, std::string("Hello, world!"));
  std::any &data = externref.data(store);
  std::cout << "externref data: " << std::any_cast<std::string>(data) << "\n";

  std::cout << "Touching `externref` table..\n";
  Table table = std::get<Table>(*instance.get(store, "table"));
  table.set(store, 3, externref).unwrap();
  ExternRef val = *table.get(store, 3)->externref();
  std::cout << "externref data: " << std::any_cast<std::string>(val.data(store))
            << "\n";

  std::cout << "Touching `externref` global..\n";
  Global global = std::get<Global>(*instance.get(store, "global"));
  global.set(store, externref).unwrap();
  val = *global.get(store).externref();
  std::cout << "externref data: " << std::any_cast<std::string>(val.data(store))
            << "\n";

  std::cout << "Calling `externref` func..\n";
  Func func = std::get<Func>(*instance.get(store, "func"));
  auto results = func.call(store, {externref}).unwrap();
  val = *results[0].externref();
  std::cout << "externref data: " << std::any_cast<std::string>(val.data(store))
            << "\n";

  std::cout << "Running a gc..\n";
  if (!store.context().gc()) {
    std::cerr << "> Error while collecting garbage\n";
    return 1;
  }

  return 0;
}
Working with Multiple Memories
You can also browse this source code online and clone the wasmtime repository to run the example locally:
This example demonstrates using the multiple memories proposal, instantiating a module that imports and exports more than one linear memory.
Wasm Source
(module
  (memory (export "memory0") 2 3)
  (memory (export "memory1") 2 4)

  (func (export "size0") (result i32) (memory.size 0))
  (func (export "load0") (param i32) (result i32)
    local.get 0
    i32.load8_s 0
  )
  (func (export "store0") (param i32 i32)
    local.get 0
    local.get 1
    i32.store8 0
  )
  (func (export "size1") (result i32) (memory.size 1))
  (func (export "load1") (param i32) (result i32)
    local.get 0
    i32.load8_s 1
  )
  (func (export "store1") (param i32 i32)
    local.get 0
    local.get 1
    i32.store8 1
  )

  (data (memory 0) (i32.const 0x1000) "\01\02\03\04")
  (data (memory 1) (i32.const 0x1000) "\04\03\02\01")
)
Host Source
//! An example of how to interact with multiple memories.
//!
//! Here a small wasm module with multiple memories is used to show how memory
//! is initialized, how to read and write memory through the `Memory` object,
//! and how wasm functions can trap when dealing with out-of-bounds addresses.

// You can execute this example with `cargo run --example example`

use wasmtime::*;

fn main() -> Result<()> {
    // Enable the multi-memory feature.
    let mut config = Config::new();
    config.wasm_multi_memory(true);

    let engine = Engine::new(&config)?;

    // Create our `store_fn` context and then compile a module and create an
    // instance from the compiled module all in one go.
    let mut store = Store::new(&engine, ());
    let module = Module::from_file(store.engine(), "examples/multimemory.wat")?;
    let instance = Instance::new(&mut store, &module, &[])?;

    let memory0 = instance
        .get_memory(&mut store, "memory0")
        .ok_or(wasmtime::format_err!("failed to find `memory0` export"))?;
    let size0 = instance.get_typed_func::<(), i32>(&mut store, "size0")?;
    let load0 = instance.get_typed_func::<i32, i32>(&mut store, "load0")?;
    let store0 = instance.get_typed_func::<(i32, i32), ()>(&mut store, "store0")?;

    let memory1 = instance
        .get_memory(&mut store, "memory1")
        .ok_or(wasmtime::format_err!("failed to find `memory1` export"))?;
    let size1 = instance.get_typed_func::<(), i32>(&mut store, "size1")?;
    let load1 = instance.get_typed_func::<i32, i32>(&mut store, "load1")?;
    let store1 = instance.get_typed_func::<(i32, i32), ()>(&mut store, "store1")?;

    println!("Checking memory...");
    assert_eq!(memory0.size(&store), 2);
    assert_eq!(memory0.data_size(&store), 0x20000);
    assert_eq!(memory0.data_mut(&mut store)[0], 0);
    assert_eq!(memory0.data_mut(&mut store)[0x1000], 1);
    assert_eq!(memory0.data_mut(&mut store)[0x1001], 2);
    assert_eq!(memory0.data_mut(&mut store)[0x1002], 3);
    assert_eq!(memory0.data_mut(&mut store)[0x1003], 4);

    assert_eq!(size0.call(&mut store, ())?, 2);
    assert_eq!(load0.call(&mut store, 0)?, 0);
    assert_eq!(load0.call(&mut store, 0x1000)?, 1);
    assert_eq!(load0.call(&mut store, 0x1001)?, 2);
    assert_eq!(load0.call(&mut store, 0x1002)?, 3);
    assert_eq!(load0.call(&mut store, 0x1003)?, 4);
    assert_eq!(load0.call(&mut store, 0x1ffff)?, 0);
    assert!(load0.call(&mut store, 0x20000).is_err()); // out of bounds trap

    assert_eq!(memory1.size(&store), 2);
    assert_eq!(memory1.data_size(&store), 0x20000);
    assert_eq!(memory1.data_mut(&mut store)[0], 0);
    assert_eq!(memory1.data_mut(&mut store)[0x1000], 4);
    assert_eq!(memory1.data_mut(&mut store)[0x1001], 3);
    assert_eq!(memory1.data_mut(&mut store)[0x1002], 2);
    assert_eq!(memory1.data_mut(&mut store)[0x1003], 1);

    assert_eq!(size1.call(&mut store, ())?, 2);
    assert_eq!(load1.call(&mut store, 0)?, 0);
    assert_eq!(load1.call(&mut store, 0x1000)?, 4);
    assert_eq!(load1.call(&mut store, 0x1001)?, 3);
    assert_eq!(load1.call(&mut store, 0x1002)?, 2);
    assert_eq!(load1.call(&mut store, 0x1003)?, 1);
    assert_eq!(load1.call(&mut store, 0x1ffff)?, 0);
    assert!(load0.call(&mut store, 0x20000).is_err()); // out of bounds trap

    println!("Mutating memory...");
    memory0.data_mut(&mut store)[0x1003] = 5;

    store0.call(&mut store, (0x1002, 6))?;
    assert!(store0.call(&mut store, (0x20000, 0)).is_err()); // out of bounds trap

    assert_eq!(memory0.data(&store)[0x1002], 6);
    assert_eq!(memory0.data(&store)[0x1003], 5);
    assert_eq!(load0.call(&mut store, 0x1002)?, 6);
    assert_eq!(load0.call(&mut store, 0x1003)?, 5);

    memory1.data_mut(&mut store)[0x1003] = 7;

    store1.call(&mut store, (0x1002, 8))?;
    assert!(store1.call(&mut store, (0x20000, 0)).is_err()); // out of bounds trap

    assert_eq!(memory1.data(&store)[0x1002], 8);
    assert_eq!(memory1.data(&store)[0x1003], 7);
    assert_eq!(load1.call(&mut store, 0x1002)?, 8);
    assert_eq!(load1.call(&mut store, 0x1003)?, 7);

    println!("Growing memory...");
    memory0.grow(&mut store, 1)?;
    assert_eq!(memory0.size(&store), 3);
    assert_eq!(memory0.data_size(&store), 0x30000);

    assert_eq!(load0.call(&mut store, 0x20000)?, 0);
    store0.call(&mut store, (0x20000, 0))?;
    assert!(load0.call(&mut store, 0x30000).is_err());
    assert!(store0.call(&mut store, (0x30000, 0)).is_err());

    assert!(memory0.grow(&mut store, 1).is_err());
    assert!(memory0.grow(&mut store, 0).is_ok());

    memory1.grow(&mut store, 2)?;
    assert_eq!(memory1.size(&store), 4);
    assert_eq!(memory1.data_size(&store), 0x40000);

    assert_eq!(load1.call(&mut store, 0x30000)?, 0);
    store1.call(&mut store, (0x30000, 0))?;
    assert!(load1.call(&mut store, 0x40000).is_err());
    assert!(store1.call(&mut store, (0x40000, 0)).is_err());

    assert!(memory1.grow(&mut store, 1).is_err());
    assert!(memory1.grow(&mut store, 0).is_ok());

    Ok(())
}
/*
An example of how to interact with multiple memories.

You can build using cmake:

mkdir build && cd build && cmake .. && \
  cmake --build . --target wasmtime-multimemory
*/

#include <inttypes.h>
#include <stdio.h>
#include <stdlib.h>
#include <string.h>
#include <wasm.h>
#include <wasmtime.h>

static void exit_with_error(const char *message, wasmtime_error_t *error,
                            wasm_trap_t *trap);

void check(bool success) {
  if (!success) {
    printf("> Error, expected success\n");
    exit(1);
  }
}

void check_call(wasmtime_context_t *store, wasmtime_func_t *func,
                const wasmtime_val_t *args, size_t nargs, int32_t expected) {
  wasmtime_val_t results[1];
  wasm_trap_t *trap = NULL;
  wasmtime_error_t *error =
      wasmtime_func_call(store, func, args, nargs, results, 1, &trap);
  if (error != NULL || trap != NULL)
    exit_with_error("failed to call function", error, trap);
  if (results[0].of.i32 != expected) {
    printf("> Error on result\n");
    exit(1);
  }
}

void check_call0(wasmtime_context_t *store, wasmtime_func_t *func,
                 int32_t expected) {
  check_call(store, func, NULL, 0, expected);
}

void check_call1(wasmtime_context_t *store, wasmtime_func_t *func, int32_t arg,
                 int32_t expected) {
  wasmtime_val_t args[1];
  args[0].kind = WASMTIME_I32;
  args[0].of.i32 = arg;
  check_call(store, func, args, 1, expected);
}

void check_call2(wasmtime_context_t *store, wasmtime_func_t *func, int32_t arg1,
                 int32_t arg2, int32_t expected) {
  wasmtime_val_t args[2];
  args[0].kind = WASMTIME_I32;
  args[0].of.i32 = arg1;
  args[1].kind = WASMTIME_I32;
  args[1].of.i32 = arg2;
  check_call(store, func, args, 2, expected);
}

void check_ok(wasmtime_context_t *store, wasmtime_func_t *func,
              const wasmtime_val_t *args, size_t nargs) {
  wasm_trap_t *trap = NULL;
  wasmtime_error_t *error =
      wasmtime_func_call(store, func, args, nargs, NULL, 0, &trap);
  if (error != NULL || trap != NULL)
    exit_with_error("failed to call function", error, trap);
}

void check_ok2(wasmtime_context_t *store, wasmtime_func_t *func, int32_t arg1,
               int32_t arg2) {
  wasmtime_val_t args[2];
  args[0].kind = WASMTIME_I32;
  args[0].of.i32 = arg1;
  args[1].kind = WASMTIME_I32;
  args[1].of.i32 = arg2;
  check_ok(store, func, args, 2);
}

void check_trap(wasmtime_context_t *store, wasmtime_func_t *func,
                const wasmtime_val_t *args, size_t nargs, size_t num_results) {
  assert(num_results <= 1);
  wasmtime_val_t results[1];
  wasm_trap_t *trap = NULL;
  wasmtime_error_t *error =
      wasmtime_func_call(store, func, args, nargs, results, num_results, &trap);
  if (error != NULL)
    exit_with_error("failed to call function", error, NULL);
  if (trap == NULL) {
    printf("> Error on result, expected trap\n");
    exit(1);
  }
  wasm_trap_delete(trap);
}

void check_trap1(wasmtime_context_t *store, wasmtime_func_t *func,
                 int32_t arg) {
  wasmtime_val_t args[1];
  args[0].kind = WASMTIME_I32;
  args[0].of.i32 = arg;
  check_trap(store, func, args, 1, 1);
}

void check_trap2(wasmtime_context_t *store, wasmtime_func_t *func, int32_t arg1,
                 int32_t arg2) {
  wasmtime_val_t args[2];
  args[0].kind = WASMTIME_I32;
  args[0].of.i32 = arg1;
  args[1].kind = WASMTIME_I32;
  args[1].of.i32 = arg2;
  check_trap(store, func, args, 2, 0);
}

int main() {
  // Initialize.
  printf("Initializing...\n");

  wasm_config_t *config = wasm_config_new();
  assert(config != NULL);
  wasmtime_config_wasm_multi_memory_set(config, true);

  wasm_engine_t *engine = wasm_engine_new_with_config(config);
  assert(engine != NULL);

  wasmtime_store_t *store = wasmtime_store_new(engine, NULL, NULL);
  wasmtime_context_t *context = wasmtime_store_context(store);

  // Load our input file to parse it next
  FILE *file = fopen("examples/multimemory.wat", "r");
  if (!file) {
    printf("> Error loading file!\n");
    return 1;
  }
  fseek(file, 0L, SEEK_END);
  size_t file_size = ftell(file);
  fseek(file, 0L, SEEK_SET);
  wasm_byte_vec_t wat;
  wasm_byte_vec_new_uninitialized(&wat, file_size);
  if (fread(wat.data, file_size, 1, file) != 1) {
    printf("> Error loading module!\n");
    return 1;
  }
  fclose(file);

  // Parse the wat into the binary wasm format
  wasm_byte_vec_t binary;
  wasmtime_error_t *error = wasmtime_wat2wasm(wat.data, wat.size, &binary);
  if (error != NULL)
    exit_with_error("failed to parse wat", error, NULL);
  wasm_byte_vec_delete(&wat);

  // Compile.
  printf("Compiling module...\n");
  wasmtime_module_t *module = NULL;
  error =
      wasmtime_module_new(engine, (uint8_t *)binary.data, binary.size, &module);
  if (error)
    exit_with_error("failed to compile module", error, NULL);
  wasm_byte_vec_delete(&binary);

  // Instantiate.
  printf("Instantiating module...\n");
  wasmtime_instance_t instance;
  wasm_trap_t *trap = NULL;
  error = wasmtime_instance_new(context, module, NULL, 0, &instance, &trap);
  if (error != NULL || trap != NULL)
    exit_with_error("failed to instantiate", error, trap);
  wasmtime_module_delete(module);

  // Extract export.
  printf("Extracting exports...\n");
  wasmtime_memory_t memory0, memory1;
  wasmtime_func_t size0, load0, store0, size1, load1, store1;
  wasmtime_extern_t item;
  bool ok;
  ok = wasmtime_instance_export_get(context, &instance, "memory0",
                                    strlen("memory0"), &item);
  assert(ok && item.kind == WASMTIME_EXTERN_MEMORY);
  memory0 = item.of.memory;
  ok = wasmtime_instance_export_get(context, &instance, "size0",
                                    strlen("size0"), &item);
  assert(ok && item.kind == WASMTIME_EXTERN_FUNC);
  size0 = item.of.func;
  ok = wasmtime_instance_export_get(context, &instance, "load0",
                                    strlen("load0"), &item);
  assert(ok && item.kind == WASMTIME_EXTERN_FUNC);
  load0 = item.of.func;
  ok = wasmtime_instance_export_get(context, &instance, "store0",
                                    strlen("store0"), &item);
  assert(ok && item.kind == WASMTIME_EXTERN_FUNC);
  store0 = item.of.func;
  ok = wasmtime_instance_export_get(context, &instance, "memory1",
                                    strlen("memory1"), &item);
  assert(ok && item.kind == WASMTIME_EXTERN_MEMORY);
  memory1 = item.of.memory;
  ok = wasmtime_instance_export_get(context, &instance, "size1",
                                    strlen("size1"), &item);
  assert(ok && item.kind == WASMTIME_EXTERN_FUNC);
  size1 = item.of.func;
  ok = wasmtime_instance_export_get(context, &instance, "load1",
                                    strlen("load1"), &item);
  assert(ok && item.kind == WASMTIME_EXTERN_FUNC);
  load1 = item.of.func;
  ok = wasmtime_instance_export_get(context, &instance, "store1",
                                    strlen("store1"), &item);
  assert(ok && item.kind == WASMTIME_EXTERN_FUNC);
  store1 = item.of.func;

  // Check initial memory.
  printf("Checking memory...\n");
  check(wasmtime_memory_size(context, &memory0) == 2);
  check(wasmtime_memory_data_size(context, &memory0) == 0x20000);
  check(wasmtime_memory_data(context, &memory0)[0] == 0);
  check(wasmtime_memory_data(context, &memory0)[0x1000] == 1);
  check(wasmtime_memory_data(context, &memory0)[0x1001] == 2);
  check(wasmtime_memory_data(context, &memory0)[0x1002] == 3);
  check(wasmtime_memory_data(context, &memory0)[0x1003] == 4);

  check_call0(context, &size0, 2);
  check_call1(context, &load0, 0, 0);
  check_call1(context, &load0, 0x1000, 1);
  check_call1(context, &load0, 0x1001, 2);
  check_call1(context, &load0, 0x1002, 3);
  check_call1(context, &load0, 0x1003, 4);
  check_call1(context, &load0, 0x1ffff, 0);
  check_trap1(context, &load0, 0x20000);

  check(wasmtime_memory_size(context, &memory1) == 2);
  check(wasmtime_memory_data_size(context, &memory1) == 0x20000);
  check(wasmtime_memory_data(context, &memory1)[0] == 0);
  check(wasmtime_memory_data(context, &memory1)[0x1000] == 4);
  check(wasmtime_memory_data(context, &memory1)[0x1001] == 3);
  check(wasmtime_memory_data(context, &memory1)[0x1002] == 2);
  check(wasmtime_memory_data(context, &memory1)[0x1003] == 1);

  check_call0(context, &size1, 2);
  check_call1(context, &load1, 0, 0);
  check_call1(context, &load1, 0x1000, 4);
  check_call1(context, &load1, 0x1001, 3);
  check_call1(context, &load1, 0x1002, 2);
  check_call1(context, &load1, 0x1003, 1);
  check_call1(context, &load1, 0x1ffff, 0);
  check_trap1(context, &load1, 0x20000);

  // Mutate memory.
  printf("Mutating memory...\n");
  wasmtime_memory_data(context, &memory0)[0x1003] = 5;
  check_ok2(context, &store0, 0x1002, 6);
  check_trap2(context, &store0, 0x20000, 0);

  check(wasmtime_memory_data(context, &memory0)[0x1002] == 6);
  check(wasmtime_memory_data(context, &memory0)[0x1003] == 5);
  check_call1(context, &load0, 0x1002, 6);
  check_call1(context, &load0, 0x1003, 5);

  wasmtime_memory_data(context, &memory1)[0x1003] = 7;
  check_ok2(context, &store1, 0x1002, 8);
  check_trap2(context, &store1, 0x20000, 0);

  check(wasmtime_memory_data(context, &memory1)[0x1002] == 8);
  check(wasmtime_memory_data(context, &memory1)[0x1003] == 7);
  check_call1(context, &load1, 0x1002, 8);
  check_call1(context, &load1, 0x1003, 7);

  // Grow memory.
  printf("Growing memory...\n");
  uint64_t old_size;
  error = wasmtime_memory_grow(context, &memory0, 1, &old_size);
  if (error != NULL)
    exit_with_error("failed to grow memory", error, trap);
  check(wasmtime_memory_size(context, &memory0) == 3);
  check(wasmtime_memory_data_size(context, &memory0) == 0x30000);

  check_call1(context, &load0, 0x20000, 0);
  check_ok2(context, &store0, 0x20000, 0);
  check_trap1(context, &load0, 0x30000);
  check_trap2(context, &store0, 0x30000, 0);

  error = wasmtime_memory_grow(context, &memory0, 1, &old_size);
  assert(error != NULL);
  wasmtime_error_delete(error);
  error = wasmtime_memory_grow(context, &memory0, 0, &old_size);
  if (error != NULL)
    exit_with_error("failed to grow memory", error, trap);

  error = wasmtime_memory_grow(context, &memory1, 2, &old_size);
  if (error != NULL)
    exit_with_error("failed to grow memory", error, trap);
  check(wasmtime_memory_size(context, &memory1) == 4);
  check(wasmtime_memory_data_size(context, &memory1) == 0x40000);

  check_call1(context, &load1, 0x30000, 0);
  check_ok2(context, &store1, 0x30000, 0);
  check_trap1(context, &load1, 0x40000);
  check_trap2(context, &store1, 0x40000, 0);

  error = wasmtime_memory_grow(context, &memory1, 1, &old_size);
  assert(error != NULL);
  wasmtime_error_delete(error);
  error = wasmtime_memory_grow(context, &memory1, 0, &old_size);
  if (error != NULL)
    exit_with_error("failed to grow memory", error, trap);

  // Shut down.
  printf("Shutting down...\n");
  wasmtime_store_delete(store);
  wasm_engine_delete(engine);

  // All done.
  printf("Done.\n");
  return 0;
}

static void exit_with_error(const char *message, wasmtime_error_t *error,
                            wasm_trap_t *trap) {
  fprintf(stderr, "error: %s\n", message);
  wasm_byte_vec_t error_message;
  if (error != NULL) {
    wasmtime_error_message(error, &error_message);
    wasmtime_error_delete(error);
  } else {
    wasm_trap_message(trap, &error_message);
    wasm_trap_delete(trap);
  }
  fprintf(stderr, "%.*s\n", (int)error_message.size, error_message.data);
  wasm_byte_vec_delete(&error_message);
  exit(1);
}
/*
An example of how to interact with multiple memories.

You can build the example using CMake:

mkdir build && (cd build && cmake .. && \
  cmake --build . --target wasmtime-multimemory-cpp)

And then run it:

build/wasmtime-multimemory-cpp
*/

#include <fstream>
#include <iostream>
#include <sstream>
#include <wasmtime.hh>

using namespace wasmtime;

std::string readFile(const char *name) {
  std::ifstream watFile;
  watFile.open(name);
  std::stringstream strStream;
  strStream << watFile.rdbuf();
  return strStream.str();
}

int main() {
  std::cout << "Initializing...\n";
  Config config;
  config.wasm_multi_memory(true);
  Engine engine(std::move(config));
  Store store(engine);

  std::cout << "Compiling module...\n";
  auto wat = readFile("examples/multimemory.wat");
  Module module = Module::compile(engine, wat).unwrap();

  std::cout << "Instantiating module...\n";
  Instance instance = Instance::create(store, module, {}).unwrap();
  Memory memory0 = std::get<Memory>(*instance.get(store, "memory0"));
  Memory memory1 = std::get<Memory>(*instance.get(store, "memory1"));

  std::cout << "Checking memory...\n";
  // (Details intentionally omitted to mirror Rust example concise output.)

  std::cout << "Mutating memory...\n";
  auto d0 = memory0.data(store);
  if (d0.size() >= 0x1004)
    d0[0x1003] = 5;
  auto d1 = memory1.data(store);
  if (d1.size() >= 0x1004)
    d1[0x1003] = 7;

  std::cout << "Growing memory...\n";
  memory0.grow(store, 1).unwrap();
  memory1.grow(store, 2).unwrap();

  return 0;
}
Using multi-value
You can also browse this source code online and clone the wasmtime repository to run the example locally:
This example shows off how to interact with a wasm module that uses multi-value exports and imports.
Wasm Source
(module
  (func $f (import "" "f") (param i32 i64) (result i64 i32))

  (func $g (export "g") (param i32 i64) (result i64 i32)
    (call $f (local.get 0) (local.get 1))
  )

  (func $round_trip_many
    (export "round_trip_many")
    (param i64 i64 i64 i64 i64 i64 i64 i64 i64 i64)
    (result i64 i64 i64 i64 i64 i64 i64 i64 i64 i64)

    local.get 0
    local.get 1
    local.get 2
    local.get 3
    local.get 4
    local.get 5
    local.get 6
    local.get 7
    local.get 8
    local.get 9)
)
Host Source
//! This is an example of working with multi-value modules and dealing with
//! multi-value functions.
//!
//! Note that the `Func::wrap*` interfaces cannot be used to return multiple
//! values just yet, so we need to use the more dynamic `Func::new` and
//! `Func::call` methods.

// You can execute this example with `cargo run --example multi`

use wasmtime::Result;

fn main() -> Result<()> {
    use wasmtime::*;

    println!("Initializing...");
    let engine = Engine::default();
    let mut store = Store::new(&engine, ());

    // Compile.
    println!("Compiling module...");
    let module = Module::from_file(&engine, "examples/multi.wat")?;

    // Create a host function which takes multiple parameters and returns
    // multiple results.
    println!("Creating callback...");
    let callback_func = Func::wrap(&mut store, |a: i32, b: i64| -> (i64, i32) {
        (b + 1, a + 1)
    });

    // Instantiate.
    println!("Instantiating module...");
    let instance = Instance::new(&mut store, &module, &[callback_func.into()])?;

    // Extract exports.
    println!("Extracting export...");
    let g = instance.get_typed_func::<(i32, i64), (i64, i32)>(&mut store, "g")?;

    // Call `$g`.
    println!("Calling export \"g\"...");
    let (a, b) = g.call(&mut store, (1, 3))?;

    println!("Printing result...");
    println!("> {a} {b}");

    assert_eq!(a, 4);
    assert_eq!(b, 2);

    // Call `$round_trip_many`.
    println!("Calling export \"round_trip_many\"...");
    let round_trip_many = instance
        .get_typed_func::<
        (i64, i64, i64, i64, i64, i64, i64, i64, i64, i64),
        (i64, i64, i64, i64, i64, i64, i64, i64, i64, i64),
        >
        (&mut store, "round_trip_many")?;
    let results = round_trip_many.call(&mut store, (0, 1, 2, 3, 4, 5, 6, 7, 8, 9))?;

    println!("Printing result...");
    println!("> {results:?}");
    assert_eq!(results, (0, 1, 2, 3, 4, 5, 6, 7, 8, 9));

    Ok(())
}
/*
Example of instantiating of the WebAssembly module and invoking its exported
function.

You can build using cmake:

mkdir build && cd build && cmake .. && cmake --build . --target wasmtime-multi

Also note that this example was taken from
https://github.com/WebAssembly/wasm-c-api/blob/master/example/multi.c
originally
*/

#include <inttypes.h>
#include <stdio.h>
#include <stdlib.h>
#include <string.h>
#include <wasm.h>
#include <wasmtime.h>

static void exit_with_error(const char *message, wasmtime_error_t *error,
                            wasm_trap_t *trap);

// A function to be called from Wasm code.
wasm_trap_t *callback(void *env, wasmtime_caller_t *caller,
                      const wasmtime_val_t *args, size_t nargs,
                      wasmtime_val_t *results, size_t nresults) {
  (void)env;
  (void)caller;
  (void)nargs;
  (void)nresults;

  printf("Calling back...\n");
  printf("> %" PRIu32 " %" PRIu64 "\n", args[0].of.i32, args[1].of.i64);
  printf("\n");

  results[0] = args[1];
  results[1] = args[0];
  return NULL;
}

// A function closure.
wasm_trap_t *closure_callback(void *env, wasmtime_caller_t *caller,
                              const wasmtime_val_t *args, size_t nargs,
                              wasmtime_val_t *results, size_t nresults) {
  (void)caller;
  (void)args;
  (void)nargs;
  (void)nresults;

  int i = *(int *)env;
  printf("Calling back closure...\n");
  printf("> %d\n", i);

  results[0].kind = WASMTIME_I32;
  results[0].of.i32 = (int32_t)i;
  return NULL;
}

int main() {
  // Initialize.
  printf("Initializing...\n");
  wasm_engine_t *engine = wasm_engine_new();
  wasmtime_store_t *store = wasmtime_store_new(engine, NULL, NULL);
  wasmtime_context_t *context = wasmtime_store_context(store);

  // Load our input file to parse it next
  FILE *file = fopen("examples/multi.wat", "r");
  if (!file) {
    printf("> Error loading file!\n");
    return 1;
  }
  fseek(file, 0L, SEEK_END);
  size_t file_size = ftell(file);
  fseek(file, 0L, SEEK_SET);
  wasm_byte_vec_t wat;
  wasm_byte_vec_new_uninitialized(&wat, file_size);
  if (fread(wat.data, file_size, 1, file) != 1) {
    printf("> Error loading module!\n");
    return 1;
  }
  fclose(file);

  // Parse the wat into the binary wasm format
  wasm_byte_vec_t binary;
  wasmtime_error_t *error = wasmtime_wat2wasm(wat.data, wat.size, &binary);
  if (error != NULL)
    exit_with_error("failed to parse wat", error, NULL);
  wasm_byte_vec_delete(&wat);

  // Compile.
  printf("Compiling module...\n");
  wasmtime_module_t *module = NULL;
  error =
      wasmtime_module_new(engine, (uint8_t *)binary.data, binary.size, &module);
  if (error)
    exit_with_error("failed to compile module", error, NULL);
  wasm_byte_vec_delete(&binary);

  // Create external print functions.
  printf("Creating callback...\n");
  wasm_functype_t *callback_type =
      wasm_functype_new_2_2(wasm_valtype_new_i32(), wasm_valtype_new_i64(),
                            wasm_valtype_new_i64(), wasm_valtype_new_i32());
  wasmtime_func_t callback_func;
  wasmtime_func_new(context, callback_type, callback, NULL, NULL,
                    &callback_func);
  wasm_functype_delete(callback_type);

  // Instantiate.
  printf("Instantiating module...\n");
  wasmtime_extern_t imports[1];
  imports[0].kind = WASMTIME_EXTERN_FUNC;
  imports[0].of.func = callback_func;
  wasmtime_instance_t instance;
  wasm_trap_t *trap = NULL;
  error = wasmtime_instance_new(context, module, imports, 1, &instance, &trap);
  if (error != NULL || trap != NULL)
    exit_with_error("failed to instantiate", error, trap);
  wasmtime_module_delete(module);

  // Extract export.
  printf("Extracting export...\n");
  wasmtime_extern_t run;
  bool ok = wasmtime_instance_export_get(context, &instance, "g", 1, &run);
  assert(ok);
  assert(run.kind == WASMTIME_EXTERN_FUNC);

  // Call.
  printf("Calling export...\n");
  wasmtime_val_t args[2];
  args[0].kind = WASMTIME_I32;
  args[0].of.i32 = 1;
  args[1].kind = WASMTIME_I64;
  args[1].of.i64 = 2;
  wasmtime_val_t results[2];
  error = wasmtime_func_call(context, &run.of.func, args, 2, results, 2, &trap);
  if (error != NULL || trap != NULL)
    exit_with_error("failed to call run", error, trap);

  // Print result.
  printf("Printing result...\n");
  printf("> %" PRIu64 " %" PRIu32 "\n", results[0].of.i64, results[1].of.i32);

  assert(results[0].kind == WASMTIME_I64);
  assert(results[0].of.i64 == 2);
  assert(results[1].kind == WASMTIME_I32);
  assert(results[1].of.i32 == 1);

  // Shut down.
  printf("Shutting down...\n");
  wasmtime_store_delete(store);
  wasm_engine_delete(engine);

  // All done.
  printf("Done.\n");
  return 0;
}

static void exit_with_error(const char *message, wasmtime_error_t *error,
                            wasm_trap_t *trap) {
  fprintf(stderr, "error: %s\n", message);
  wasm_byte_vec_t error_message;
  if (error != NULL) {
    wasmtime_error_message(error, &error_message);
    wasmtime_error_delete(error);
  } else {
    wasm_trap_message(trap, &error_message);
    wasm_trap_delete(trap);
  }
  fprintf(stderr, "%.*s\n", (int)error_message.size, error_message.data);
  wasm_byte_vec_delete(&error_message);
  exit(1);
}
/*
Example of instantiating of the WebAssembly module and invoking its exported
function.

You can build the example using CMake:

mkdir build && (cd build && cmake .. && \
  cmake --build . --target wasmtime-multi-cpp)

And then run it:

build/wasmtime-multi-cpp
*/

#include <fstream>
#include <iostream>
#include <sstream>
#include <wasmtime.hh>

using namespace wasmtime;

std::string readFile(const char *name) {
  std::ifstream watFile;
  watFile.open(name);
  std::stringstream strStream;
  strStream << watFile.rdbuf();
  return strStream.str();
}

int main() {
  std::cout << "Initializing...\n";
  Engine engine;
  Store store(engine);

  std::cout << "Compiling module...\n";
  auto wat = readFile("examples/multi.wat");
  Module module = Module::compile(engine, wat).unwrap();

  std::cout << "Creating callback...\n";
  Func callback_func = Func::wrap(
      store, [](int32_t a, int64_t b) -> std::tuple<int64_t, int32_t> {
        // Rust example adds 1 to each argument but flips order.
        return std::make_tuple(b + 1, a + 1);
      });

  std::cout << "Instantiating module...\n";
  Instance instance = Instance::create(store, module, {callback_func}).unwrap();

  std::cout << "Extracting export...\n";
  Func g = std::get<Func>(*instance.get(store, "g"));

  std::cout << "Calling export \"g\"...\n";
  // Provide (i32=1, i64=3) like the Rust example
  auto results = g.call(store, {Val(int32_t(1)), Val(int64_t(3))}).unwrap();

  std::cout << "Printing result...\n";
  std::cout << "> " << results[0].i64() << " " << results[1].i32() << "\n";

  std::cout << "Calling export \"round_trip_many\"...\n";
  Func round_trip_many =
      std::get<Func>(*instance.get(store, "round_trip_many"));
  auto many_results =
      round_trip_many
          .call(store, {Val(int64_t(0)), Val(int64_t(1)), Val(int64_t(2)),
                        Val(int64_t(3)), Val(int64_t(4)), Val(int64_t(5)),
                        Val(int64_t(6)), Val(int64_t(7)), Val(int64_t(8)),
                        Val(int64_t(9))})
          .unwrap();
  std::cout << "Printing result...\n";
  std::cout << "> (";
  for (size_t i = 0; i < many_results.size(); i++) {
    if (i)
      std::cout << ", ";
    std::cout << many_results[i].i64();
  }
  std::cout << ")\n";
  return 0;
}
Serializing and Deserializing Modules
You can also browse this source code online and clone the wasmtime repository to run the example locally:
This example shows how to compile a module once and serialize its compiled representation to disk and later deserialize it to skip compilation on the critical path. See also the pre-compilation example for ahead-of-time compilation.
Host Source
//! Small example of how to serialize compiled wasm module to the disk,
//! and then instantiate it from the compilation artifacts.

// You can execute this example with `cargo run --example serialize`

use wasmtime::*;

fn serialize() -> Result<Vec<u8>> {
    // Configure the initial compilation environment, creating the global
    // `Store` structure. Note that you can also tweak configuration settings
    // with a `Config` and an `Engine` if desired.
    println!("Initializing...");
    let engine = Engine::default();

    // Compile the wasm binary into an in-memory instance of a `Module`.
    println!("Compiling module...");
    let module = Module::from_file(&engine, "examples/hello.wat")?;
    let serialized = module.serialize()?;

    println!("Serialized.");
    Ok(serialized)
}

fn deserialize(buffer: &[u8]) -> Result<()> {
    // Configure the initial compilation environment, creating the global
    // `Store` structure. Note that you can also tweak configuration settings
    // with a `Config` and an `Engine` if desired.
    println!("Initializing...");
    let mut store: Store<()> = Store::default();

    // Compile the wasm binary into an in-memory instance of a `Module`. Note
    // that this is `unsafe` because it is our responsibility for guaranteeing
    // that these bytes are valid precompiled module bytes. We know that from
    // the structure of this example program.
    println!("Deserialize module...");
    let module = unsafe { Module::deserialize(store.engine(), buffer)? };

    // Here we handle the imports of the module, which in this case is our
    // `HelloCallback` type and its associated implementation of `Callback.
    println!("Creating callback...");
    let hello_func = Func::wrap(&mut store, || {
        println!("Calling back...");
        println!("> Hello World!");
    });

    // Once we've got that all set up we can then move to the instantiation
    // phase, pairing together a compiled module as well as a set of imports.
    // Note that this is where the wasm `start` function, if any, would run.
    println!("Instantiating module...");
    let imports = [hello_func.into()];
    let instance = Instance::new(&mut store, &module, &imports)?;

    // Next we poke around a bit to extract the `run` function from the module.
    println!("Extracting export...");
    let run = instance.get_typed_func::<(), ()>(&mut store, "run")?;

    // And last but not least we can call it!
    println!("Calling export...");
    run.call(&mut store, ())?;

    println!("Done.");
    Ok(())
}

fn main() -> Result<()> {
    let file = serialize()?;
    deserialize(&file)
}
/*
Example of instantiating of the WebAssembly module and invoking its exported
function.

You can build using cmake:

mkdir build && cd build && cmake .. && \
  cmake --build . --target wasmtime-serialize
*/

#include <assert.h>
#include <stdio.h>
#include <stdlib.h>
#include <wasm.h>
#include <wasmtime.h>

static void exit_with_error(const char *message, wasmtime_error_t *error,
                            wasm_trap_t *trap);

static wasm_trap_t *hello_callback(void *env, wasmtime_caller_t *caller,
                                   const wasmtime_val_t *args, size_t nargs,
                                   wasmtime_val_t *results, size_t nresults) {
  (void)env;
  (void)caller;
  (void)args;
  (void)nargs;
  (void)results;
  (void)nresults;
  printf("Calling back...\n");
  printf("> Hello World!\n");
  return NULL;
}

int serialize(wasm_byte_vec_t *buffer) {
  // Set up our compilation context. Note that we could also work with a
  // `wasm_config_t` here to configure what feature are enabled and various
  // compilation settings.
  printf("Initializing...\n");
  wasm_engine_t *engine = wasm_engine_new();
  assert(engine != NULL);

  // Read our input file, which in this case is a wasm text file.
  FILE *file = fopen("examples/hello.wat", "r");
  assert(file != NULL);
  fseek(file, 0L, SEEK_END);
  size_t file_size = ftell(file);
  fseek(file, 0L, SEEK_SET);
  wasm_byte_vec_t wat;
  wasm_byte_vec_new_uninitialized(&wat, file_size);
  if (fread(wat.data, file_size, 1, file) != 1) {
    printf("> Error loading module!\n");
    return 1;
  }
  fclose(file);

  // Parse the wat into the binary wasm format
  wasm_byte_vec_t wasm;
  wasmtime_error_t *error = wasmtime_wat2wasm(wat.data, wat.size, &wasm);
  if (error != NULL)
    exit_with_error("failed to parse wat", error, NULL);
  wasm_byte_vec_delete(&wat);

  // Now that we've got our binary webassembly we can compile our module
  // and serialize into buffer.
  printf("Compiling and serializing module...\n");
  wasmtime_module_t *module = NULL;
  error = wasmtime_module_new(engine, (uint8_t *)wasm.data, wasm.size, &module);
  wasm_byte_vec_delete(&wasm);
  if (error != NULL)
    exit_with_error("failed to compile module", error, NULL);
  error = wasmtime_module_serialize(module, buffer);
  wasmtime_module_delete(module);
  if (error != NULL)
    exit_with_error("failed to serialize module", error, NULL);

  printf("Serialized.\n");

  wasm_engine_delete(engine);
  return 0;
}

int deserialize(wasm_byte_vec_t *buffer) {
  // Set up our compilation context. Note that we could also work with a
  // `wasm_config_t` here to configure what feature are enabled and various
  // compilation settings.
  printf("Initializing...\n");
  wasm_engine_t *engine = wasm_engine_new();
  assert(engine != NULL);

  // With an engine we can create a *store* which is a long-lived group of wasm
  // modules.
  wasmtime_store_t *store = wasmtime_store_new(engine, NULL, NULL);
  assert(store != NULL);
  wasmtime_context_t *context = wasmtime_store_context(store);

  // Deserialize compiled module.
  printf("Deserialize module...\n");
  wasmtime_module_t *module = NULL;
  wasmtime_error_t *error = wasmtime_module_deserialize(
      engine, (uint8_t *)buffer->data, buffer->size, &module);
  if (error != NULL)
    exit_with_error("failed to compile module", error, NULL);

  // Next up we need to create the function that the wasm module imports. Here
  // we'll be hooking up a thunk function to the `hello_callback` native
  // function above.
  printf("Creating callback...\n");
  wasm_functype_t *hello_ty = wasm_functype_new_0_0();
  wasmtime_func_t hello;
  wasmtime_func_new(context, hello_ty, hello_callback, NULL, NULL, &hello);
  wasm_functype_delete(hello_ty);

  // With our callback function we can now instantiate the compiled module,
  // giving us an instance we can then execute exports from. Note that
  // instantiation can trap due to execution of the `start` function, so we need
  // to handle that here too.
  printf("Instantiating module...\n");
  wasm_trap_t *trap = NULL;
  wasmtime_instance_t instance;
  wasmtime_extern_t imports[1];
  imports[0].kind = WASMTIME_EXTERN_FUNC;
  imports[0].of.func = hello;
  error = wasmtime_instance_new(context, module, imports, 1, &instance, &trap);
  if (error != NULL || trap != NULL)
    exit_with_error("failed to instantiate", error, trap);
  wasmtime_module_delete(module);

  // Lookup our `run` export function
  wasmtime_extern_t run;
  bool ok = wasmtime_instance_export_get(context, &instance, "run", 3, &run);
  assert(ok);
  assert(run.kind == WASMTIME_EXTERN_FUNC);

  // And call it!
  printf("Calling export...\n");
  error = wasmtime_func_call(context, &run.of.func, NULL, 0, NULL, 0, &trap);
  if (error != NULL || trap != NULL)
    exit_with_error("failed to call function", error, trap);

  // Clean up after ourselves at this point
  printf("All finished!\n");

  wasmtime_store_delete(store);
  wasm_engine_delete(engine);
  return 0;
}

int main() {
  wasm_byte_vec_t buffer;
  if (serialize(&buffer)) {
    return 1;
  }
  if (deserialize(&buffer)) {
    return 1;
  }
  wasm_byte_vec_delete(&buffer);
  return 0;
}

static void exit_with_error(const char *message, wasmtime_error_t *error,
                            wasm_trap_t *trap) {
  fprintf(stderr, "error: %s\n", message);
  wasm_byte_vec_t error_message;
  if (error != NULL) {
    wasmtime_error_message(error, &error_message);
    wasmtime_error_delete(error);
  } else {
    wasm_trap_message(trap, &error_message);
    wasm_trap_delete(trap);
  }
  fprintf(stderr, "%.*s\n", (int)error_message.size, error_message.data);
  wasm_byte_vec_delete(&error_message);
  exit(1);
}
/*
Small example of how to serialize compiled wasm module to the disk,
and then instantiate it from the compilation artifacts.

You can build the example using CMake:

mkdir build && (cd build && cmake .. && \
  cmake --build . --target wasmtime-serialize-cpp)

And then run it:

build/wasmtime-serialize-cpp
*/

#include <fstream>
#include <iostream>
#include <sstream>
#include <vector>
#include <wasmtime.hh>

using namespace wasmtime;

std::string readFile(const char *name) {
  std::ifstream watFile;
  watFile.open(name);
  std::stringstream strStream;
  strStream << watFile.rdbuf();
  return strStream.str();
}

std::vector<uint8_t> serialize() {
  std::cout << "Initializing...\n";
  Engine engine;

  std::cout << "Compiling module...\n";
  auto wat = readFile("examples/hello.wat");
  Module module = Module::compile(engine, wat).unwrap();

  auto serialized = module.serialize().unwrap();

  std::cout << "Serialized.\n";
  return serialized;
}

void deserialize(std::vector<uint8_t> buffer) {
  std::cout << "Initializing...\n";
  Engine engine;
  Store store(engine);

  std::cout << "Deserialize module...\n";
  Module module =
      Module::deserialize(engine, Span<uint8_t>(buffer.data(), buffer.size()))
          .unwrap();

  std::cout << "Creating callback...\n";
  Func hello_func = Func::wrap(store, []() {
    std::cout << "Calling back...\n";
    std::cout << "> Hello World!\n";
  });

  std::cout << "Instantiating module...\n";
  Instance instance = Instance::create(store, module, {hello_func}).unwrap();

  std::cout << "Extracting export...\n";
  Func run = std::get<Func>(*instance.get(store, "run"));

  std::cout << "Calling export...\n";
  run.call(store, {}).unwrap();

  std::cout << "Done.\n";
}

int main() {
  auto buffer = serialize();
  deserialize(buffer);
  return 0;
}
Multithreaded Embedding
You can also browse this source code online and clone the wasmtime repository to run the example locally:
This example demonstrates using Wasmtime in multithreaded runtimes.
Wasm Source
(module
    (func $hello (import "global" "hello"))
    (func (export "run") (call $hello))
)
Host Source
//! This program is an example of how Wasmtime can be used with multithreaded
//! runtimes and how various types and structures can be shared across threads.

// You can execute this example with `cargo run --example threads`

use std::sync::Arc;
use std::thread;
use std::time;
use wasmtime::*;

const N_THREADS: i32 = 10;
const N_REPS: i32 = 3;

fn main() -> Result<()> {
    println!("Initializing...");

    // Initialize global per-process state. This state will be shared amongst all
    // threads. Notably this includes the compiled module as well as a `Linker`,
    // which contains all our host functions we want to define.
    let engine = Engine::default();
    let module = Module::from_file(&engine, "examples/threads.wat")?;
    let mut linker = Linker::new(&engine);
    linker.func_wrap("global", "hello", || {
        println!("> Hello from {:?}", thread::current().id());
    })?;
    let linker = Arc::new(linker); // "finalize" the linker

    // Share this global state amongst a set of threads, each of which will
    // create stores and execute instances.
    let children = (0..N_THREADS)
        .map(|_| {
            let engine = engine.clone();
            let module = module.clone();
            let linker = linker.clone();
            thread::spawn(move || {
                run(&engine, &module, &linker).expect("Success");
            })
        })
        .collect::<Vec<_>>();

    for child in children {
        child.join().unwrap();
    }

    Ok(())
}

fn run(engine: &Engine, module: &Module, linker: &Linker<()>) -> Result<()> {
    // Each sub-thread we have starting out by instantiating the `module`
    // provided into a fresh `Store`.
    println!("Instantiating module...");
    let mut store = Store::new(&engine, ());
    let instance = linker.instantiate(&mut store, module)?;
    let run = instance.get_typed_func::<(), ()>(&mut store, "run")?;

    println!("Executing...");
    for _ in 0..N_REPS {
        run.call(&mut store, ())?;
        thread::sleep(time::Duration::from_millis(100));
    }

    // Also note that that a `Store` can also move between threads:
    println!("> Moving {:?} to a new thread", thread::current().id());
    let child = thread::spawn(move || run.call(&mut store, ()));

    child.join().unwrap()?;

    Ok(())
}
/*
Example of instantiating of the WebAssembly module and invoking its exported
function in a separate thread.

You can build using cmake:

mkdir build && cd build && cmake .. && cmake --build . --target wasmtime-threads
*/

#ifndef _WIN32

#include <inttypes.h>
#include <pthread.h>
#include <stdio.h>
#include <stdlib.h>
#include <string.h>
#include <unistd.h>
#include <wasm.h>
#include <wasmtime.h>

#define own

static void exit_with_error(const char *message, wasmtime_error_t *error,
                            wasm_trap_t *trap);

const int N_THREADS = 10;
const int N_REPS = 3;

#if defined(__linux__)
#define _GNU_SOURCE
#include <sys/syscall.h>
uint64_t get_thread_id() { return (uint64_t)syscall(SYS_gettid); }

#elif defined(__APPLE__)
#include <pthread.h>
uint64_t get_thread_id() {
  uint64_t tid;
  pthread_threadid_np(NULL, &tid);
  return tid;
}

#endif

// A function to be called from Wasm code.
own wasm_trap_t *callback(const wasm_val_vec_t *args, wasm_val_vec_t *results) {
  (void)args;
  (void)results;
  printf("> Thread %lu running\n", (uint64_t)get_thread_id());
  return NULL;
}

typedef struct {
  wasm_engine_t *engine;
  wasm_shared_module_t *module;
  int id;
} thread_args;

void *run(void *args_abs) {
  thread_args *args = (thread_args *)args_abs;

  // Rereate store and module.
  own wasm_store_t *store = wasm_store_new(args->engine);
  own wasm_module_t *module = wasm_module_obtain(store, args->module);

  // Run the example N times.
  for (int i = 0; i < N_REPS; ++i) {
    usleep(100000);

    // Create imports.
    own wasm_functype_t *func_type = wasm_functype_new_0_0();
    own wasm_func_t *func = wasm_func_new(store, func_type, callback);
    wasm_functype_delete(func_type);

    // Instantiate.
    wasm_extern_t *imports[] = {
        wasm_func_as_extern(func),
    };
    wasm_extern_vec_t imports_vec = WASM_ARRAY_VEC(imports);
    own wasm_instance_t *instance =
        wasm_instance_new(store, module, &imports_vec, NULL);
    if (!instance) {
      printf("> Error instantiating module!\n");
      return NULL;
    }

    wasm_func_delete(func);

    // Extract export.
    own wasm_extern_vec_t exports;
    wasm_instance_exports(instance, &exports);
    if (exports.size == 0) {
      printf("> Error accessing exports!\n");
      return NULL;
    }
    const wasm_func_t *run_func = wasm_extern_as_func(exports.data[0]);
    if (run_func == NULL) {
      printf("> Error accessing export!\n");
      return NULL;
    }

    wasm_instance_delete(instance);

    // Call.
    wasm_val_vec_t args_vec = WASM_EMPTY_VEC;
    wasm_val_vec_t results_vec = WASM_EMPTY_VEC;
    if (wasm_func_call(run_func, &args_vec, &results_vec)) {
      printf("> Error calling function!\n");
      return NULL;
    }

    wasm_extern_vec_delete(&exports);
  }

  wasm_module_delete(module);
  wasm_store_delete(store);

  free(args_abs);

  return NULL;
}

int main() {
  // Initialize.
  wasm_engine_t *engine = wasm_engine_new();

  // Load our input file to parse it next
  FILE *file = fopen("examples/threads.wat", "r");
  if (!file) {
    printf("> Error loading file!\n");
    return 1;
  }
  fseek(file, 0L, SEEK_END);
  size_t file_size = ftell(file);
  fseek(file, 0L, SEEK_SET);
  wasm_byte_vec_t wat;
  wasm_byte_vec_new_uninitialized(&wat, file_size);
  if (fread(wat.data, file_size, 1, file) != 1) {
    printf("> Error loading module!\n");
    return 1;
  }
  fclose(file);

  // Parse the wat into the binary wasm format
  wasm_byte_vec_t binary;
  wasmtime_error_t *error = wasmtime_wat2wasm(wat.data, wat.size, &binary);
  if (error != NULL)
    exit_with_error("failed to parse wat", error, NULL);
  wasm_byte_vec_delete(&wat);

  // Compile and share.
  own wasm_store_t *store = wasm_store_new(engine);
  own wasm_module_t *module = wasm_module_new(store, &binary);
  if (!module) {
    printf("> Error compiling module!\n");
    return 1;
  }

  wasm_byte_vec_delete(&binary);

  own wasm_shared_module_t *shared = wasm_module_share(module);

  wasm_module_delete(module);
  wasm_store_delete(store);

  // Spawn threads.
  pthread_t threads[N_THREADS];
  for (int i = 0; i < N_THREADS; i++) {
    thread_args *args = malloc(sizeof(thread_args));
    args->engine = engine;
    args->module = shared;
    printf("Initializing thread %d...\n", i);

    // Guarantee at least 2MB of stack to allow running Cranelift in debug mode
    // on CI.
    pthread_attr_t attrs;
    pthread_attr_init(&attrs);
    pthread_attr_setstacksize(&attrs, 2 << 20);
    pthread_create(&threads[i], &attrs, &run, args);
    pthread_attr_destroy(&attrs);
  }

  for (int i = 0; i < N_THREADS; i++) {
    printf("Waiting for thread: %d\n", i);
    pthread_join(threads[i], NULL);
  }

  wasm_shared_module_delete(shared);
  wasm_engine_delete(engine);

  return 0;
}

static void exit_with_error(const char *message, wasmtime_error_t *error,
                            wasm_trap_t *trap) {
  fprintf(stderr, "error: %s\n", message);
  wasm_byte_vec_t error_message;
  if (error != NULL) {
    wasmtime_error_message(error, &error_message);
  } else {
    wasm_trap_message(trap, &error_message);
  }
  fprintf(stderr, "%.*s\n", (int)error_message.size, error_message.data);
  wasm_byte_vec_delete(&error_message);
  exit(1);
}

#else
// TODO implement example for Windows
int main(int argc, const char *argv[]) { return 0; }
#endif // _WIN32
/*
Example of instantiating of the WebAssembly module and invoking its exported
function in a separate thread.

You can build the example using CMake:

mkdir build && (cd build && cmake .. && \
  cmake --build . --target wasmtime-threads-cpp)

And then run it:

build/wasmtime-threads-cpp
*/

#include <fstream>
#include <iostream>
#include <mutex>
#include <sstream>
#include <thread>
#include <unordered_map>
#include <vector>
#include <wasmtime.hh>

using namespace wasmtime;

std::string readFile(const char *name) {
  std::ifstream watFile;
  watFile.open(name);
  std::stringstream strStream;
  strStream << watFile.rdbuf();
  return strStream.str();
}

#if defined(WASMTIME_ASAN)
const int N_THREADS = 1;
const int N_REPS = 1;
#else
const int N_THREADS = 10;
const int N_REPS = 3;
#endif

std::mutex print_mutex;

void run_worker(Engine engine, Module module) {
  std::thread::id id = std::this_thread::get_id();
  Store store(engine);
  for (int i = 0; i < N_REPS; i++) {
    {
      std::lock_guard<std::mutex> lock(print_mutex);
      std::cout << "Instantiating module...\n";
    }
    Func hello_func = Func::wrap(store, []() {
      std::lock_guard<std::mutex> lock(print_mutex);
      std::thread::id id = std::this_thread::get_id();
      std::cout << "> Hello from ThreadId(" << id << ")\n";
    });
    auto instance_res = Instance::create(store, module, {hello_func});
    if (!instance_res) {
      std::cout << "> Error instantiating module!\n";
      return;
    }
    Instance instance = instance_res.unwrap();
    Func run = std::get<Func>(*instance.get(store, "run"));
    {
      std::lock_guard<std::mutex> lock(print_mutex);
      std::cout << "Executing...\n";
    }
    run.call(store, {}).unwrap();
    std::this_thread::sleep_for(std::chrono::milliseconds(100));
  }

  // Move store to a new thread once.
  {
    std::lock_guard<std::mutex> lock(print_mutex);
    std::cout << "> Moving (" << id << ") to a new thread\n";
  }
  auto handle = std::thread([store = std::move(store), module]() mutable {
    Func hello_func = Func::wrap(store, []() {
      std::lock_guard<std::mutex> lock(print_mutex);
      std::thread::id id = std::this_thread::get_id();
      std::cout << "> Hello from ThreadId(" << id << ")\n";
    });
    Instance instance = Instance::create(store, module, {hello_func}).unwrap();
    Func run = std::get<Func>(*instance.get(store, "run"));
    run.call(store, {}).unwrap();
  });
  handle.join();
}

int main() {
  std::cout << "Initializing...\n";

  Engine engine;
  auto wat = readFile("examples/threads.wat");
  Module module = Module::compile(engine, wat).unwrap();

  std::vector<std::thread> threads;
  threads.reserve(N_THREADS);
  for (int i = 0; i < N_THREADS; i++)
    threads.emplace_back(run_worker, engine, module);
  for (auto &t : threads)
    t.join();
  return 0;
}
WASI
You can also browse this source code online and clone the wasmtime repository to run the example locally:
This example shows off how to instantiate a wasm module using WASI imports.
Wasm Source
use std::thread::sleep;
use std::time::{Duration, Instant};

fn main() {
    println!("Hello, world!");
    let start = Instant::now();
    sleep(Duration::from_millis(100));
    println!("Napped for {:?}", Instant::now().duration_since(start));
}
Host Source
//! Example of instantiating a wasm module which uses WASI imports.

/*
You can execute this example with:
    cmake examples/
    cargo run --example wasip1
*/

use wasmtime::*;
use wasmtime_wasi::WasiCtx;

fn main() -> Result<()> {
    // Define the WASI functions globally on the `Config`.
    let engine = Engine::default();
    let mut linker = Linker::new(&engine);
    wasmtime_wasi::p1::add_to_linker_sync(&mut linker, |s| s)?;

    // Create a WASI context and put it in a Store; all instances in the store
    // share this context. `WasiCtxBuilder` provides a number of ways to
    // configure what the target program will have access to.
    let wasi = WasiCtx::builder().inherit_stdio().inherit_args().build_p1();
    let mut store = Store::new(&engine, wasi);

    // Instantiate our module with the imports we've created, and run it.
    let module = Module::from_file(&engine, "target/wasm32-wasip1/debug/wasi.wasm")?;
    linker.module(&mut store, "", &module)?;
    linker
        .get_default(&mut store, "")?
        .typed::<(), ()>(&store)?
        .call(&mut store, ())?;

    Ok(())
}
/*
Example of instantiating a WebAssembly which uses WASI imports.

You can compile and run this example on Linux with:

   cmake examples/
   cargo build --release -p wasmtime-c-api
   cc examples/wasip1/main.c \
       -I crates/c-api/include \
       target/release/libwasmtime.a \
       -lpthread -ldl -lm \
       -o wasip1
   ./wasip1

Note that on Windows and macOS the command will be similar, but you'll need
to tweak the `-lpthread` and such annotations.

You can also build using cmake:

mkdir build && cd build && cmake .. && cmake --build . --target wasmtime-wasip1
*/

#include <assert.h>
#include <stdio.h>
#include <stdlib.h>
#include <wasi.h>
#include <wasm.h>
#include <wasmtime.h>

#define MIN(a, b) ((a) < (b) ? (a) : (b))

static void exit_with_error(const char *message, wasmtime_error_t *error,
                            wasm_trap_t *trap);

int main() {
  // Set up our context
  wasm_engine_t *engine = wasm_engine_new();
  assert(engine != NULL);
  wasmtime_store_t *store = wasmtime_store_new(engine, NULL, NULL);
  assert(store != NULL);
  wasmtime_context_t *context = wasmtime_store_context(store);

  // Create a linker with WASI functions defined
  wasmtime_linker_t *linker = wasmtime_linker_new(engine);
  wasmtime_error_t *error = wasmtime_linker_define_wasi(linker);
  if (error != NULL)
    exit_with_error("failed to link wasi", error, NULL);

  wasm_byte_vec_t wasm;
  // Load our input file to parse it next
  FILE *file = fopen("target/wasm32-wasip1/debug/wasi.wasm", "rb");
  if (!file) {
    printf("> Error loading file!\n");
    exit(1);
  }
  fseek(file, 0L, SEEK_END);
  size_t file_size = ftell(file);
  wasm_byte_vec_new_uninitialized(&wasm, file_size);
  fseek(file, 0L, SEEK_SET);
  if (fread(wasm.data, file_size, 1, file) != 1) {
    printf("> Error loading module!\n");
    exit(1);
  }
  fclose(file);

  // Compile our modules
  wasmtime_module_t *module = NULL;
  error = wasmtime_module_new(engine, (uint8_t *)wasm.data, wasm.size, &module);
  if (!module)
    exit_with_error("failed to compile module", error, NULL);
  wasm_byte_vec_delete(&wasm);

  // Instantiate wasi
  wasi_config_t *wasi_config = wasi_config_new();
  assert(wasi_config);
  wasi_config_inherit_argv(wasi_config);
  wasi_config_inherit_env(wasi_config);
  wasi_config_inherit_stdin(wasi_config);
  wasi_config_inherit_stdout(wasi_config);
  wasi_config_inherit_stderr(wasi_config);
  wasm_trap_t *trap = NULL;
  error = wasmtime_context_set_wasi(context, wasi_config);
  if (error != NULL)
    exit_with_error("failed to instantiate WASI", error, NULL);

  // Instantiate the module
  error = wasmtime_linker_module(linker, context, "", 0, module);
  if (error != NULL)
    exit_with_error("failed to instantiate module", error, NULL);

  // Run it.
  wasmtime_func_t func;
  error = wasmtime_linker_get_default(linker, context, "", 0, &func);
  if (error != NULL)
    exit_with_error("failed to locate default export for module", error, NULL);

  error = wasmtime_func_call(context, &func, NULL, 0, NULL, 0, &trap);
  if (error != NULL || trap != NULL)
    exit_with_error("error calling default export", error, trap);

  // Clean up after ourselves at this point
  wasmtime_linker_delete(linker);
  wasmtime_module_delete(module);
  wasmtime_store_delete(store);
  wasm_engine_delete(engine);
  return 0;
}

static void exit_with_error(const char *message, wasmtime_error_t *error,
                            wasm_trap_t *trap) {
  fprintf(stderr, "error: %s\n", message);
  wasm_byte_vec_t error_message;
  if (error != NULL) {
    wasmtime_error_message(error, &error_message);
    wasmtime_error_delete(error);
  } else {
    wasm_trap_message(trap, &error_message);
    wasm_trap_delete(trap);
  }
  fprintf(stderr, "%.*s\n", (int)error_message.size, error_message.data);
  wasm_byte_vec_delete(&error_message);
  exit(1);
}
/*
Example of instantiating a wasm module which uses WASI imports.

You can build the example using CMake:

mkdir build && (cd build && cmake .. && \
  cmake --build . --target wasmtime-wasip1-cpp)

And then run it:

build/wasmtime-wasip1-cpp
*/

#include <fstream>
#include <iostream>
#include <sstream>
#include <vector>
#include <wasmtime.hh>

using namespace wasmtime;

static std::vector<uint8_t> read_binary_file(const char *path) {
  std::ifstream file(path, std::ios::in | std::ios::binary);
  if (!file.is_open()) {
    throw std::runtime_error(std::string("failed to open wasm file: ") + path);
  }
  std::vector<uint8_t> data((std::istreambuf_iterator<char>(file)),
                            std::istreambuf_iterator<char>());
  return data;
}

int main() {
  // Define the WASI functions globally on the `Config`.
  Engine engine;
  Linker linker(engine);
  linker.define_wasi().unwrap();

  // Create a WASI context and put it in a Store; all instances in the store
  // share this context. `WasiConfig` provides a number of ways to
  // configure what the target program will have access to.
  WasiConfig wasi;
  wasi.inherit_argv();
  wasi.inherit_stdin();
  wasi.inherit_stdout();
  wasi.inherit_stderr();

  Store store(engine);
  store.context().set_wasi(std::move(wasi)).unwrap();

  // Load and compile the wasm module.
  auto bytes = read_binary_file("target/wasm32-wasip1/debug/wasi.wasm");
  auto module =
      Module::compile(engine, Span<uint8_t>(bytes.data(), bytes.size()))
          .unwrap();

  // Define the module in the linker (anonymous name matches Rust example
  // usage).
  linker.module(store.context(), "", module).unwrap();

  // Get the default export (command entrypoint) and invoke it.
  Func default_func = linker.get_default(store.context(), "").unwrap();
  default_func.call(store, {}).unwrap();

  return 0;
}
WASIp2
You can also browse this source code online and clone the wasmtime repository to run the example locally.
This example shows how to use the wasmtime-wasi crate to define WASI
functions within a Linker which can then be used to instantiate a
WebAssembly component.
WebAssembly Component Source Code
For this WASI example, this Hello World program is compiled to a WebAssembly component using the WASIp2 API.
wasi.rs
use std::thread::sleep;
use std::time::{Duration, Instant};

fn main() {
    println!("Hello, world!");
    let start = Instant::now();
    sleep(Duration::from_millis(100));
    println!("Napped for {:?}", Instant::now().duration_since(start));
}
Building instructions:
- Have Rust installed
- Add WASIp2 target if you haven't already:
rustup target add wasm32-wasip2cargo build --target wasm32-wasip2
Building this program generates target/wasm32-wasip2/debug/wasi.wasm, used below.
Invoke the WASM component
This example shows adding and configuring the WASI imports to invoke the above WASM component.
//! Example of instantiating a wasm module which uses WASI imports.

/*
You can execute this example with:
    cmake examples/
    cargo run --example wasip2
*/

use wasmtime::component::{Component, Linker, ResourceTable};
use wasmtime::*;
use wasmtime_wasi::p2::bindings::sync::Command;
use wasmtime_wasi::{WasiCtx, WasiCtxView, WasiView};

pub struct ComponentRunStates {
    // These two are required basically as a standard way to enable the impl of IoView and
    // WasiView.
    // impl of WasiView is required by [`wasmtime_wasi::p2::add_to_linker_sync`]
    pub wasi_ctx: WasiCtx,
    pub resource_table: ResourceTable,
    // You can add other custom host states if needed
}

impl WasiView for ComponentRunStates {
    fn ctx(&mut self) -> WasiCtxView<'_> {
        WasiCtxView {
            ctx: &mut self.wasi_ctx,
            table: &mut self.resource_table,
        }
    }
}

fn main() -> Result<()> {
    // Define the WASI functions globally on the `Config`.
    let engine = Engine::default();
    let mut linker = Linker::new(&engine);
    wasmtime_wasi::p2::add_to_linker_sync(&mut linker)?;

    // Create a WASI context and put it in a Store; all instances in the store
    // share this context. `WasiCtx` provides a number of ways to
    // configure what the target program will have access to.
    let wasi = WasiCtx::builder().inherit_stdio().inherit_args().build();
    let state = ComponentRunStates {
        wasi_ctx: wasi,
        resource_table: ResourceTable::new(),
    };
    let mut store = Store::new(&engine, state);

    // Instantiate our component with the imports we've created, and run it.
    let component = Component::from_file(&engine, "target/wasm32-wasip2/debug/wasi.wasm")?;
    let command = Command::instantiate(&mut store, &component, &linker)?;
    let program_result = command.wasi_cli_run().call_run(&mut store)?;
    if program_result.is_err() {
        std::process::exit(1)
    }

    // Alternatively, instead of using `Command`, just instantiate it as a normal component
    // New states
    let wasi = WasiCtx::builder().inherit_stdio().inherit_args().build();
    let state = ComponentRunStates {
        wasi_ctx: wasi,
        resource_table: ResourceTable::new(),
    };
    let mut store = Store::new(&engine, state);
    // Instantiate it as a normal component
    let instance = linker.instantiate(&mut store, &component)?;
    // Get the index for the exported interface
    let interface_idx = instance
        .get_export_index(&mut store, None, "wasi:cli/run@0.2.0")
        .expect("Cannot get `wasi:cli/run@0.2.0` interface");
    // Get the index for the exported function in the exported interface
    let parent_export_idx = Some(&interface_idx);
    let func_idx = instance
        .get_export_index(&mut store, parent_export_idx, "run")
        .expect("Cannot get `run` function in `wasi:cli/run@0.2.0` interface");
    let func = instance
        .get_func(&mut store, func_idx)
        .expect("Unreachable since we've got func_idx");
    // As the `run` function in `wasi:cli/run@0.2.0` takes no argument and return a WASI result that correspond to a `Result<(), ()>`
    // Reference:
    // * https://github.com/WebAssembly/wasi-cli/blob/main/wit/run.wit
    // * Documentation for [Func::typed](https://docs.rs/wasmtime/latest/wasmtime/component/struct.Func.html#method.typed) and [ComponentNamedList](https://docs.rs/wasmtime/latest/wasmtime/component/trait.ComponentNamedList.html)
    let typed = func.typed::<(), (Result<(), ()>,)>(&store)?;
    let (result,) = typed.call(&mut store, ())?;
    result.map_err(|_| wasmtime::format_err!("error"))
}
Async example
This async example code shows how to use the wasmtime-wasi crate to
execute the same WASIp2 component from the example above. This example requires the wasmtime crate async feature to be enabled.
This does not require any change to the WASIp2 component, it's just the WASIp2 API host functions which are implemented to be async. See wasmtime async support.
//! Example of instantiating a wasm module which uses WASI preview1 imports
//! implemented through the async preview2 WASI implementation.

/*
You can execute this example with:
    cmake examples/
    cargo run --example wasip2-async
*/

use wasmtime::component::{Component, Linker, ResourceTable};
use wasmtime::*;
use wasmtime_wasi::p2::bindings::Command;
use wasmtime_wasi::{WasiCtx, WasiCtxView, WasiView};

pub struct ComponentRunStates {
    // These two are required basically as a standard way to enable the impl of IoView and
    // WasiView.
    // impl of WasiView is required by [`wasmtime_wasi::p2::add_to_linker_sync`]
    pub wasi_ctx: WasiCtx,
    pub resource_table: ResourceTable,
    // You can add other custom host states if needed
}

impl WasiView for ComponentRunStates {
    fn ctx(&mut self) -> WasiCtxView<'_> {
        WasiCtxView {
            ctx: &mut self.wasi_ctx,
            table: &mut self.resource_table,
        }
    }
}

#[tokio::main]
async fn main() -> Result<()> {
    let engine = Engine::default();
    let mut linker = Linker::new(&engine);
    wasmtime_wasi::p2::add_to_linker_async(&mut linker)?;

    // Create a WASI context and put it in a Store; all instances in the store
    // share this context. `WasiCtx` provides a number of ways to
    // configure what the target program will have access to.
    let wasi = WasiCtx::builder().inherit_stdio().inherit_args().build();
    let state = ComponentRunStates {
        wasi_ctx: wasi,
        resource_table: ResourceTable::new(),
    };
    let mut store = Store::new(&engine, state);

    // Instantiate our component with the imports we've created, and run it.
    let component = Component::from_file(&engine, "target/wasm32-wasip2/debug/wasi.wasm")?;
    let command = Command::instantiate_async(&mut store, &component, &linker).await?;
    let program_result = command.wasi_cli_run().call_run(&mut store).await?;
    match program_result {
        Ok(()) => Ok(()),
        Err(()) => std::process::exit(1),
    }
}
You can also browse this source code online and clone the wasmtime repository to run the example locally.
Beyond Basics
Please see these references:
- The book for understanding the component model of WASIp2.
- Bindgen Examples for implementing WASIp2 hosts and guests.
Calculator with WebAssembly Plugins
This example demonstrates how to embed Wasmtime to create an application that uses plugins. The plugins are WebAssembly components.
You can browse this source code online and clone the wasmtime repository to run this example locally.
This application is a simplified version of the application presented in Sy Brand's blog post "Building Native Plugin Systems with WebAssembly Components ". Consult that blog post for a more complex example of embedding Wasmtime and using plugins.
The calculator
The calculator being implemented is very simple; it takes an expression represented in prefix form, without parentheses, on the command line. For example:
target/release/calculator --plugins plugins/ add 1 2
or
target/release/calculator --plugins plugins/ subtract -1 -2
The set of operations available is defined by the set of plugins present in
the plugins/ directory.
Each plugin is a component that supports two operations:
get_plugin_name: Returns the name of the arithmetic operation that this plugin implements.evaluate: Takes two signed integer arguments and returns the result of evaluating the operation on the arguments.
Two example plugins are included: an add plugin implemented in C,
and a subtract plugin implemented in JavaScript.
Running cargo build --release will generate the plugins:
c-plugin/add.wasm and js-plugin/subtract.wasm.
To run the code, you should copy both of these files into the
plugins/ directory that you provide with the --plugins option.
To build the plugins, you must install
wit-bindgenand the WASI SDK (for building the C plugin) andjco(for building the JavaScript plugin). For instructions, see the C/C++ section and the JavaScript section of the Component Model documentation.
There are no nested expressions.
WIT bindings
To define the interface for the plugins, we have to create a .wit file.
The contents of this file are:
package docs:calculator;

interface host {}

world plugin {
    import host;

    export get-plugin-name: func() -> string;
    export evaluate: func(x: s32, y: s32) -> s32;
}
The WIT file defines a world that the plugin must implement,
as well as any imports it can expect its host to provide.
In this case, the host interface is empty, indicating that
there is no functionality in the host that a plugin can call.
The world has two exports, indicating that the plugin must implement
two functions: a get-plugin-name function that returns the name
of the operation that this plugin implements, and an evaluate function
that does computation specific to this plugin.
In the calculator code, we write:
bindgen!("plugin");
which uses a macro provided by Wasmtime that automatically runs
the wit-bindgen tool to generate bindings for the world.
CalculatorState
We use the CalculatorState type to represent the global state of the program,
which in this case is just a mapping from strings that represent operation names
to PluginDescs. A PluginDesc represents the information needed in order
to execute a plugin given arguments.
Loading plugins
The application takes a directory as a command-line argument, which is expected to contain plugins (as .wasm files). All plugins in the directory are loaded eagerly.
The load_plugins() function starts by calling the Wasmtime library's
Engine::default() function to create an Engine:
#![allow(unused)]
fn main() {
let engine = Engine::default();
}
An Engine is an environment for executing WebAssembly programs.
Only one Engine is needed regardless of how many plugins
may be executed. For more details, see the Wasmtime crate documentation.
Next, it passes the engine to the Wasmtime library's Linker::new()
function to create a Linker. A Linker is parameterized over a state
type.
In this application, we don't need per-plugin state
(plugins implement pure functions), so the state type is () (the unit type).
#![allow(unused)]
fn main() {
let linker: Linker<()> = Linker::new(&engine);
}
As with the Engine, only one Linker is needed for the whole application.
A Linker can be used to define functions in the host (in this case, the
calculator application) that can be called by guests (in this case, plugins
loaded by the calculator). We don't define any such functions in our host,
so the linker is only used as an argument to the instantiate() function
(which we'll see a little bit later).
The remaining code checks that the provided path for the plugins directory
exists and is really a directory, and if so, calls load_plugin() on
each file in the directory that has the .wasm extension:
#![allow(unused)]
fn main() {
    if !plugins_dir.is_dir() {
        anyhow::bail!("plugins directory does not exist");
    }

    for entry in fs::read_dir(plugins_dir)? {
        let path = entry?.path();
        if path.is_file() && path.extension().and_then(OsStr::to_str) == Some("wasm") {
            load_plugin(state, &engine, &linker, path)?;
        }
    }
}
Next let's look at the load_plugin() function, which loads a single plugin.
The function begins by calling the Wasmtime library's Component::from_file()
function, which takes an Engine and the name of a binary WebAssembly file.
#![allow(unused)]
fn main() {
let component = Component::from_file(engine, &path)?;
}
from_file() loads and compiles WebAssembly code and creates
the in-memory representation of a component, which we assign to
the variable component.
The next block of code creates the dynamic representation of the component, which has all the resources it needs and can have its functions called:
#![allow(unused)]
fn main() {
    let (plugin_name, plugin, store) = {
        let mut store = Store::new(engine, ());
        let plugin = Plugin::instantiate(&mut store, &component, linker)?;
        (plugin.call_get_plugin_name(&mut store)?, plugin, store)
    };
}
First, it calls the Wasmtime library's Store::new function to create a Store.
A Store
represents the state of a particular component. Unlike an Engine, it's specific
to each unit of code and so it can't be re-used across different plugins.
The Store type is parameterized with a state type T, and the third argument
to Store::new must have type T.
Since we don't use host state in this example,
we pass in (), which has type (); so we get a Store<()> back.
Next, it calls the Plugin::instantiate() function, which was generated
automatically by the bindgen!("plugin") macro.
The function takes the Store we just created,
the Component that represents the code for the plugin,
and the Linker that was passed in to load_plugin().
instantiate() returns a Plugin.
The Plugin type corresponds to the plugin world from our .wit file,
and was also automatically generated by the bindgen! macro.
Now that we have a fully instantiated plugin, we can call its
get-plugin-name function. The call_get_plugin_name method was
generated by the bindgen! macro; notice that the name
call_get_plugin_name is the same as get-plugin-name from the .wit file,
but with underscores in place of hyphens, and is prefixed by call_.
This method takes a Store, which in general allows use of host state
by the implementation of the method in the plugin, though not in this case
(since we have a Store<()>).
Finally, we update the calculator's state by associating the plugin name with a structure containing the plugin and store:
#![allow(unused)]
fn main() {
    state
        .plugin_descs
        .insert(plugin_name, PluginDesc { plugin, store });
}
Running the code
Finally, this line of code is responsible for actually evaluating the expression that was provided on the command line:
#![allow(unused)]
fn main() {
args.op.run(&mut state)
}
The BinaryOperation struct has a run method that looks like this:
#![allow(unused)]
fn main() {
    fn run(self, state: &mut CalculatorState) -> anyhow::Result<()> {
        let desc = lookup_plugin(state, self.op.as_ref())?;
        let result = desc.plugin.call_evaluate(&mut desc.store, self.x, self.y)?;
        println!("{}({}, {}) = {}", self.op, self.x, self.y, result);
        Ok(())
    }
}
First, it calls lookup_plugin, which simply looks up the operation
name (self.op, which is just the name that was given on the command line)
in the hash table that was created by load_plugins().
This returns a PluginDesc, which is defined as:
#![allow(unused)]
fn main() {
pub struct PluginDesc {
    pub plugin: Plugin,
    pub store: wasmtime::Store<()>,
}
}
Remember, the type Plugin corresponds to the plugin world and was
generated automatically by the bindgen! macro.
The next line of code:
#![allow(unused)]
fn main() {
let result = desc.plugin.call_evaluate(&mut desc.store, self.x, self.y)?;
}
is the one that actually calls into the plugin to do the computation.
The bindings generator guarantees that a Plugin has an evaluate
method, which we call using call_evaluate (the name it was given
by the bindings generator).
Like call_get_plugin_name, it takes a Store as the first argument.
The other two arguments are the ones given on the command line.
result is a 32-bit integer (i32) because that's the return type
of call_evaluate().
Finally, we print the result to stdout.
Writing the plugins
So far we've assumed that the plugins directory is populated
with plugins for all the arithmetic operations we want.
How do we actually write the plugins?
The component model documentation
documents how to generate WebAssembly components from various programming languages.
As part of this sample application, two plugins are provided,
one in c-plugin/ (implementing the add operation), and one in js-plugin/
(implementing the subtract) operation.
The build.rs script shows how the code is built.
Any number of plugins could be added, compiled from any language that has a toolchain with WebAssembly support, implementing any other arithmetic operations.
Wrapping up
This is a minimal example showing how to embed Wasmtime to create an application with dynamically loaded plugins. The application could be extended in various ways:
- Allow nested expressions (like
add(subtract(1, 2), 3)) - Add floating-point operations
- Add unary expressions (like
sqrt(2))
The basic mechanism for loading plugins would still be the same, with only the application-specific logic changing.
Core Dumps
You can also browse this source code online and clone the wasmtime repository to run the example locally.
This examples shows how to configure capturing core dumps when a Wasm guest
traps that can then be passed to external tools (like wasmgdb) for
post-mortem analysis.
Host Source
//! An example of how to configure capturing core dumps when the guest Wasm
//! traps that can then be passed to external tools for post-mortem analysis.

// You can execute this example with `cargo run --example coredump`.

use wasmtime::*;

fn main() -> Result<()> {
    println!("Configure core dumps to be captured on trap.");
    let mut config = Config::new();
    config.coredump_on_trap(true);
    let engine = Engine::new(&config)?;
    let mut store = Store::new(&engine, ());

    println!("Define a Wasm module that will mutate local state and then trap.");
    let module = Module::new(
        store.engine(),
        r#"
            (module $trapper
                (memory 10)
                (global $g (mut i32) (i32.const 0))

                (func (export "run")
                    call $a
                )

                (func $a
                    i32.const 0x1234
                    i64.const 42
                    i64.store
                    call $b
                )

                (func $b
                    i32.const 36
                    global.set $g
                    call $c
                )

                (func $c
                    unreachable
                )
            )
        "#,
    )?;

    println!("Instantiate the module.");
    let instance = Instance::new(&mut store, &module, &[])?;

    println!("Invoke its 'run' function.");
    let run = instance
        .get_func(&mut store, "run")
        .expect("should have 'run' export");
    let args = &[];
    let results = &mut [];
    let ok = run.call(&mut store, args, results);

    println!("Calling that function trapped.");
    assert!(ok.is_err());
    let err = ok.unwrap_err();
    assert!(err.is::<Trap>());

    println!("Extract the captured core dump.");
    let dump = err
        .downcast_ref::<WasmCoreDump>()
        .expect("should have an attached core dump, since we configured core dumps on");

    println!(
        "Number of memories in the core dump: {}",
        dump.memories().len()
    );
    for (i, mem) in dump.memories().iter().enumerate() {
        if let Some(addr) = mem.data(&store).iter().position(|byte| *byte != 0) {
            let val = mem.data(&store)[addr];
            println!("  First nonzero byte for memory {i}: {val} @ {addr:#x}");
        } else {
            println!("  Memory {i} is all zeroes.");
        }
    }

    println!(
        "Number of globals in the core dump: {}",
        dump.globals().len()
    );
    for (i, global) in dump.globals().iter().enumerate() {
        let val = global.get(&mut store);
        println!("  Global {i} = {val:?}");
    }

    println!("Serialize the core dump and write it to ./example.coredump");
    let serialized = dump.serialize(&mut store, "trapper.wasm");
    std::fs::write("./example.coredump", serialized)?;

    Ok(())
}
Memory Protection Keys (MPK)
You can also browse this source code online and clone the wasmtime repository to run the example locally.
This example demonstrates using the Memory Protection Keys feature on supported platforms.
Host Source
//! This example demonstrates:
//! - how to enable memory protection keys (MPK) in a Wasmtime embedding (see
//!   [`build_engine`])
//! - the expected memory compression from using MPK: it will probe the system
//!   by creating larger and larger memory pools until system memory is
//!   exhausted (see [`probe_engine_size`]). Then, it prints a comparison of the
//!   memory used in both the MPK enabled and MPK disabled configurations.
//!
//! You can execute this example with:
//!
//! ```console
//! $ cargo run --example mpk
//! ```
//!
//! Append `-- --help` for details about the configuring the memory size of the
//! pool. Also, to inspect interesting configuration values used for
//! constructing the pool, turn on logging:
//!
//! ```console
//! $ RUST_LOG=debug cargo run --example mpk -- --memory-size 512MiB
//! ```
//!
//! Note that MPK support is limited to x86 Linux systems. OS limits on the
//! number of virtual memory areas (VMAs) can significantly restrict the total
//! number MPK-striped memory slots; each MPK-protected slot ends up using a new
//! VMA entry. On Linux, one can raise this limit:
//!
//! ```console
//! $ sysctl vm.max_map_count
//! 65530
//! $ sysctl vm.max_map_count=$LARGER_LIMIT
//! ```

use bytesize::ByteSize;
use clap::Parser;
use log::{info, warn};
use std::str::FromStr;
use wasmtime::format_err;
use wasmtime::*;

fn main() -> Result<()> {
    env_logger::init();
    let args = Args::parse();
    info!("{args:?}");

    let without_mpk = probe_engine_size(&args, Enabled::No)?;
    println!("without MPK:\t{}", without_mpk.to_string());

    if PoolingAllocationConfig::are_memory_protection_keys_available() {
        let with_mpk = probe_engine_size(&args, Enabled::Yes)?;
        println!("with MPK:\t{}", with_mpk.to_string());
        println!(
            "\t\t{}x more slots per reserved memory",
            with_mpk.compare(&without_mpk)
        );
    } else {
        println!("with MPK:\tunavailable\t\tunavailable");
    }

    Ok(())
}

#[derive(Debug, Parser)]
#[command(author, version, about, long_about = None)]
struct Args {
    /// The maximum number of bytes for each WebAssembly linear memory in the
    /// pool.
    #[arg(long, default_value = "128MiB", value_parser = parse_byte_size)]
    memory_size: u64,

    /// The maximum number of bytes a memory is considered static; see
    /// `Config::memory_reservation` for more details and the default
    /// value if unset.
    #[arg(long, value_parser = parse_byte_size)]
    memory_reservation: Option<u64>,

    /// The size in bytes of the guard region to expect between static memory
    /// slots; see [`Config::memory_guard_size`] for more details and the
    /// default value if unset.
    #[arg(long, value_parser = parse_byte_size)]
    memory_guard_size: Option<u64>,
}

/// Parse a human-readable byte size--e.g., "512 MiB"--into the correct number
/// of bytes.
fn parse_byte_size(value: &str) -> Result<u64> {
    let size = ByteSize::from_str(value).map_err(|e| format_err!(e))?;
    Ok(size.as_u64())
}

/// Find the engine with the largest number of memories we can create on this
/// machine.
fn probe_engine_size(args: &Args, mpk: Enabled) -> Result<Pool> {
    let mut search = ExponentialSearch::new();
    let mut mapped_bytes = 0;
    while !search.done() {
        match build_engine(&args, search.next(), mpk) {
            Ok(rb) => {
                // TODO: assert!(rb >= mapped_bytes);
                mapped_bytes = rb;
                search.record(true)
            }
            Err(e) => {
                warn!("failed engine allocation, continuing search: {e:?}");
                search.record(false)
            }
        }
    }
    Ok(Pool {
        num_memories: search.next(),
        mapped_bytes,
    })
}

#[derive(Debug)]
struct Pool {
    num_memories: u32,
    mapped_bytes: usize,
}
impl Pool {
    /// Print a human-readable, tab-separated description of this structure.
    fn to_string(&self) -> String {
        let human_size = ByteSize::b(self.mapped_bytes as u64).display().si();
        format!(
            "{} memory slots\t{} reserved",
            self.num_memories, human_size
        )
    }
    /// Return the number of times more memory slots in `self` than `other`
    /// after normalizing by the mapped bytes sizes. Rounds to three decimal
    /// places arbitrarily; no significance intended.
    fn compare(&self, other: &Pool) -> f64 {
        let size_ratio = other.mapped_bytes as f64 / self.mapped_bytes as f64;
        let slots_ratio = self.num_memories as f64 / other.num_memories as f64;
        let times_more_efficient = slots_ratio * size_ratio;
        (times_more_efficient * 1000.0).round() / 1000.0
    }
}

/// Exponentially increase the `next` value until the attempts fail, then
/// perform a binary search to find the maximum attempted value that still
/// succeeds.
#[derive(Debug)]
struct ExponentialSearch {
    /// Determines if we are in the growth phase.
    growing: bool,
    /// The last successful value tried; this is the algorithm's lower bound.
    last: u32,
    /// The next value to try; this is the algorithm's upper bound.
    next: u32,
}
impl ExponentialSearch {
    fn new() -> Self {
        Self {
            growing: true,
            last: 0,
            next: 1,
        }
    }
    fn next(&self) -> u32 {
        self.next
    }
    fn record(&mut self, success: bool) {
        if !success {
            self.growing = false
        }
        let diff = if self.growing {
            (self.next - self.last) * 2
        } else {
            (self.next - self.last + 1) / 2
        };
        if success {
            self.last = self.next;
            self.next = self.next + diff;
        } else {
            self.next = self.next - diff;
        }
    }
    fn done(&self) -> bool {
        self.last == self.next
    }
}

/// Build a pool-allocated engine with `num_memories` slots.
fn build_engine(args: &Args, num_memories: u32, enable_mpk: Enabled) -> Result<usize> {
    // Configure the memory pool.
    let mut pool = PoolingAllocationConfig::default();
    let max_memory_size =
        usize::try_from(args.memory_size).expect("memory size should fit in `usize`");
    pool.max_memory_size(max_memory_size)
        .total_memories(num_memories)
        .memory_protection_keys(enable_mpk);

    // Configure the engine itself.
    let mut config = Config::new();
    if let Some(memory_reservation) = args.memory_reservation {
        config.memory_reservation(memory_reservation);
    }
    if let Some(memory_guard_size) = args.memory_guard_size {
        config.memory_guard_size(memory_guard_size);
    }
    config.allocation_strategy(InstanceAllocationStrategy::Pooling(pool));

    // Measure memory use before and after the engine is built.
    let mapped_bytes_before = num_bytes_mapped()?;
    let engine = Engine::new(&config)?;
    let mapped_bytes_after = num_bytes_mapped()?;

    // Ensure we actually use the engine somehow.
    engine.increment_epoch();

    let mapped_bytes = mapped_bytes_after - mapped_bytes_before;
    info!("{num_memories}-slot pool ({enable_mpk:?}): {mapped_bytes} bytes mapped");
    Ok(mapped_bytes)
}

/// Add up the sizes of all the mapped virtual memory regions for the current
/// Linux process.
///
/// This manually parses `/proc/self/maps` to avoid a rather-large `proc-maps`
/// dependency. We do expect this example to be Linux-specific anyways. For
/// reference, lines of that file look like:
///
/// ```text
/// 5652d4418000-5652d441a000 r--p 00000000 00:23 84629427 /usr/bin/...
/// ```
///
/// We parse the start and end addresses: <start>-<end> [ignore the rest].
#[cfg(target_os = "linux")]
fn num_bytes_mapped() -> Result<usize> {
    use std::fs::File;
    use std::io::{BufRead, BufReader};

    let file = File::open("/proc/self/maps")?;
    let reader = BufReader::new(file);
    let mut total = 0;
    for line in reader.lines() {
        let line = line?;
        let range = line
            .split_whitespace()
            .next()
            .ok_or(format_err!("parse failure: expected whitespace"))?;
        let mut addresses = range.split("-");
        let start = addresses.next().ok_or(format_err!(
            "parse failure: expected dash-separated address"
        ))?;
        let start = usize::from_str_radix(start, 16)?;
        let end = addresses.next().ok_or(format_err!(
            "parse failure: expected dash-separated address"
        ))?;
        let end = usize::from_str_radix(end, 16)?;

        total += end - start;
    }
    Ok(total)
}

#[cfg(not(target_os = "linux"))]
fn num_bytes_mapped() -> Result<usize> {
    wasmtime::bail!("this example can only read virtual memory maps on Linux")
}
Asynchronous Host Functions
You can also browse this source code online and clone the wasmtime repository to run the example locally.
This example demonstrates configuring Wasmtime for asynchronous operation and calling async host functions from wasm.
Wasm Source
(module
  (import "host" "print" (func $print (param i32)))
  (func $fibonacci (param $n i32) (result i32)
    (if
      (i32.lt_s (local.get $n) (i32.const 2))
      (then (return (local.get $n)))
    )
    (i32.add
      (call $fibonacci (i32.sub (local.get $n) (i32.const 1)))
      (call $fibonacci (i32.sub (local.get $n) (i32.const 2)))
    )
  )
  (func $print_fibonacci (param $n i32)
    (call $fibonacci (local.get $n))
    (call $print)
  )
  (export "print_fibonacci" (func $print_fibonacci))
)
Host Source
/*
Example of instantiating of the WebAssembly module and invoking its exported
function.

You can compile and run this example on Linux with:

   cargo build --release -p wasmtime-c-api
   c++ examples/async.cc \
       -I crates/c-api/include \
       target/release/libwasmtime.a \
       -std=c++11 \
       -lpthread -ldl -lm \
       -o async
   ./async

Note that on Windows and macOS the command will be similar, but you'll need
to tweak the `-lpthread` and such annotations.

You can also build using cmake:

mkdir build && cd build && cmake .. && cmake --build . --target wasmtime-async
*/

#include <array>
#include <assert.h>
#include <chrono>
#include <cstdlib>
#include <fstream>
#include <future>
#include <iostream>
#include <memory>
#include <optional>
#include <sstream>
#include <streambuf>
#include <string>
#include <thread>
#include <wasmtime.h>

namespace {

template <typename T, void (*fn)(T *)> struct deleter {
  void operator()(T *ptr) { fn(ptr); }
};
template <typename T, void (*fn)(T *)>
using handle = std::unique_ptr<T, deleter<T, fn>>;

void exit_with_error(std::string msg, wasmtime_error_t *err,
                     wasm_trap_t *trap) {
  std::cerr << "error: " << msg << std::endl;
  wasm_byte_vec_t error_message;
  if (err) {
    wasmtime_error_message(err, &error_message);
  } else {
    wasm_trap_message(trap, &error_message);
  }
  std::cerr << std::string(error_message.data, error_message.size) << std::endl;
  wasm_byte_vec_delete(&error_message);
  std::exit(1);
}

handle<wasm_engine_t, wasm_engine_delete> create_engine() {
  wasm_config_t *config = wasm_config_new();
  assert(config != nullptr);
  wasmtime_config_consume_fuel_set(config, true);
  handle<wasm_engine_t, wasm_engine_delete> engine;
  // this takes ownership of config
  engine.reset(wasm_engine_new_with_config(config));
  assert(engine);
  return engine;
}

handle<wasmtime_store_t, wasmtime_store_delete>
create_store(wasm_engine_t *engine) {
  handle<wasmtime_store_t, wasmtime_store_delete> store;
  store.reset(wasmtime_store_new(engine, nullptr, nullptr));
  assert(store);
  return store;
}

handle<wasmtime_linker_t, wasmtime_linker_delete>
create_linker(wasm_engine_t *engine) {
  handle<wasmtime_linker_t, wasmtime_linker_delete> linker;
  linker.reset(wasmtime_linker_new(engine));
  assert(linker);
  return linker;
}

handle<wasmtime_module_t, wasmtime_module_delete>
compile_wat_module_from_file(wasm_engine_t *engine,
                             const std::string &filename) {
  std::ifstream t(filename);
  std::stringstream buffer;
  buffer << t.rdbuf();
  if (t.bad()) {
    std::cerr << "error reading file: " << filename << std::endl;
    std::exit(1);
  }
  const std::string &content = buffer.str();
  wasm_byte_vec_t wasm_bytes;
  handle<wasmtime_error_t, wasmtime_error_delete> error{
      wasmtime_wat2wasm(content.data(), content.size(), &wasm_bytes)};
  if (error) {
    exit_with_error("failed to parse wat", error.get(), nullptr);
  }
  wasmtime_module_t *mod_ptr = nullptr;
  error.reset(wasmtime_module_new(engine,
                                  reinterpret_cast<uint8_t *>(wasm_bytes.data),
                                  wasm_bytes.size, &mod_ptr));
  wasm_byte_vec_delete(&wasm_bytes);
  handle<wasmtime_module_t, wasmtime_module_delete> mod{mod_ptr};
  if (!mod) {
    exit_with_error("failed to compile module", error.get(), nullptr);
  }
  return mod;
}

class printer_thread_state {
public:
  void set_value_to_print(int32_t v) {
    _print_finished_future = _print_finished.get_future();
    _value_to_print.set_value(v);
  }
  int32_t get_value_to_print() { return _value_to_print.get_future().get(); }

  bool print_is_pending() const {
    return _print_finished_future.valid() &&
           _print_finished_future.wait_for(std::chrono::seconds(0)) !=
               std::future_status::ready;
  }
  void wait_for_print_result() const { _print_finished_future.wait(); }
  void get_print_result() { _print_finished_future.get(); }
  void set_print_success() { _print_finished.set_value(); }

private:
  std::promise<int32_t> _value_to_print;
  std::promise<void> _print_finished;
  std::future<void> _print_finished_future;
};

printer_thread_state printer_state;

struct async_call_env {
  wasm_trap_t **trap_ret;
};

bool poll_print_finished_state(void *env) {
  std::cout << "polling async host function result" << std::endl;
  auto *async_env = static_cast<async_call_env *>(env);
  // Don't block, just poll the future state.
  if (printer_state.print_is_pending()) {
    return false;
  }
  try {
    printer_state.get_print_result();
  } catch (const std::exception &ex) {
    std::string msg = ex.what();
    *async_env->trap_ret = wasmtime_trap_new(msg.data(), msg.size());
  }
  return true;
}
} // namespace

int main() {
  // A thread that will async perform host function calls.
  std::thread printer_thread([]() {
    int32_t value_to_print = printer_state.get_value_to_print();
    std::cout << "received value to print!" << std::endl;
    std::this_thread::sleep_for(std::chrono::milliseconds(500));
    std::cout << "printing: " << value_to_print << std::endl;
    std::this_thread::sleep_for(std::chrono::milliseconds(500));
    std::cout << "signaling that value is printed" << std::endl;
    printer_state.set_print_success();
  });

  handle<wasmtime_error_t, wasmtime_error_delete> error;

  auto engine = create_engine();
  auto store = create_store(engine.get());
  // This pointer is unowned.
  auto *context = wasmtime_store_context(store.get());
  // Configure the store to periodically yield control
  wasmtime_context_set_fuel(context, 100000);
  wasmtime_context_fuel_async_yield_interval(context, /*interval=*/10000);

  auto compiled_module =
      compile_wat_module_from_file(engine.get(), "examples/async.wat");

  auto linker = create_linker(engine.get());
  static std::string host_module_name = "host";
  static std::string host_func_name = "print";

  // Declare our async host function's signature and definition.
  wasm_valtype_vec_t arg_types;
  wasm_valtype_vec_t result_types;
  wasm_valtype_vec_new_uninitialized(&arg_types, 1);
  arg_types.data[0] = wasm_valtype_new_i32();
  wasm_valtype_vec_new_empty(&result_types);
  handle<wasm_functype_t, wasm_functype_delete> functype{
      wasm_functype_new(&arg_types, &result_types)};

  error.reset(wasmtime_linker_define_async_func(
      linker.get(), host_module_name.data(), host_module_name.size(),
      host_func_name.data(), host_func_name.size(), functype.get(),
      [](void *, wasmtime_caller_t *, const wasmtime_val_t *args, size_t,
         wasmtime_val_t *, size_t, wasm_trap_t **trap_ret,
         wasmtime_async_continuation_t *continuation_ret) {
        std::cout << "invoking async host function" << std::endl;
        printer_state.set_value_to_print(args[0].of.i32);

        continuation_ret->callback = &poll_print_finished_state;
        continuation_ret->env = new async_call_env{trap_ret};
        continuation_ret->finalizer = [](void *env) {
          std::cout << "deleting async_call_env" << std::endl;
          delete static_cast<async_call_env *>(env);
        };
      },
      /*env=*/nullptr, /*finalizer=*/nullptr));
  if (error) {
    exit_with_error("failed to define host function", error.get(), nullptr);
  }

  // Now instantiate our module using the linker.
  handle<wasmtime_call_future_t, wasmtime_call_future_delete> call_future;
  wasm_trap_t *trap_ptr = nullptr;
  wasmtime_error_t *error_ptr = nullptr;
  wasmtime_instance_t instance;
  call_future.reset(wasmtime_linker_instantiate_async(
      linker.get(), context, compiled_module.get(), &instance, &trap_ptr,
      &error_ptr));
  while (!wasmtime_call_future_poll(call_future.get())) {
    std::cout << "yielding instantiation!" << std::endl;
  }
  error.reset(error_ptr);
  handle<wasm_trap_t, wasm_trap_delete> trap{trap_ptr};
  if (error || trap) {
    exit_with_error("failed to instantiate module", error.get(), trap.get());
  }
  // delete call future - it's no longer needed
  call_future = nullptr;
  // delete the linker now that we've created our instance
  linker = nullptr;

  // Grab our exported function
  static std::string guest_func_name = "print_fibonacci";
  wasmtime_extern_t guest_func_extern;
  bool found =
      wasmtime_instance_export_get(context, &instance, guest_func_name.data(),
                                   guest_func_name.size(), &guest_func_extern);
  assert(found);
  assert(guest_func_extern.kind == WASMTIME_EXTERN_FUNC);

  // Now call our print_fibonacci function with n=15
  std::array<wasmtime_val_t, 1> args;
  args[0].kind = WASMTIME_I32;
  args[0].of.i32 = 15;
  std::array<wasmtime_val_t, 0> results;
  call_future.reset(wasmtime_func_call_async(
      context, &guest_func_extern.of.func, args.data(), args.size(),
      results.data(), results.size(), &trap_ptr, &error_ptr));
  // Poll the execution of the call. This can yield control back if there is an
  // async host call or if we ran out of fuel.
  while (!wasmtime_call_future_poll(call_future.get())) {
    // if we have an async host call pending then wait for that future to finish
    // before continuing.
    if (printer_state.print_is_pending()) {
      std::cout << "waiting for async host function to complete" << std::endl;
      printer_state.wait_for_print_result();
      std::cout << "async host function completed" << std::endl;
      continue;
    }
    // Otherwise we ran out of fuel and yielded.
    std::cout << "yield!" << std::endl;
  }
  // Extract if there were failures or traps after poll returns that execution
  // completed.
  error.reset(error_ptr);
  trap.reset(trap_ptr);
  if (error || trap) {
    exit_with_error("running guest function failed", error.get(), trap.get());
  }
  call_future = nullptr;
  // At this point, if our host function returned results they would be
  // available in the `results` array.
  std::cout << "async function call complete!" << std::endl;

  // Join our thread and exit.
  printer_thread.join();
  return 0;
}
Debugging WebAssembly
Wasmtime currently provides the following support for debugging misbehaving WebAssembly:
-
We can live debug and step through the guest Wasm on its own.
-
We can live debug and step through the guest Wasm and the host at the same time with
gdborlldb. -
When a Wasm guest traps, we can generate Wasm core dumps, that can be consumed by other tools for post-mortem analysis.
Native (Wasm + runtime) Debugging with gdb and lldb
The following steps describe how to use gdb or lldb to debug both the Wasm
guest and the host (i.e. the Wasmtime CLI or your Wasmtime-embedding program) at
the same time:
-
Compile your WebAssembly with debug info enabled, usually
-g; for example:clang foo.c -g -o foo.wasm -
Run Wasmtime with the debug info enabled; this is
-D debug-infofrom the CLI andConfig::debug_info(true)in an embedding (e.g. see debugging in a Rust embedding). It's also recommended to use-O opt-level=0for better inspection of local variables if desired. -
Use a supported debugger:
lldb -- wasmtime run -D debug-info foo.wasmgdb --args wasmtime run -D debug-info -O opt-level=0 foo.wasm
If you run into trouble, the following discussions might help:
-
On MacOS with LLDB you may need to run:
settings set plugin.jit-loader.gdb.enable on(#1953) -
With LLDB, call
__vmctx.set()to set the current context before calling any dereference operators (#1482):(lldb) p __vmctx->set() (lldb) p *foo -
The address of the start of instance memory can be found in
__vmctx->memory -
On Windows you may experience degraded WASM compilation throughput due to the enablement of additional native heap checks when under the debugger by default. You can set the environment variable
_NO_DEBUG_HEAPto1to disable them.
Debugging WebAssembly with Core Dumps
Wasmtime can be configured to generate the standard Wasm core dump
format whenever guest Wasm programs trap. These core dumps can then be
consumed by external tooling (such as wasmgdb) for post-mortem analysis.
This page focuses on generating and inspecting core dumps via the Wasmtime
command-line interface. For details on how to generate core dumps via the
wasmtime embedding API, see Core Dumps in a Rust
Embedding.
First, we need to compile some code to Wasm that can trap. Consider the following Rust code:
// trap.rs

fn main() {
    foo(42);
}

fn foo(x: u32) {
    bar(x);
}

fn bar(x: u32) {
    baz(x);
}

fn baz(x: u32) {
    assert!(x != 42);
}
We can compile it to Wasm with the following command:
rustc --target wasm32-wasip1 -o ./trap.wasm ./trap.rs
Next, we can run it in Wasmtime and capture a core dump when it traps:
$ wasmtime -D coredump=./trap.coredump ./trap.wasm
thread 'main' panicked at /home/nick/scratch/trap.rs:14:5:
assertion failed: x != 42
note: run with `RUST_BACKTRACE=1` environment variable to display a backtrace
Error: failed to run main module `/home/nick/scratch/trap.wasm`

Caused by:
    0: core dumped at /home/nick/scratch/trap.coredump
    1: failed to invoke command default
    2: wasm coredump generated while executing store_name:
       modules:
         <module>
       instances:
         Instance(store=1, index=1)
       memories:
         Memory(store=1, index=1)
       globals:
         Global(store=1, index=0)
       backtrace:
       error while executing at wasm backtrace:
           0: 0x5961 - <unknown>!__rust_start_panic
           1: 0x562a - <unknown>!rust_panic
           2: 0x555d - <unknown>!std::panicking::rust_panic_with_hook::h58e7d0b3d70e95b6
           3: 0x485d - <unknown>!std::panicking::begin_panic_handler::{{closure}}::h1853004619879cfd
           4: 0x47bd - <unknown>!std::sys_common::backtrace::__rust_end_short_backtrace::hed32bc5557405634
           5: 0x4f02 - <unknown>!rust_begin_unwind
           6: 0xac01 - <unknown>!core::panicking::panic_fmt::h53ca5bf48b428895
           7: 0xb1c5 - <unknown>!core::panicking::panic::h62c2c2bb054da7e1
           8:  0x661 - <unknown>!trap::baz::h859f39b65389c077
           9:  0x616 - <unknown>!trap::bar::h7ad12f9c5b730d17
          10:  0x60a - <unknown>!trap::foo::ha69c95723611c1a0
          11:  0x5fe - <unknown>!trap::main::hdfcd9f2d150fc3dc
          12:  0x434 - <unknown>!core::ops::function::FnOnce::call_once::h24336e950fb97d1e
          13:  0x40b - <unknown>!std::sys_common::backtrace::__rust_begin_short_backtrace::h2b37384d2b1a57ff
          14:  0x4ec - <unknown>!std::rt::lang_start::{{closure}}::he86eb1b6ac6d7501
          15: 0x24f7 - <unknown>!std::rt::lang_start_internal::h21f6a1d8f3633b54
          16:  0x497 - <unknown>!std::rt::lang_start::h7d256f21902ff32b
          17:  0x687 - <unknown>!__main_void
          18:  0x3e6 - <unknown>!_start
       note: using the `WASMTIME_BACKTRACE_DETAILS=1` environment variable may show more debugging information
You now have a core dump at ./trap.coredump that can be consumed by external
tooling to do post-mortem analysis of the failure.
Profiling WebAssembly
One of WebAssembly's major goals is to be quite close to native code in terms of performance, so typically when executing Wasm you'll be quite interested in how well your Wasm module is performing! From time to time you might want to dive a bit deeper into the performance of your Wasm, and this is where profiling comes into the picture.
For best results, ideally you'd use hardware performance counters for your timing measurements. However, that requires special support from your CPU and operating system. Because Wasmtime is a JIT, that also requires hooks from Wasmtime to your platform's native profiling tools.
As a result, Wasmtime support for native profiling is limited to certain platforms. See the following sections of this book if you're using these platforms:
-
On Linux, we support perf.
-
For Intel's x86 CPUs on Linux or Windows, we support VTune.
-
For Linux and macOS, we support samply.
-
For everything else, see the cross-platform profiler.
The native profilers can measure time spent in WebAssembly guest code as well as time spent in the Wasmtime host and potentially even time spent in the kernel. This provides a comprehensive view of performance.
The cross-platform-profiler can only measure time spent in WebAssembly guest code, and its timing measurements are not as precise as the native profilers. However, it works on every platform that Wasmtime supports.
Using perf on Linux
One profiler supported by Wasmtime is the perf
profiler for Linux. This is
an extremely powerful profiler with lots of documentation on the web, but for
the rest of this section we'll assume you're running on Linux and already have
perf installed.
There are two profiling agents for perf:
- a very simple one that will map code regions to symbol names:
perfmap. - a more detailed one that can provide additional information and mappings between the source
language statements and generated JIT code:
jitdump.
Profiling with perfmap
Simple profiling support with perf generates a "perf map" file that the perf CLI will
automatically look for, when running into unresolved symbols. This requires runtime support from
Wasmtime itself, so you will need to manually change a few things to enable profiling support in
your application. Enabling runtime support depends on how you're using Wasmtime:
-
Rust API - you'll want to call the [
Config::profiler] method withProfilingStrategy::PerfMapto enable profiling of your wasm modules. -
C API - you'll want to call the
wasmtime_config_profiler_setAPI with aWASMTIME_PROFILING_STRATEGY_PERFMAPvalue. -
Command Line - you'll want to pass the
--profile=perfmapflag on the command line.
Once perfmap support is enabled, you'll use perf record like usual to record
your application's performance.
For example if you're using the CLI, you'll execute:
perf record -k mono wasmtime --profile=perfmap foo.wasm
This will create a perf.data file as per usual, but it will also create a
/tmp/perf-XXXX.map file. This extra .map file is the perf map file which is
specified by perf and Wasmtime generates at runtime.
After that you can explore the perf.data profile as you usually would, for example with:
perf report --input perf.data
You should be able to see time spent in wasm functions, generate flamegraphs based on that, etc.. You should also see entries for wasm functions show up as one function and the name of each function matches the debug name section in the wasm file.
Note that support for perfmap is still relatively new in Wasmtime, so if you have any problems, please don't hesitate to file an issue!
Profiling with jitdump
Profiling support with perf uses the "jitdump" support in the perf CLI. This
requires runtime support from Wasmtime itself, so you will need to manually
change a few things to enable profiling support in your application. First
you'll want to make sure that Wasmtime is compiled with the jitdump Cargo
feature (which is enabled by default). Otherwise enabling runtime support
depends on how you're using Wasmtime:
-
Rust API - you'll want to call the [
Config::profiler] method withProfilingStrategy::JitDumpto enable profiling of your wasm modules. -
C API - you'll want to call the
wasmtime_config_profiler_setAPI with aWASMTIME_PROFILING_STRATEGY_JITDUMPvalue. -
Command Line - you'll want to pass the
--profile=jitdumpflag on the command line.
Once jitdump support is enabled, you'll use perf record like usual to record
your application's performance. You'll need to also be sure to pass the
--clockid mono or -k mono flag to perf record.
For example if you're using the CLI, you'll execute:
perf record -k mono wasmtime --profile=jitdump foo.wasm
This will create a perf.data file as per usual, but it will also create a
jit-XXXX.dump file. This extra *.dump file is the jitdump file which is
specified by perf and Wasmtime generates at runtime.
The next thing you need to do is to merge the *.dump file into the
perf.data file, which you can do with the perf inject command:
perf inject --jit --input perf.data --output perf.jit.data
This will read perf.data, automatically pick up the *.dump file that's
correct, and then create perf.jit.data which merges all the JIT information
together. This should also create a lot of jitted-XXXX-N.so files in the
current directory which are ELF images for all the JIT functions that were
created by Wasmtime.
After that you can explore the perf.jit.data profile as you usually would,
for example with:
perf report --input perf.jit.data
You should be able to annotate wasm functions and see their raw assembly. You should also see entries for wasm functions show up as one function and the name of each function matches the debug name section in the wasm file.
Note that support for jitdump is still relatively new in Wasmtime, so if you have any problems, please don't hesitate to file an issue!
perf and DWARF information
If the jitdump profile doesn't give you enough information by default, you can
also enable dwarf debug information to be generated for JIT code which should
give the perf profiler more information about what's being profiled. This can
include information like more descriptive function names, filenames, and line
numbers.
Enabling dwarf debug information for JIT code depends on how you're using Wasmtime:
-
Rust API - you'll want to call the
Config::debug_infomethod. -
C API - you'll want to call the
wasmtime_config_debug_info_setAPI. -
Command Line - you'll want to pass the
-gflag on the command line.
You shouldn't need to do anything else to get this information into perf. The
perf collection data should automatically pick up all this dwarf debug
information.
perf example
Let's run through a quick example with perf to get the feel for things. First
let's take a look at some wasm:
fn main() {
    let n = 42;
    println!("fib({}) = {}", n, fib(n));
}

fn fib(n: u32) -> u32 {
    if n <= 2 {
        1
    } else {
        fib(n - 1) + fib(n - 2)
    }
}
To collect perf information for this wasm module we'll execute:
$ rustc --target wasm32-wasip1 fib.rs -O
$ perf record -k mono wasmtime --profile=jitdump fib.wasm
fib(42) = 267914296
[ perf record: Woken up 1 times to write data ]
[ perf record: Captured and wrote 0.147 MB perf.data (3435 samples) ]
$ perf inject --jit --input perf.data --output perf.jit.data
And we should have all our information now! We can execute perf report for
example to see that 99% of our runtime (as expected) is spent in our fib
function. Note that the symbol has been demangled to fib::fib which is what
the Rust symbol is:
perf report --input perf.jit.data
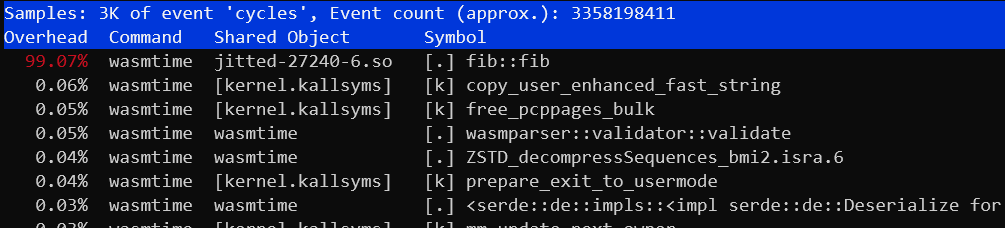
Alternatively we could also use perf annotate to take a look at the
disassembly of the fib function, seeing what the JIT generated:
perf annotate --input perf.jit.data

Using VTune
VTune is a popular performance profiling tool that targets both 32-bit and 64-bit x86 architectures. The tool collects profiling data during runtime and then, either through the command line or GUI, provides a variety of options for viewing and analyzing that data. VTune Profiler is available in both commercial and free options. The free, downloadable version is available here and is backed by a community forum for support. This version is appropriate for detailed analysis of your Wasm program.
VTune support in Wasmtime is provided through the JIT profiling APIs from the
ittapi library. This library provides code generators (or the runtimes that
use them) a way to report JIT activities. The APIs are implemented in a static
library (see ittapi source) which Wasmtime links to when VTune support is
specified through the vtune Cargo feature flag; this feature is not enabled by
default. When the VTune collector is run, the ittapi library collects
Wasmtime's reported JIT activities. This connection to ittapi is provided by
the ittapi-rs crate.
For more information on VTune and the analysis tools it provides see its documentation.
Turn on VTune support
For JIT profiling with VTune, Wasmtime currently builds with the vtune feature
enabled by default. This ensures the compiled binary understands how to inform
the ittapi library of JIT events. But it must still be enabled at
runtime--enable runtime support based on how you use Wasmtime:
-
Rust API - call the [
Config::profiler] method withProfilingStrategy::VTuneto enable profiling of your wasm modules. -
C API - call the
wasmtime_config_profiler_setAPI with aWASMTIME_PROFILING_STRATEGY_VTUNEvalue. -
Command Line - pass the
--profile=vtuneflag on the command line.
Profiling Wasmtime itself
Note that VTune is capable of profiling a single process or all system
processes. Like perf, VTune is capable of profiling the Wasmtime runtime
itself without any added support. However, the ittapi APIs also provide an
interface for marking the start and stop of code regions for easy isolation in
the VTune Profiler. Support for these APIs is expected to be added in the
future.
Example: Getting Started
With VTune properly installed, if you are using the CLI execute:
cargo build
vtune -run-pass-thru=--no-altstack -collect hotspots target/debug/wasmtime --profile=vtune foo.wasm
This command tells the VTune collector (vtune) to collect hot spot
profiling data as Wasmtime is executing foo.wasm. The --profile=vtune flag enables
VTune support in Wasmtime so that the collector is also alerted to JIT events
that take place during runtime. The first time this is run, the result of the
command is a results directory r000hs/ which contains profiling data for
Wasmtime and the execution of foo.wasm. This data can then be read and
displayed via the command line or via the VTune GUI by importing the result.
Example: CLI Collection
Using a familiar algorithm, we'll start with the following Rust code:
fn main() {
    let n = 45;
    println!("fib({}) = {}", n, fib(n));
}

fn fib(n: u32) -> u32 {
    if n <= 2 {
        1
    } else {
        fib(n - 1) + fib(n - 2)
    }
}
We compile the example to Wasm:
rustc --target wasm32-wasip1 fib.rs -C opt-level=z -C lto=yes
Then we execute the Wasmtime runtime (built with the vtune feature and
executed with the --profile=vtune flag to enable reporting) inside the VTune CLI
application, vtune, which must already be installed and available on the
path. To collect hot spot profiling information, we execute:
$ rustc --target wasm32-wasip1 fib.rs -C opt-level=z -C lto=yes
$ vtune -run-pass-thru=--no-altstack -v -collect hotspots target/debug/wasmtime --profile=vtune fib.wasm
fib(45) = 1134903170
amplxe: Collection stopped.
amplxe: Using result path /home/jlb6740/wasmtime/r000hs
amplxe: Executing actions  7 % Clearing the database
amplxe: The database has been cleared, elapsed time is 0.239 seconds.
amplxe: Executing actions 14 % Updating precomputed scalar metrics
amplxe: Raw data has been loaded to the database, elapsed time is 0.792 seconds.
amplxe: Executing actions 19 % Processing profile metrics and debug information
...
Top Hotspots
Function                                                                                      Module          CPU Time
--------------------------------------------------------------------------------------------  --------------  --------
h2bacf53cb3845acf                                                                             [Dynamic code]    3.480s
__memmove_avx_unaligned_erms                                                                  libc.so.6         0.222s
cranelift_codegen::ir::instructions::InstructionData::opcode::hee6f5b6a72fc684e               wasmtime          0.122s
core::ptr::slice_from_raw_parts::hc5cb6f1b39a0e7a1                                            wasmtime          0.066s
_$LT$usize$u20$as$u20$core..slice..SliceIndex$LT$$u5b$T$u5d$$GT$$GT$::get::h70c7f142eeeee8bd  wasmtime          0.066s
Example: Importing Results into GUI
Results directories created by the vtune CLI can be imported in the VTune GUI
by clicking "Open > Result". Below is a visualization of the collected data as
seen in VTune's GUI:
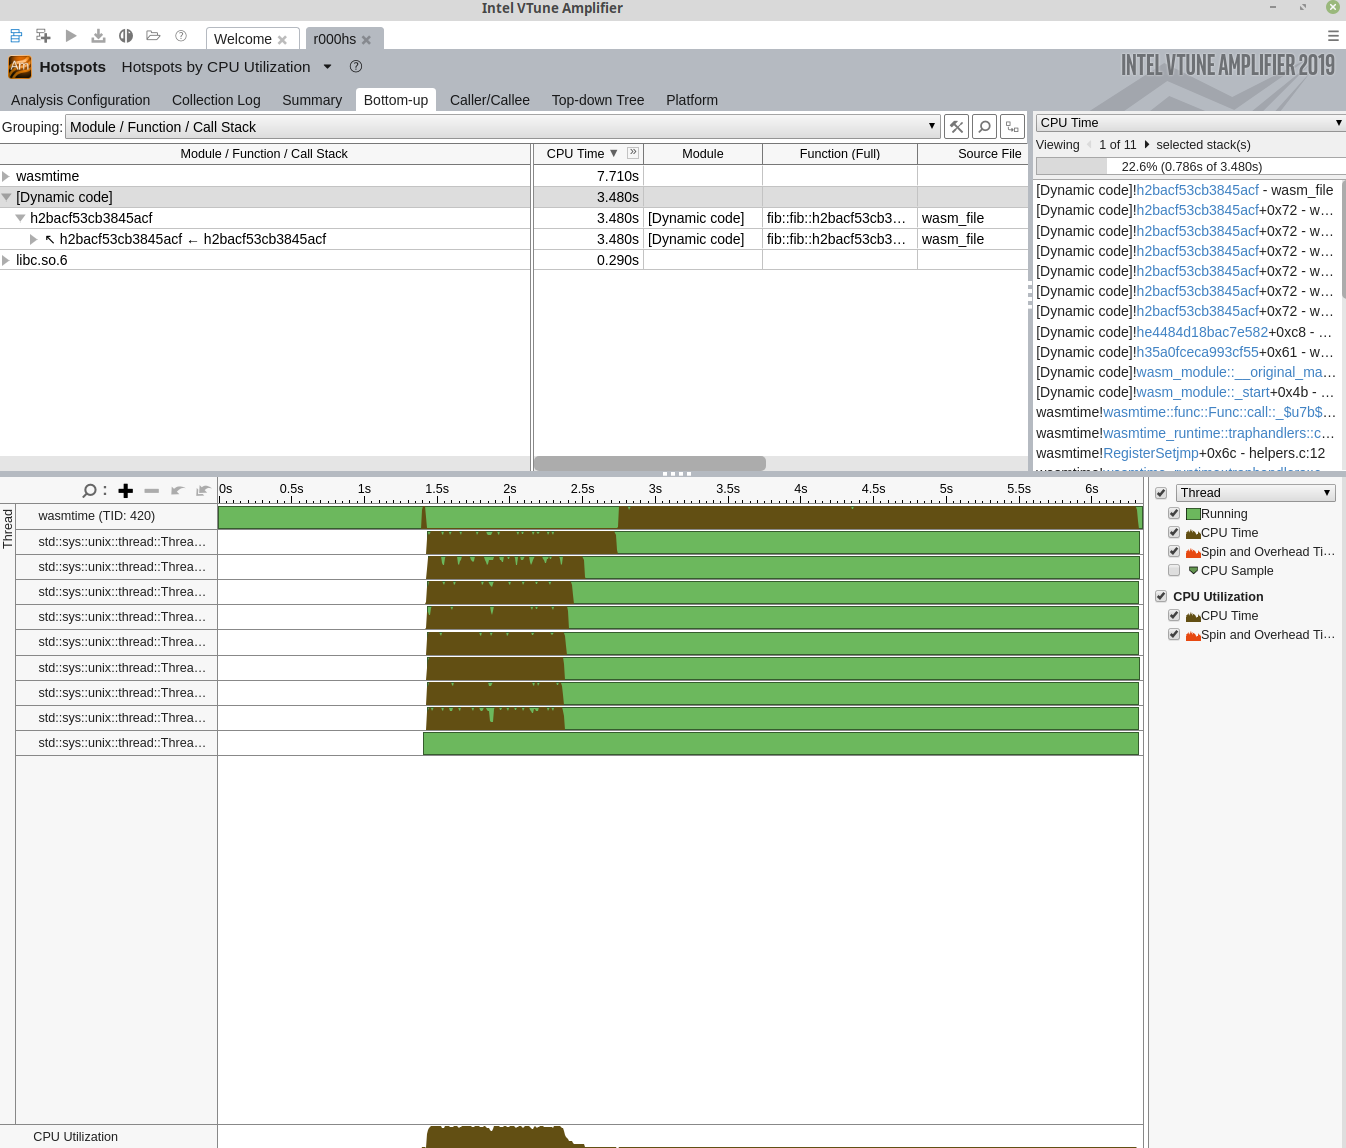
Example: GUI Collection
VTune can collect data in multiple ways (see vtune CLI discussion above);
another way is to use the VTune GUI directly. A standard work flow might look
like:
- Open VTune Profiler
- "Configure Analysis" with
- "Application" set to
/path/to/wasmtime(e.g.,target/debug/wasmtime) - "Application parameters" set to
--profile=vtune /path/to/module.wasm - "Working directory" set as appropriate
- Enable "Hardware Event-Based Sampling," which may require some system
configuration, e.g.
sysctl -w kernel.perf_event_paranoid=0
- "Application" set to
- Start the analysis
Using the samply Profiler on Linux and macOS
One profiler supported by Wasmtime is samply for Linux and macOS. As of 17th July 2023, the
latest version of samply (on crates.io) is 0.11.0 which does not seem to support perfmaps. To use this, you either need a
newer version of samply, if by the time you read this, a newer version has been released, or you can build samply from source.
Profiling with perfmap
Simple profiling support with samply generates a "perfmap" file that the samply CLI will
automatically look for, when running into unresolved symbols. This requires runtime support from
Wasmtime itself, so you will need to manually change a few things to enable profiling support in
your application. Enabling runtime support depends on how you're using Wasmtime:
-
Rust API - you'll want to call the [
Config::profiler] method withProfilingStrategy::PerfMapto enable profiling of your wasm modules. -
C API - you'll want to call the
wasmtime_config_profiler_setAPI with aWASMTIME_PROFILING_STRATEGY_PERFMAPvalue. -
Command Line - you'll want to pass the
--profile=perfmapflag on the command line.
Once perfmap support is enabled, you'll use samply record like usual to record
your application's performance.
For example if you're using the CLI, you'll execute:
samply record wasmtime --profile=perfmap foo.wasm
This will record your application's performance and open the Firefox profiler UI to view the
results. It will also dump its own profile data to a json file (called profile.json) in the current directory.
Note that support for perfmap is still relatively new in Wasmtime, so if you have any problems, please don't hesitate to file an issue!
Using Wasmtime's cross-platform profiler
The guest profiling strategy enables in-process sampling and will write the captured profile to a file which can be viewed at https://profiler.firefox.com/.
To use this profiler with the Wasmtime CLI, pass the
--profile=guest[,path[,interval]] flag.
pathis where to write the profile,wasmtime-guest-profile.jsonby defaultintervalis the duration between samples, 10ms by default
When used with -W timeout=N, the timeout will be rounded up to the nearest
multiple of the profiling interval.
Building a Minimal Wasmtime embedding
Wasmtime embeddings may wish to optimize for binary size and runtime footprint to fit on a small system. This documentation is intended to guide some features of Wasmtime and how to best produce a minimal build of Wasmtime.
An example embedding of Wasmtime optimized for size is Wasefire which runs with 256k RAM and ~300k flash. In this embedding Pulley was used for an execution engine as well.
Building a minimal CLI
Note: the exact numbers in this section were last updated on 2024-12-12 on a Linux x86_64 host. For up-to-date numbers consult the artifacts in the
devrelease of Wasmtime where themin/lib/libwasmtime.sobinary represents the culmination of these steps.
Many Wasmtime embeddings go through the wasmtime crate as opposed to the
Wasmtime C API libwasmtime.so, but to start out let's take a look at
minimizing the dynamic library as a case study. By default the C API is
relatively large:
$ cargo build -p wasmtime-c-api
$ ls -lh ./target/debug/libwasmtime.so
-rwxrwxr-x 2 alex alex 260M Dec 12 07:46 target/debug/libwasmtime.so
The easiest size optimization is to compile with optimizations. This will strip lots of dead code and additionally generate much less debug information by default
$ cargo build -p wasmtime-c-api --release
$ ls -lh ./target/release/libwasmtime.so
-rwxrwxr-x 2 alex alex 19M Dec 12 07:46 target/release/libwasmtime.so
Much better, but still relatively large! The next thing that can be done is to disable the default features of the C API. This will remove all optional functionality from the crate and strip it down to the bare bones functionality.
$ cargo build -p wasmtime-c-api --release --no-default-features
$ ls -lh ./target/release/libwasmtime.so
-rwxrwxr-x 2 alex alex 2.1M Dec 12 07:47 target/release/libwasmtime.so
Note that this library is stripped to the bare minimum of functionality which
notably means it does not have a compiler for WebAssembly files. This means that
compilation is no longer supported meaning that *.cwasm files must used to
create a module. Additionally error messages will be worse in this mode as less
contextual information is provided.
The final Wasmtime-specific optimization you can apply is to disable logging
statements. Wasmtime and its dependencies make use of the log
crate and tracing crate for
debugging and diagnosing. For a minimal build this isn't needed though so this
can all be disabled through Cargo features to shave off a small amount of code.
Note that for custom embeddings you'd need to replicate the disable-logging
feature which sets the max_level_off feature for the log and tracing
crate.
$ cargo build -p wasmtime-c-api --release --no-default-features --features disable-logging
$ ls -lh ./target/release/libwasmtime.so
-rwxrwxr-x 2 alex alex 2.1M Dec 12 07:49 target/release/libwasmtime.so
At this point the next line of tricks to apply to minimize binary size are
general tricks-of-the-trade for Rust
programs and are no longer
specific to Wasmtime. For example the first thing that can be done is to
optimize for size rather than speed via rustc's s optimization level.
This uses Cargo's environment-variable based configuration
via the CARGO_PROFILE_RELEASE_OPT_LEVEL=s environment variable to configure
this.
$ export CARGO_PROFILE_RELEASE_OPT_LEVEL=s
$ cargo build -p wasmtime-c-api --release --no-default-features --features disable-logging
$ ls -lh ./target/release/libwasmtime.so
-rwxrwxr-x 2 alex alex 2.4M Dec 12 07:49 target/release/libwasmtime.so
Note that the size has increased here slightly instead of going down. Optimizing for speed-vs-size can affect a number of heuristics in LLVM so it's best to test out locally what's best for your embedding. Further examples below continue to pass this flag since by the end it will produce a smaller binary than the default optimization level of "3" for release mode. You may wish to also try an optimization level of "2" and see which produces a smaller build for you.
After optimizations levels the next compilation setting to configure is Rust's "panic=abort" mode where panics translate to process aborts rather than unwinding. This removes landing pads from code as well as unwind tables from the executable.
$ export CARGO_PROFILE_RELEASE_OPT_LEVEL=s
$ export CARGO_PROFILE_RELEASE_PANIC=abort
$ cargo build -p wasmtime-c-api --release --no-default-features --features disable-logging
$ ls -lh ./target/release/libwasmtime.so
-rwxrwxr-x 2 alex alex 2.0M Dec 12 07:49 target/release/libwasmtime.so
Next, if the compile time hit is acceptable, LTO can be enabled to provide
deeper opportunities for compiler optimizations to remove dead code and
deduplicate. Do note that this will take a significantly longer amount of time
to compile than previously. Here LTO is configured with
CARGO_PROFILE_RELEASE_LTO=true.
$ export CARGO_PROFILE_RELEASE_OPT_LEVEL=s
$ export CARGO_PROFILE_RELEASE_PANIC=abort
$ export CARGO_PROFILE_RELEASE_LTO=true
$ cargo build -p wasmtime-c-api --release --no-default-features --features disable-logging
$ ls -lh ./target/release/libwasmtime.so
-rwxrwxr-x 2 alex alex 1.2M Dec 12 07:50 target/release/libwasmtime.so
Similar to LTO above rustc can be further instructed to place all crates into
their own single object file instead of multiple by default. This again
increases compile times. Here that's done with
CARGO_PROFILE_RELEASE_CODEGEN_UNITS=1.
$ export CARGO_PROFILE_RELEASE_OPT_LEVEL=s
$ export CARGO_PROFILE_RELEASE_PANIC=abort
$ export CARGO_PROFILE_RELEASE_LTO=true
$ export CARGO_PROFILE_RELEASE_CODEGEN_UNITS=1
$ cargo build -p wasmtime-c-api --release --no-default-features --features disable-logging
$ ls -lh ./target/release/libwasmtime.so
-rwxrwxr-x 2 alex alex 1.2M Dec 12 07:50 target/release/libwasmtime.so
Note that with LTO using a single codegen unit may only have marginal benefit. If not using LTO, however, a single codegen unit will likely provide benefit over the default 16 codegen units.
One final flag before getting to nightly features is to strip debug information
from the standard library. In --release mode Cargo by default doesn't generate
debug information for local crates, but the Rust standard library may have debug
information still included with it. This is configured via
CARGO_PROFILE_RELEASE_STRIP=debuginfo
$ export CARGO_PROFILE_RELEASE_OPT_LEVEL=s
$ export CARGO_PROFILE_RELEASE_PANIC=abort
$ export CARGO_PROFILE_RELEASE_LTO=true
$ export CARGO_PROFILE_RELEASE_CODEGEN_UNITS=1
$ export CARGO_PROFILE_RELEASE_STRIP=debuginfo
$ cargo build -p wasmtime-c-api --release --no-default-features --features disable-logging
$ ls -lh ./target/release/libwasmtime.so
-rwxrwxr-x 2 alex alex 1.2M Dec 12 07:50 target/release/libwasmtime.so
Next, if your use case allows it, the Nightly Rust toolchain provides a number
of other options to minimize the size of binaries. Note the usage of +nightly here
to the cargo command to use a Nightly toolchain (assuming your local toolchain
is installed with rustup). Also note that due to the nature of nightly the exact
flags here may not work in the future. Please open an issue with Wasmtime if
these commands don't work and we'll update the documentation.
The first nightly feature we can leverage is to remove filename and line number
information in panics with -Zlocation-detail=none
$ export CARGO_PROFILE_RELEASE_OPT_LEVEL=s
$ export CARGO_PROFILE_RELEASE_PANIC=abort
$ export CARGO_PROFILE_RELEASE_LTO=true
$ export CARGO_PROFILE_RELEASE_CODEGEN_UNITS=1
$ export CARGO_PROFILE_RELEASE_STRIP=debuginfo
$ export RUSTFLAGS="-Zlocation-detail=none"
$ cargo +nightly build -p wasmtime-c-api --release --no-default-features --features disable-logging
$ ls -lh ./target/release/libwasmtime.so
-rwxrwxr-x 2 alex alex 1.2M Dec 12 07:51 target/release/libwasmtime.so
Further along the line of nightly features the next optimization will recompile
the standard library without unwinding information, trimming out a bit more from
the standard library. This uses the -Zbuild-std flag to Cargo. Note that this
additionally requires --target as well which will need to be configured for
your particular platform.
$ export CARGO_PROFILE_RELEASE_OPT_LEVEL=s
$ export CARGO_PROFILE_RELEASE_PANIC=abort
$ export CARGO_PROFILE_RELEASE_LTO=true
$ export CARGO_PROFILE_RELEASE_CODEGEN_UNITS=1
$ export CARGO_PROFILE_RELEASE_STRIP=debuginfo
$ export RUSTFLAGS="-Zlocation-detail=none"
$ cargo +nightly build -p wasmtime-c-api --release --no-default-features --features disable-logging \
    -Z build-std=std,panic_abort --target x86_64-unknown-linux-gnu
$ ls -lh target/x86_64-unknown-linux-gnu/release/libwasmtime.so
-rwxrwxr-x 2 alex alex 941K Dec 12 07:52 target/x86_64-unknown-linux-gnu/release/libwasmtime.so
Next the Rust standard library has some optional features in addition to
Wasmtime, such as printing of backtraces. This may not be required in minimal
environments so the features of the standard library can be disabled with the
-Zbuild-std-features= flag which configures the set of enabled features to be
empty.
$ export CARGO_PROFILE_RELEASE_OPT_LEVEL=s
$ export CARGO_PROFILE_RELEASE_PANIC=abort
$ export CARGO_PROFILE_RELEASE_LTO=true
$ export CARGO_PROFILE_RELEASE_CODEGEN_UNITS=1
$ export CARGO_PROFILE_RELEASE_STRIP=debuginfo
$ export RUSTFLAGS="-Zlocation-detail=none"
$ cargo +nightly build -p wasmtime-c-api --release --no-default-features --features disable-logging \
    -Z build-std=std,panic_abort --target x86_64-unknown-linux-gnu \
    -Z build-std-features=
$ ls -lh target/x86_64-unknown-linux-gnu/release/libwasmtime.so
-rwxrwxr-x 2 alex alex 784K Dec 12 07:53 target/x86_64-unknown-linux-gnu/release/libwasmtime.so
And finally, if you can enable the panic_immediate_abort feature of the Rust
standard library to shrink panics even further. Note that this comes at a cost
of making bugs/panics very difficult to debug.
$ export CARGO_PROFILE_RELEASE_OPT_LEVEL=s
$ export CARGO_PROFILE_RELEASE_PANIC=abort
$ export CARGO_PROFILE_RELEASE_LTO=true
$ export CARGO_PROFILE_RELEASE_CODEGEN_UNITS=1
$ export CARGO_PROFILE_RELEASE_STRIP=debuginfo
$ export RUSTFLAGS="-Zlocation-detail=none"
$ cargo +nightly build -p wasmtime-c-api --release --no-default-features --features disable-logging \
    -Z build-std=std,panic_abort --target x86_64-unknown-linux-gnu \
    -Z build-std-features=panic_immediate_abort
$ ls -lh target/x86_64-unknown-linux-gnu/release/libwasmtime.so
-rwxrwxr-x 2 alex alex 698K Dec 12 07:54 target/x86_64-unknown-linux-gnu/release/libwasmtime.so
Minimizing further
Above shows an example of taking the default cargo build result of 260M down
to a 700K binary for the libwasmtime.so binary of the C API. Similar steps
can be done to reduce the size of the wasmtime CLI executable as well. This is
currently the smallest size with the source code as-is, but there are more size
reductions which haven't been implemented yet.
This is a listing of some example sources of binary size. Some sources of binary size may not apply to custom embeddings since, for example, your custom embedding might already not use WASI and might already not be included.
-
Unused functionality in the C API - building
libwasmtime.{a,so}can show a misleading file size because the linker is unable to remove unused code. For examplelibwasmtime.socontains all code for the C API but your embedding may not be using all of the symbols present so in practice the final linked binary will often be much smaller thanlibwasmtime.so. Similarlylibwasmtime.ais forced to contain the entire C API so its size is likely much larger than a linked application. For a minimal embedding it's recommended to link againstlibwasmtime.awith--gc-sectionsas a linker flag and evaluate the size of your own application. -
Formatting strings in Wasmtime - Wasmtime makes extensive use of formatting strings for error messages and other purposes throughout the implementation. Most of this is intended for debugging and understanding more when something goes wrong, but much of this is not necessary for a truly minimal embedding. In theory much of this could be conditionally compiled out of the Wasmtime project to produce a smaller executable. Just how much of the final binary size is accounted for by formatting string is unknown, but it's well known in Rust that
std::fmtis not the slimmest of modules. -
CLI: WASI implementation - currently the CLI includes all of WASI. This includes two separate implementations of WASI - one for preview2 and one for preview1. This accounts for 1M+ of space which is a significant chunk of the remaining ~2M. While removing just preview2 or preview1 would be easy enough with a Cargo feature, the resulting executable wouldn't be able to do anything. Something like a plugin feature for the CLI, however, would enable removing WASI while still being a usable executable. Note that the C API's implementation of WASI can be disabled because custom host functionality can be provided.
-
CLI: Argument parsing - as a command line executable
wasmtimecontains parsing of command line arguments which currently uses theclapcrate. This contributes ~200k of binary size to the final executable which would likely not be present in a custom embedding of Wasmtime. While this can't be removed from Wasmtime it's something to consider when evaluating the size of CI artifacts. -
Cranelift vs Winch - the "min" builds on CI exclude Cranelift from their binary footprint but this comes at a cost of the final binary not supporting compilation of wasm modules. If this is required then no effort has yet been put into minimizing the code size of Cranelift itself. One possible tradeoff that can be made though is to choose between the Winch baseline compiler vs Cranelift. Winch should be much smaller from a compiled footprint point of view while not sacrificing everything in terms of performance. Note though that Winch is still under development.
Above are some future avenues to take in terms of reducing the binary size of Wasmtime and various tradeoffs that can be made. The Wasmtime project is eager to hear embedder use cases/profiles if Wasmtime is not suitable for binary size reasons today. Please feel free to open an issue and let us know and we'd be happy to discuss more how best to handle a particular use case.
Building Wasmtime for a Custom Platform
Wasmtime supports a wide range of functionality by default on major operating
systems such as Windows, macOS, and Linux, but this functionality is not
necessarily present on all platforms (much less custom platforms). Most of
Wasmtime's features are gated behind either platform-specific configuration
flags or Cargo feature flags. The wasmtime crate for example documents
important crate
features which likely
want to be disabled for custom platforms.
Not all of Wasmtime's features are supported on all platforms, but many are
enabled by default. For example the parallel-compilation crate feature
requires the host platform to have threads, or in other words the Rust rayon
crate must compile for your platform. If the parallel-compilation feature is
disabled, though, then rayon won't be compiled. For a custom platform, one of
the first things you'll want to do is to disable the default features of the
wasmtime crate (or C API).
Some important features to be aware of for custom platforms are:
-
runtime- you likely want to enable this feature since this includes the runtime to actually execute WebAssembly binaries. -
craneliftandwinch- you likely want to disable these features. This primarily cuts down on binary size. Note that you'll need to use*.cwasmartifacts so wasm files will need to be compiled outside of the target platform and transferred to them. -
signals-based-traps- without this feature Wasmtime won't rely on host OS signals (e.g. segfaults) at runtime and will instead perform manual checks to avoid signals. This increases portability at the cost of runtime performance. For maximal portability leave this disabled.
When compiling Wasmtime for an unknown platform, for example "not Windows" or
"not Unix", then Wasmtime will need some symbols to be provided by the embedder
to operate correctly. The header file at
examples/min-platform/embedding/wasmtime-platform.h describes the
symbols that the Wasmtime runtime requires to work which your platform will need
to provide. Some important notes about this are:
-
wasmtime_tls_{get,set}are required for the runtime to operate. Effectively a single pointer of TLS storage is necessary. Whether or not this is actually stored in TLS is up to the embedder, for example storage instaticmemory is ok if the embedder knows it won't be using threads. -
WASMTIME_SIGNALS_BASED_TRAPS- if this#defineis given (e.g. thesignals-based-trapsfeature was enabled at compile time), then your platform must have the concept of virtual memory and supportmmap-like APIs and signal handling. Many APIs in this header are disabled ifWASMTIME_SIGNALS_BASED_TRAPSis turned off which is why it's more portable, but if you enable this feature all of these APIs must be implemented.
You can find an example in the wasmtime repository of building a
minimal embedding. Note that for Rust code you'll be using #![no_std] and
you'll need to provide a memory allocator and a panic handler as well. The
memory alloator will likely get hooked up to your platform's memory allocator
and the panic handler mostly just needs to abort.
Building Wasmtime for a custom platform is not a turnkey process right now, there are a number of points that need to be considered:
-
For a truly custom platform you'll probably want to create a custom Rust target. This means that Nightly Rust will be required.
-
Wasmtime depends on the availability of a memory allocator (e.g.
malloc). Wasmtime assumes that failed memory allocation aborts execution (except for the case of allocating linear memories and growing them). -
Not all features for Wasmtime can be built for custom targets. For example WASI support does not work on custom targets. When building Wasmtime you'll probably want
--no-default-featuresand will then want to incrementally add features back in as needed.
The examples/min-platform directory has an example of building this minimal
embedding and some necessary steps. Combined with the above features about
producing a minimal build currently produces a 400K library on Linux.
Using Pulley: Wasmtime's Portable, Optimizing Interpreter
On architectures such as x86_64 or aarch64 Wasmtime will by default use the Cranelift compiler to translate WebAssembly to native machine code and execute it. Cranelift does not support all architectures, however, for example i686 (32-bit Intel machines) is not supported at this time. To help execute WebAssembly on these architectures Wasmtime comes with an interpreter called Pulley.
Pulley is a bytecode interpreter originally proposed in an RFC which is intended to primarily be portable. Pulley is a loose backronym for "Portable, Universal, Low-Level Execution strategY" but mostly just a theme on machines/tools (Cranelift, Winch, Pulley, ...). Pulley is a distinct target and execution environment for Wasmtime.
Enabling Pulley
The Pulley interpreter is enabled via one of two means:
-
On architectures which have Cranelift support, Pulley must be enabled via the
pulleycrate feature of thewasmtimecrate. This feature is otherwise off-by-default. -
On architectures which do NOT have Cranelift support, Pulley is already enabled by default. This means that Wasmtime can execute WebAssembly by default on any platform, it'll just be faster on Cranelift-supported platforms.
For platforms in category (2) there is no opt-in necessary to execute Pulley as
that's already the default target. Platforms in category (1), such as
x86_64-unknown-linux-gnu, may still want to execute Pulley to run tests,
evaluate the implementation, benchmark, etc.
To force execution of Pulley on any platform the pulley crate feature of
the wasmtime crate must be enabled in addition to configuring a target.
Specifying a target is done with the --target CLI option to the wasmtime
executable, the Config::target method in Rust, or the
wasmtime_config_target_set C API. The target string for pulley must be one
of:
pulley32- for 32-bit little-endian hostspulley32be- for 32-bit big-endian hostspulley64- for 64-bit little-endian hostspulley64be- for 64-bit big-endian hosts
The Pulley target string must match the environment that the Pulley Bytecode will be executing in. Some examples of Pulley targets are:
| Host target | Pulley target |
|---|---|
x86_64-unknown-linux-gnu | pulley64 |
i686-unknown-linux-gnu | pulley32 |
s390x-unknown-linux-gnu | pulley64be |
Wasmtime will return an error trying to load bytecode compiled for the wrong Pulley target. When Pulley is the default target for a particular host then the correct Pulley target will be selected automatically. Specifying the Pulley target may still be necessary when cross-compiling from one platform to another, however.
Using Pulley
Using Pulley in Wasmtime requires no further configuration beyond specifying the
target for Pulley. Once that is done all of the Wasmtime crate's Rust APIs or C
API work as usual. For example when specifying wasmtime run --target pulley64
on the CLI this will execute all WebAssembly in the interpreter rather than via
Cranelift.
Pulley at this time has the same feature parity for WebAssembly as Cranelift does. This means that all WebAssembly proposals and features supported by Wasmtime are supported by Pulley.
If you notice anything awry, however, please feel free to file an issue.
Impact of using Pulley
Pulley is an interpreter for its own bytecode format. While the design of Pulley is optimized for speed you should still expect a ~10x order-of-magnitude slowdown relative to native code or Cranelift. This means that Pulley is likely not suitable for compute-intensive tasks that must run in as little time as possible.
The primary goal of Pulley is to enable using and embedding Wasmtime across a variety of platforms simultaneously. The same API/interface is used to interact with the runtime and loading WebAssembly module regardless of the host architecture.
Pulley bytecode is produced by the Cranelift compiler today in a similar manner to native platforms. Pulley is not designed for quickly loading WebAssembly modules as Cranelift is an optimizing compiler. Compiling WebAssembly to Pulley bytecode should be expected to take about the same time as compiling to native platforms.
Disabling SIMD in Pulley
By default all Pulley opcodes are enabled in the interpreter meaning it's possible to execute any Pulley bytecode created by Cranelift and Wasmtime. This includes, for example, SIMD opcodes for all of the WebAssembly SIMD proposal. Not all WebAssembly modules use these opcodes though nor do all embeddings want to enable it, so Pulley supports a custom Rust flag that can be specified at compile time to compile-out the SIMD opcodes:
RUSTFLAGS=--cfg=pulley_disable_interp_simd
When specified the Pulley interpreter will no longer include code to execute
SIMD opcodes. Instead attempting to execute any opcode will raise a "disabled
opcode" trap instead. If doing this it's recommended to pair it with
Config::wasm_simd(false) to ensure that SIMD-using modules do not pass
validation.
High-level Design of Pulley
This section is not necessary for users of Pulley but for those interested this is a description of the high-level design of Pulley. The Pulley virtual machine consists of:
- 32 "X" integer registers each of which are 64-bits large. (
XReg) - 32 "F" float registers each of which are 64-bits large. (
FReg) - 32 "V" vector registers each of which are 128-bits large. (
VReg) - A dynamically allocated "stack" on the host's heap.
- A frame pointer register.
- A link register to store the return address for the current function.
This state lives in MachineState which is in turned stored in a Vm.
Pulley's source code lives in pulley/ in the Wasmtime repository.
Pulley's bytecode is defined in pulley/src/lib.rs with a combination of the
for_each_op! and for_each_extended_op! macros. Opcode numbers and opcode
layout are defined by the structure of these macros. The macros are used to
"derive" encoding/decoding/traits/etc used throughout the pulley_interpreter
crate.
Pulley opcodes are a single discriminator byte followed by any immediates. Immediates are not aligned and require unaligned loads/stores to work with them. Pulley has more than 256 opcodes, however, which is where "extended" opcodes come into play. The final Pulley opcode is reserved to indicate that an extended opcode is being used. Extended opcodes follow this initial discriminator with a 16-bit integer which further indicates which extended opcode is being used. This design is intended to allow common operations to be encoded more compactly while less common operations can still be packed in effectively without limit.
Pulley opcode assignment happens through the order of the for_each_op! macro
which means that it's not portable across multiple versions of Wasmtime.
The interpreter is an implementation of the OpVisitor and
ExtendedOpVisitor traits. This is located at pulley/src/interp.rs. Notably
this means that there's a method-per-opcode and is how the interpreter is
implemented.
The interpreter loop itself is implemented in one of two ways:
-
A "match loop" which is a Rust
loop { ... }which internally uses theDecodetrait on each opcode. This is not literally modeled as but compiles down to something that looks likeloop { match .. { ... } }. This interpreter loop is located atpulley/src/interp/match_loop.rs. -
A "tail loop" were each opcode handler is a Rust function. Control flow between opcodes continues with tail-calls and exiting the interpreter is done by returning from the function. Tail calls are not available in stable Rust so this interpreter loop is not used by default. It can be enabled, though, with
RUSTFLAGS=--cfg=pulley_assume_llvm_makes_tail_callsto rely on LLVM's tail-call-optimization pass to implement the loop.
The "match loop" is the default interpreter loop as it's portable and works on
stable Rust. The "tail loop" is thought to probably perform better than the
"match loop" but it's not available on stable Rust (become in Rust is an
unfinished nightly feature at this time) or portable (tail-call-optimization
doesn't happen the same in LLVM on all architectures).
Inspecting Pulley Bytecode
Like when compiling to native the wasmtime objdump command can be used to
inspect compiled bytecode:
$ wasmtime compile --target pulley64 foo.wat
$ wasmtime objdump foo.cwasm --addresses --bytes
0x000000: wasm[0]::function[20]:
       0: 9f 10 00 08 00                     push_frame_save 16, x19
       5: 40 13 00                           xmov x19, x0
       8: 03 13 13 3f cb 89 00               call2 x19, x19, 0x89cb3f    // target = 0x89cb47
       f: 03 13 13 8c ab 84 00               call2 x19, x19, 0x84ab8c    // target = 0x84ab9b
      16: 03 13 13 5b 12 00 00               call2 x19, x19, 0x125b    // target = 0x1271
      1d: 03 13 13 9f 12 00 00               call2 x19, x19, 0x129f    // target = 0x12bc
      24: 03 13 13 e0 45 00 00               call2 x19, x19, 0x45e0    // target = 0x4604
...
Profiling Pulley
Profiling the Pulley interpreter can be done with native profiler such as perf
but this has a few downsides:
-
When profiling the "match loop" it's not clear what machine code corresponds to which Pulley opcode. Most of the time all the samples are just in the one big "run" function.
-
When profiling with the "tail loop" you can see hot opcodes much more clearly, but it can be difficult to understand why a particular opcode was chosen.
It can sometimes be more beneficial to see time spent per Pulley opcode itself
in the context of the all Pulley opcodes. In a similar manner as you can look at
instruction-level profiling in perf it can be useful to look at opcode-level
profiling of Pulley.
Pulley has limited support for opcode-level profiling. This is off-by-default as
it has a performance hit for the interpreter. To collect a profile with the
wasmtime CLI you'll have to build from source and enable the profile-pulley
feature:
cargo run --features profile-pulley --release run --profile pulley --target pulley64 foo.wat
This will compile an optimized wasmtime executable with the profile-pulley
Cargo feature enabled. The --profile pulley flag can then be passed to the
wasmtime CLI to enable the profiler at runtime.
The command will emit a pulley-$pid.data file which contains raw data about
Pulley opcodes and samples taken. To view this file you can use:
cargo run -p pulley-interpreter --example profiler-html --all-features ./pulley-$pid.data
This will load the pulley-*.data file, parse it, collate the results, and
display the hottest functions. The hottest function is emitted last and
instructions are annotated with the % of samples taken that were executing at
that instruction.
Some more information can be found in the PR that implemented Pulley profiling support
Pre-Compiling and Cross-Compiling WebAssembly Programs
Wasmtime can compile a WebAssembly program to native code on one machine, and then run it on a different machine. This has a number of benefits:
-
Faster start up: Compilation is removed from the critical path. When a new HTTP request comes into your function-as-a-service platform, for example, you do not have to wait for the associated Wasm program to compile before it can start handling the request. Similarly, when a new update for your embedded device's Wasm application logic comes in, you do not need to compile the update on the under-powered device before it can begin running new updated logic.
-
Less Memory Usage: Pre-compiled Wasm programs can be lazily
mmaped from disk, only paging their code into memory as those code paths are executed. If none of the code on a page is ever executed, the OS will never make the page resident. This means that running pre-compiled Wasm programs lowers overall memory usage in the system. -
Smaller Code Size for Embedded: Wasmtime can be built such that it can only run Wasm programs that were pre-compiled elsewhere. These builds will not include the executable code for Wasm compilation. This is done by disabling the
craneliftandwinchcargo features at build time. These builds are useful for embedded devices, where programs must be small and fit within the device's constrained environment. -
Smaller Attack Surfaces: Similarly, building Wasmtime without a compiler, and with only support for running pre-compiled Wasm programs, can be useful for security-minded embeddings to reduce the potential attack surface exposed to untrusted and potentially hostile Wasm guests. Compilation, triggered by the control plane, can happen inside a Wasmtime build that can compile but not run Wasm programs. Execution, in the data plane, can happen inside a Wasmtime build that can run but not compile new Wasm programs. Exposing a minimal attack surface to untrusted code is good security practice.
Note that these benefits are applicable regardless which Wasm execution strategy you've configured: Cranelift, Winch, or Pulley.
Pre-Compile the Wasm on One Machine
This must be done with a Wasmtime build that has a Wasm execution strategy
enabled, e.g. was built with the cranelift or winch cargo features. It does
not require the ability to run Wasm programs, so the runtime cargo feature can
be disabled at build time.
//! Pre-compiling a Wasm program.

use wasmtime::{Config, Engine, Result, Strategy};

fn main() -> Result<()> {
    // Configure Wasmtime for compiling Wasm programs to x86_64 with the
    // Cranelift compiler.
    let mut config = Config::new();
    config.strategy(Strategy::Cranelift);
    if let Err(error) = config.target("x86_64") {
        eprintln!(
            "this Wasmtime was not built with the x86_64 Cranelift backend \
             enabled: {error:?}",
        );
        return Ok(());
    }

    // Create an `Engine` with that configuration.
    let engine = match Engine::new(&config) {
        Ok(engine) => engine,
        Err(error) => {
            println!("Wasmtime build is incompatible with config: {error:?}");
            return Ok(());
        }
    };

    // Pre-compile a Wasm program.
    //
    // Note that passing the Wasm text format, like we are doing here, is only
    // supported when the `wat` cargo feature is enabled.
    let precompiled = engine.precompile_module(
        r#"
            (module
              (func (export "add") (param i32 i32) (result i32)
                (i32.add (local.get 0) (local.get 1))
              )
            )
        "#
        .as_bytes(),
    )?;

    // Write the pre-compiled program to a file.
    //
    // Note that the `.cwasm` extension is conventional for these files, and is
    // what the Wasmtime CLI will use by default, for example.
    std::fs::write("add.cwasm", &precompiled)?;

    // And we are done -- now a different Wasmtime embedding can load and run
    // the pre-compiled Wasm program from that `add.cwasm` file!
    Ok(())
}
Run the Pre-Compiled Wasm on Another Machine
This must be done with a Wasmtime build that can run pre-compiled Wasm programs,
that is a Wasmtime built with the runtime cargo feature. It does not need to
compile new Wasm programs, so the cranelift and winch cargo features can be
disabled.
//! Running pre-compiled Wasm programs.

use wasmtime::{Config, Engine, Instance, Module, Result, Store};

fn main() -> Result<()> {
    // Create the default configuration for this host platform. Note that this
    // configuration must match the configuration used to pre-compile the Wasm
    // program. We cannot run Wasm programs pre-compiled for configurations that
    // do not match our own, therefore if you enabled or disabled any particular
    // Wasm proposals or tweaked memory knobs when pre-compiling, you should
    // make identical adjustments to this config.
    let config = Config::default();

    // Create an `Engine` with that configuration.
    let engine = Engine::new(&config)?;

    // Create a runtime `Module` from a Wasm program that was pre-compiled and
    // written to the `add.cwasm` file by `wasmtime/examples/pre_compile.rs`.
    //
    // **Warning:** Wasmtime does not (and in general cannot) fully validate
    // pre-compiled modules for safety -- only create `Module`s and `Component`s
    // from pre-compiled bytes you control and trust! Passing unknown or
    // untrusted bytes will lead to arbitrary code execution vulnerabilities in
    // your system!
    let module = match unsafe { Module::deserialize_file(&engine, "add.cwasm") } {
        Ok(module) => module,
        Err(error) => {
            println!("failed to deserialize pre-compiled module: {error:?}");
            return Ok(());
        }
    };

    // Instantiate the module and invoke its `add` function!
    let mut store = Store::new(&engine, ());
    let instance = Instance::new(&mut store, &module, &[])?;
    let add = instance.get_typed_func::<(i32, i32), i32>(&mut store, "add")?;
    let sum = add.call(&mut store, (3, 8))?;
    println!("the sum of 3 and 8 is {sum}");

    Ok(())
}
See Also
- Tuning Wasmtime for Fast Wasm Instantiation
- Tuning Wasmtime for Fast Wasm Execution
- Building a Minimal Wasmtime Embedding
wasmtime::Engine::precompile_moduleandwasmtime::Engine::precompile_componentwasmtime::Module::deserialize,wasmtime::Module::deserialize_file,wasmtime::component::Component::deserialize, andwasmtime::component::Component::deserialize_file
Tuning Wasmtime for Fast Wasm Execution
To tune Wasmtime for faster Wasm execution, consider the following tips.
Enable Cranelift
Cranelift is an optimizing compiler. Compared to alternative strategies like the Winch "baseline" compiler, it translates Wasm into faster machine code, but compilation is slower. Cranelift is similar to the optimizing tier of browsers' just-in-time Wasm engines, such as SpiderMonkey's Ion tier or V8's TurboFan tier.
See the API docs for
wasmtime::Strategy
and
wasmtime::Config::strategy
for more details.
Configure Wasmtime to Elide Explicit Bounds Checks
Wasm programs are sandboxed and may only access their linear memories. Attempts to access beyond the bounds of a linear memory results in a trap, and this prevents the Wasm guest from stealing data from host memory, or from another concurrently running Wasm instance. Explicitly bounds-checking every linear memory operation performed by a Wasm guest is expensive: it has been measured to create between a 1.2x to 1.8x slow down, depending on a number of factors. Luckily, Wasmtime can usually omit explicit bounds checks by relying on virtual memory guard pages. This requires enabling signals-based traps (on by default for non-bare-metal builds), running Wasm on a 64-bit host architecture, and ensuring that memory reservations and guard pages are appropriately sized (again, configured by default for 64-bit architectures).
To elide any explicit bounds checks, Wasm linear memories must have at least a
4GiB (1 << 32 bytes) reservation. If a memory instruction has an additional
static offset immediate, then the bounds check can only be elided when there is
a memory guard of at least that offset's size. Using a 4GiB guard region allows
Wasmtime to elide explicit bounds checks regardless of the static memory offset
immediate. While small static offset immediate values are common, very large
values are exceedingly rare, so you can get almost all of the benefits while
consuming less virtual memory address space by using, for example, 32MiB guards.
See the API docs for
wasmtime::Config::signals_based_traps,
wasmtime::Config::memory_reservation,
and
wasmtime::Config::memory_guard_size
for more details.
Force-Enable ISA Extensions
This section can be ignored if you are compiling and running Wasm programs on the same machine. In this scenario, Wasmtime will automatically detect which ISA extensions (such as AVX on x86_64) are available, and you do not need to configure anything yourself.
However, if you are compiling a Wasm program on one machine and then running that pre-compiled Wasm program on another machine, then during compilation Wasmtime cannot automatically detect which ISA extensions will be available on the machine on which you actually execute the pre-compiled Wasm program. Configuring which ISA extensions are available on the target architecture that will run the pre-compiled Wasm programs can have a large impact for certain Wasm programs, particularly those using SIMD instructions.
See the API docs for
wasmtime::Config::cranelift_flag_enable
for more details.
Putting It All Together
//! Tuning Wasmtime for fast Wasm execution.

use wasmtime::{Config, Engine, Result, Strategy};

fn main() -> Result<()> {
    let mut config = Config::new();

    // Enable the Cranelift optimizing compiler.
    config.strategy(Strategy::Cranelift);

    // Enable signals-based traps. This is required to elide explicit
    // bounds-checking.
    config.signals_based_traps(true);

    // Configure linear memories such that explicit bounds-checking can be
    // elided.
    config.memory_reservation(1 << 32);
    config.memory_guard_size(1 << 32);

    if CROSS_COMPILING {
        // When cross-compiling, force-enable various ISA extensions.
        //
        // Warning: it is wildly unsafe to run a pre-compiled Wasm program that
        // enabled a particular ISA extension on a machine that does not
        // actually support that ISA extension!!!
        unsafe {
            if let Err(error) = config.target("x86_64") {
                eprintln!(
                    "Wasmtime was not compiled with the x86_64 backend for \
                     Cranelift enabled: {error:?}",
                );
                return Ok(());
            }
            config.cranelift_flag_enable("has_sse41");
            config.cranelift_flag_enable("has_avx");
            config.cranelift_flag_enable("has_avx2");
            config.cranelift_flag_enable("has_lzcnt");
        }
    }

    // Build an `Engine` with our `Config` that is tuned for fast Wasm
    // execution.
    let engine = match Engine::new(&config) {
        Ok(engine) => engine,
        Err(error) => {
            eprintln!("Configuration is incompatible with this host platform: {error:?}");
            return Ok(());
        }
    };

    // Now we can use `engine` to compile and/or run some Wasm programs...

    let _ = engine;
    Ok(())
}

const CROSS_COMPILING: bool = false;
See Also
- Tuning Wasmtime for Fast Wasm Compilation
- Tuning Wasmtime for Fast Wasm Instantiation
- Pre-Compiling Wasm Programs
Tuning Wasmtime for Fast Instantiation
Before a WebAssembly module can begin execution, it must first be compiled and then instantiated. Compilation can happen ahead of time, which removes compilation from the critical path. That leaves just instantiation on the critical path. This page documents methods for tuning Wasmtime for fast instantiation.
Enable the Pooling Allocator
By enabling the pooling allocator, you are configuring Wasmtime to up-front and ahead-of-time allocate a large pool containing all the resources necessary to run the configured maximum number of concurrent instances. Creating a new instance doesn't require allocating new Wasm memories and tables on demand, it just takes pre-allocated memories and tables from the pool, which is generally much faster. Deallocating an instance returns its memories and tables to the pool.
See
wasmtime::PoolingAllocationConfig,
wasmtime::InstanceAllocationStrategy,
and
wasmtime::Config::allocation_strategy
for more details.
Enable Copy-on-Write Heap Images
Initializing a WebAssembly linear memory via a copy-on-write mapping can drastically improve instantiation costs because copying memory is deferred from instantiation time to when the data is first mutated. When the Wasm module only reads the initial data, and never overwrites it, then the copying is completely avoided.
See the API docs for
wasmtime::Config::memory_init_cow
for more details.
Use InstancePre
To instantiate a WebAssembly module or component, Wasmtime must look up each of
the module's imports and check that they are of the expected types. If the
imports are always the same, this work can be done ahead of time, before
instantiation. A wasmtime::InstancePre represents an instance just before it
is instantiated, after all type-checking and imports have been resolved. The
only thing left to do for this instance is to actually allocate its memories,
tables, and internal runtime context, initialize its state, and run its start
function, if any.
See the API docs for
wasmtime::InstancePre,
wasmtime::Linker::instantiate_pre,
wasmtime::component::InstancePre,
and
wasmtime::component::Linker::instantiate_pre
for more details.
Putting It All Together
//! Tuning Wasmtime for fast instantiation.

use wasmtime::format_err;
use wasmtime::{
    Config, Engine, InstanceAllocationStrategy, Linker, Module, PoolingAllocationConfig, Result,
    Store,
};

fn main() -> Result<()> {
    let mut config = Config::new();

    // Configure and enable the pooling allocator with space for 100 memories of
    // up to 2GiB in size, 100 tables holding up to 5000 elements, and with a
    // limit of no more than 100 concurrent instances.
    let mut pool = PoolingAllocationConfig::new();
    pool.total_memories(100);
    pool.max_memory_size(1 << 31); // 2 GiB
    pool.total_tables(100);
    pool.table_elements(5000);
    pool.total_core_instances(100);
    config.allocation_strategy(InstanceAllocationStrategy::Pooling(pool));

    // Enable copy-on-write heap images.
    config.memory_init_cow(true);

    // Create an engine with our configuration.
    let engine = Engine::new(&config)?;

    // Create a linker and populate it with all the imports needed for the Wasm
    // programs we will run. In a more realistic Wasmtime embedding, this would
    // probably involve adding WASI functions to the linker, for example.
    let mut linker = Linker::<()>::new(&engine);
    linker.func_wrap("math", "add", |a: u32, b: u32| -> u32 { a + b })?;

    // Create a new module, load a pre-compiled module from disk, or etc...
    let module = Module::new(
        &engine,
        r#"
            (module
                (import "math" "add" (func $add (param i32 i32) (result i32)))
                (func (export "run")
                    (call $add (i32.const 29) (i32.const 13))
                )
            )
        "#,
    )?;

    // Create an `InstancePre` for our module, doing import resolution and
    // type-checking ahead-of-time and removing it from the instantiation
    // critical path.
    let instance_pre = linker.instantiate_pre(&module)?;

    // Now we can very quickly instantiate our module, so long as we have no
    // more than 100 concurrent instances at a time!
    //
    // For example, we can spawn 100 threads and have each of them instantiate
    // and run our Wasm module in a loop.
    //
    // In a real Wasmtime embedding, this would be doing something like handling
    // new HTTP requests, game events, or etc... instead of just calling the
    // same function. A production embedding would likely also be using async,
    // in which case it would want some sort of back-pressure mechanism (like a
    // semaphore) on incoming tasks to avoid attempting to allocate more than
    // the pool's maximum-supported concurrent instances (at which point,
    // instantiation will start returning errors).
    let handles: Vec<std::thread::JoinHandle<Result<()>>> = (0..100)
        .map(|_| {
            let engine = engine.clone();
            let instance_pre = instance_pre.clone();
            std::thread::spawn(move || -> Result<()> {
                for _ in 0..999 {
                    // Create a new store for this instance.
                    let mut store = Store::new(&engine, ());
                    // Instantiate our module in this store.
                    let instance = instance_pre.instantiate(&mut store)?;
                    // Call the instance's `run` function!
                    let _result = instance
                        .get_typed_func::<(), i32>(&mut store, "run")?
                        .call(&mut store, ());
                }
                Ok(())
            })
        })
        .collect();

    // Wait for the threads to finish.
    for h in handles.into_iter() {
        h.join().map_err(|_| format_err!("thread panicked!"))??;
    }

    Ok(())
}
See Also
- Pre-Compiling Wasm Programs
- Tuning Wasmtime for Fast Wasm Compilation
- Tuning Wasmtime for Fast Wasm Execution
- Wizer, the WebAssembly Pre-Initializer
Tuning Wasmtime for Fast Compilation
Wasmtime must compile a Wasm program before executing it. This means that, by default, Wasm compilation is on your critical path. In most scenarios, you can completely remove Wasm compilation from the critical path by pre-compiling Wasm programs. That option is not always available, however, and this page documents how to tune Wasmtime for fast compilation in these alternative scenarios.
Enable the Compilation Cache
Wasmtime can be configured to use a cache, so that if you attempt to compile a Wasm program that has already been compiled previously, it just grabs the cached result rather than performing compilation all over again.
See these API docs for more details:
Enable Winch
Winch is Wasmtime's "baseline" compiler: for each Wasm opcode, it emits a canned sequence of machine instructions to implement that opcode. This makes compilation fast: it performs only a single, quick pass over the Wasm code. However, it does not perform optimizations, so the machine code it emits will run Wasm programs slower than Cranelift, Wasmtime's optimizing compiler.
See the API docs for
wasmtime::Strategy
and
wasmtime::Config::strategy
for more details.
Enable Parallel Compilation
Wasmtime can compile Wasm programs in parallel, speeding up the compilation
process more or less depending on how many cores your machine has and the exact
shape of the Wasm program. Wasmtime will generally enable parallel compilation
by default, but it does depend on the host platform and cargo features enabled
when building Wasmtime itself. You can double check that parallel compilation is
enabled via the setting the
wasmtime::Config::parallel_compilation
configuration option.
Putting It All Together
//! Tuning Wasmtime for fast compilation.
//!
//! If your application design is compatible with pre-compiling Wasm programs,
//! prefer doing that.

use wasmtime::{Cache, Config, Engine, Result, Strategy};

fn main() -> Result<()> {
    let mut config = Config::new();

    // Enable the compilation cache, using the default cache configuration
    // settings.
    config.cache(Some(Cache::from_file(None)?));

    // Enable Winch, Wasmtime's baseline compiler.
    config.strategy(Strategy::Winch);

    // Enable parallel compilation.
    config.parallel_compilation(true);

    // Build an `Engine` with our `Config` that is tuned for fast Wasm
    // compilation.
    let engine = Engine::new(&config)?;

    // Now we can use `engine` to compile and/or run some Wasm programs...

    let _ = engine;
    Ok(())
}
See Also
- Pre-Compiling Wasm Programs
- Tuning Wasmtime for Fast Wasm Instantiation
- Tuning Wasmtime for Fast Wasm Execution
Interrupting Wasm Execution
If you want to interrupt Wasm execution, for example to prevent an infinite loop in the Wasm guest from indefinitely blocking the host, Wasmtime provides two mechanisms you can choose between. Wasmtime also allows you to choose what happens when Wasm execution is interrupted.
What Happens When Execution is Interrupted
When a Wasm program's execution is interrupted, you can configure Wasmtime to do either of the following:
-
Raise a trap: This terminates the current Wasm program, and it is not resumable.
-
Async yield: This pauses the current Wasm program, yields control back to the host, and lets the host decide whether to resume execution sometime in the future.
These options are both available regardless of which interruption mechanism you employ.
Interruption Mechanisms
Deterministic Fuel
Fuel-based interruption is completely deterministic: the same program run with the same amount of fuel will always be interrupted at the same location in the program (unless it has enough fuel to complete its computation, or there is some other form of non-determinism that causes the program to behave differently).
The downside is that fuel-based interruption imposes more overhead on execution, slowing down Wasm programs, than epochs do.
//! Example of limiting a WebAssembly function's runtime using "fuel consumption".

// You can execute this example with `cargo run --example fuel`

use wasmtime::*;

fn main() -> Result<()> {
    let mut config = Config::new();
    config.consume_fuel(true);
    let engine = Engine::new(&config)?;
    let mut store = Store::new(&engine, ());
    store.set_fuel(10_000)?;
    let module = Module::from_file(store.engine(), "examples/fuel.wat")?;
    let instance = Instance::new(&mut store, &module, &[])?;

    // Invoke `fibonacci` export with higher and higher numbers until we exhaust our fuel.
    let fibonacci = instance.get_typed_func::<i32, i32>(&mut store, "fibonacci")?;
    for n in 1.. {
        let fuel_before = store.get_fuel().unwrap();
        let output = match fibonacci.call(&mut store, n) {
            Ok(v) => v,
            Err(e) => {
                assert_eq!(e.downcast::<Trap>()?, Trap::OutOfFuel);
                println!("Exhausted fuel computing fib({n})");
                break;
            }
        };
        let fuel_consumed = fuel_before - store.get_fuel().unwrap();
        println!("fib({n}) = {output} [consumed {fuel_consumed} fuel]");
        store.set_fuel(10_000)?;
    }
    Ok(())
}
See these API docs for more details:
wasmtime::Config::consume_fuelwasmtime::Config::set_fuelwasmtime::Config::fuel_async_yield_interval
Non-Deterministic Epochs
Epoch-based interruption imposes relatively low overhead on Wasm execution; it has been measured at around a 10% slowdown. It is faster than fuel-based interruption.
The downside is that it is non-deterministic. Running the same program with the same inputs for one epoch might result in an interrupt at one location the first time, a later location the second time, or even complete successfully another time. This is because it is based on wall-time rather than an exact count of how many Wasm instructions are executed.
//! Example of interrupting a WebAssembly function's runtime via epoch
//! changes ("epoch interruption") in a synchronous context.  To see
//! an example of setup for asynchronous usage, see
//! `tests/all/epoch_interruption.rs`

use std::sync::Arc;
use wasmtime::Error;
use wasmtime::{Config, Engine, Instance, Module, Store};

fn main() -> Result<(), Error> {
    // Set up an engine configured with epoch interruption enabled.
    let mut config = Config::new();
    config.epoch_interruption(true);
    let engine = Arc::new(Engine::new(&config)?);

    let mut store = Store::new(&engine, ());
    // Configure the store to trap on reaching the epoch deadline.
    // This is the default, but we do it explicitly here to
    // demonstrate.
    store.epoch_deadline_trap();
    // Configure the store to have an initial epoch deadline one tick
    // in the future.
    store.set_epoch_deadline(1);

    // Reuse the fibonacci function from the Fuel example. This is a
    // long-running function that we will want to interrupt.
    let module = Module::from_file(store.engine(), "examples/fuel.wat")?;
    let instance = Instance::new(&mut store, &module, &[])?;

    // Start a thread that will bump the epoch after 1 second.
    let engine_clone = engine.clone();
    std::thread::spawn(move || {
        std::thread::sleep(std::time::Duration::from_secs(1));
        engine_clone.increment_epoch();
    });

    // Invoke `fibonacci` with a large argument such that a normal
    // invocation would take many seconds to complete.
    let fibonacci = instance.get_typed_func::<i32, i32>(&mut store, "fibonacci")?;
    match fibonacci.call(&mut store, 100) {
        Ok(_) => panic!("Somehow we computed recursive fib(100) in less than a second!"),
        Err(_) => {
            println!("Trapped out of fib(100) after epoch increment");
        }
    };

    Ok(())
}
See these API docs for more details:
wasmtime::Config::epoch_interruptionwasmtime::Config::epoch_deadline_trapwasmtime::Config::epoch_deadline_callbackwasmtime::Config::epoch_deadline_async_yield_and_update
Deterministic Wasm Execution
The WebAssembly language is mostly deterministic, but there are a few places where non-determinism slips in. This page documents how to use Wasmtime to execute Wasm programs fully deterministically, even when the Wasm language spec allows for non-determinism.
Make Sure All Imports are Deterministic
Do not give Wasm programs access to non-deterministic host functions.
When using WASI, use
wasi-virt to virtualize
non-deterministic APIs like clocks and file systems.
Enable IEEE-754 NaN canonicalization
Some Wasm opcodes can result in NaN (not-a-number) values. The IEEE-754 spec
defines a whole range of NaN values and the Wasm spec does not require that
Wasm always generates any particular NaN value, it could be any one of
them. This non-determinism can then be observed by the Wasm program by storing
the NaN value to memory or bitcasting it to an integer. Therefore, Wasmtime
can be configured to canonicalize all NaNs into a particular, canonical NaN
value. The downside is that this adds overhead to Wasm's floating-point
instructions.
See wasmtime::Config::cranelift_nan_canonicalization for more details.
Make the Relaxed SIMD Proposal Deterministic
The relaxed SIMD proposal gives Wasm programs access to SIMD operations that cannot be made to execute both identically and performantly across different architectures. The proposal gave up determinism across different architectures in order to maintain portable performance.
At the cost of worse runtime performance, Wasmtime can deterministically execute this proposal's instructions. See wasmtime::Config::relaxed_simd_deterministic for more details.
Alternatively, you can simply disable the proposal completely. See
wasmtime::Config::wasm_relaxed_simd
for more details.
Handling Non-Deterministic Memory and Table Growth
All WebAssembly memories and tables have an associated minimum, or initial, size
and an optional maximum size. When the maximum size is not present, that means
"unlimited". If a memory or table is already at its maximum size, then attempts
to grow them will always fail. If they are below their maximum size, however,
then the memory.grow and table.grow instructions are allowed to
non-deterministicaly succeed or fail (for example, when the host system does not
have enough memory available to satisfy that growth).
You can make this deterministic in a variety of ways:
-
Disallow Wasm programs that use memories and tables via a limiter that rejects non-zero-sized memories and tables.
-
Use a custom memory creator that allocates the maximum size up front so that growth will either always succeed or fail before the program has begun execution.
-
Use the
wasmparsercrate to write a little validator program that rejects Wasm modules that use{memory,table}.growinstructions or alternatively rejects memories and tables that do not have a maximum size equal to their minimum size (which, again, means that their allocation must happen completely up front, and if allocation fails, it will have failed before the Wasm program began executing).
Use Deterministic Interruption, If Any
If you are making Wasm execution interruptible, use deterministic fuel-based interruption rather than non-deterministic epoch-based interruption.
Wasm memcheck (wmemcheck)
wmemcheck provides the ability to check for invalid mallocs, reads, and writes
inside a Wasm module, as long as Wasmtime is able to make certain assumptions
(malloc and free functions are visible and your program uses only the
default allocator). This is analogous to the Valgrind tool's memory checker
(memcheck) tool for native programs.
How to use:
- When building Wasmtime, add the CLI flag "--features wmemcheck" to compile with wmemcheck configured.
cargo build --features wmemcheck
- When running your wasm module, add the CLI flag "-W wmemcheck".
wasmtime run -W wmemcheck test.wasm
If your program executes an invalid operation (load or store to non-allocated address, double-free, or an internal error in malloc that allocates the same memory twice) you will see an error that looks like a Wasm trap. For example, given the program
#include <stdlib.h>

int main() {
    char* p = malloc(1024);
    *p = 0;
    free(p);
    *p = 0;
}
compiled with WASI-SDK via
$ /opt/wasi-sdk/bin/clang -o test.wasm test.c
you can observe the memory checker working like so:
$ wasmtime run -W wmemcheck ./test.wasm
Error: failed to run main module `./test.wasm`

Caused by:
    0: failed to invoke command default
    1: error while executing at wasm backtrace:
           0:  0x103 - <unknown>!__original_main
           1:   0x87 - <unknown>!_start
           2: 0x2449 - <unknown>!_start.command_export
    2: Invalid store at addr 0x10610 of size 1
Stability
... more coming soon
Release Process
Wasmtime's release process was originally designed in an RFC and later amended with an LTS process and this page is intended to serve as documentation for the current process as-is today.
The high-level summary of Wasmtime's release process is:
- A new major version of Wasmtime will be made available on the 20th of each month.
- Each release that is a multiple of 12 is considered an LTS release and is supported for 24 months. Other releases are supported for 2 months.
- Security bugs are guaranteed to be backported to all supported releases.
- Bug fixes are backported on a volunteer basis.
Current Versions
This is a table of supported, recent, and some upcoming releases of Wasmtime along with the dates around their release process. Rows in bold are actively supported at this time.
| Version | LTS | Branch Date | Release Date | EOL Date |
|---|
In more visual form this is a gantt chart of the current release trains:
New Versions
Once a month Wasmtime will issue a new major version. This will be issued with a
semver-major version update, such as 4.0.0 to 5.0.0. Releases are created from
main with a new release-X.0.0 git branch on the 5th of every month. The
release itself then happens on the 20th of the month, or shortly after if that
happens to fall on a weekend.
Each major release of Wasmtime reserves the right to break both behavior and API backwards-compatibility. This is not expected to happen frequently, however, and any breaking change will follow these criteria:
-
Minor breaking changes, either behavior or with APIs, will be documented in the
RELEASES.mdrelease notes. Minor changes will require some degree of consensus but are not required to go through the entire RFC process. -
Major breaking changes, such as major refactorings to the API, will be required to go through the RFC process. These changes are intended to be broadly communicated to those interested and provides an opportunity to give feedback about embeddings. Release notes will clearly indicate if any major breaking changes through accepted RFCs are included in a release.
All releases will have an accompanying RELEASES.md on the release branch
documenting major and minor changes made during development. Note that each
branch only contains the release notes for that branch, but links are provided
for older release notes.
For maintainers, performing a release is documented here.
Version Support
Wasmtime major version releases are of one of two categories:
-
LTS release - this happens every 12 releases of Wasmtime and the version number is always divisible by 12. LTS releases are supported for 24 months. For example Wasmtime 24.0.0 is supported for 2 years.
-
Normal release - this is every release other than an LTS release. Normal releases are supported for 2 months. For example Wasmtime 31.0.0 is supported for 2 months.
At any one time Wasmtime has two supported LTS releases and up to two supported normal releases. Once a version of Wasmtime is release the project strives to maintain binary/version compatibility with dependencies and such throughout the lifetime of the release. For example the minimum supported version of Rust required to compile a version of Wasmtime will not increase. Exceptions may be made to LTS branches though if the versions of tooling to produce the LTS itself have fallen out-of-date. For example if an LTS was originally produced with a GitHub Actions runner that is no longer available then the oldest supported image will be used instead.
Patch Versions
Patch releases of Wasmtime will only be issued for security and critical correctness issues for on-by-default behavior in supported releases. For example if the current version is 39.0.0 then a security issue would issue a new release for:
- 39.0.x - the current release
- 38.0.x - the last release
- 36.0.x - the current LTS release
- 24.0.x - the last LTS release
Patch releases are guaranteed to maintain API and behavior backwards-compatibility and are intended to be trivial for users to upgrade to.
The Wasmtime project guarantees backports and patch releases will be made for any discovered security issue. Other bug fixes are done on a best-effort basis in accordance with volunteers able to do the backports (see below). The Wasmtime project does not support backporting new features to older releases, even if a volunteer performs a backport for the project.
Patch releases for Cranelift will be made for any miscompilations found by Cranelift, even those that Wasmtime itself may not exercise. Due to the current release process a patch release for Cranelift will issue a patch release for Wasmtime as well.
Patch releases do not have a set cadence and are done on an as-needed basis. For maintainers, performing a patch release is documented here.
Security Fixes
Security fixes will be issued as patch releases of Wasmtime. They follow the same process as normal backports except that they're coordinated in private prior to patch release day.
For maintainers, performing a security release is documented here.
What's released?
At this time the release process of Wasmtime encompasses:
- The
wasmtimeRust crate - The C API of Wasmtime
- The
wasmtimeCLI tool through thewasmtime-cliRust crate
Other projects maintained by the Bytecode Alliance will also likely be released, with the same version numbers, with the main Wasmtime project soon after a release is made, such as:
Note, though, that bugs and security issues in these projects do not at this time warrant patch releases for Wasmtime.
Releases and "CI Weather"
Wasmtime relies on GitHub Actions to perform a release. This is true for both normal releases and security releases. GitHub Actions has become much less reliable over time and is often subject to widespread outages which can prevent Wasmtime from making a release. At this time Wasmtime has no alternative for making a release and we're entirely subject to the whims of Azure and GitHub Actions and how they're doing that day. If there is an outage when a release is being made then Wasmtime will not be able to make a release. This can affect the timely publish of a security release, for example. We do our best to keep tabs on the status of GitHub Actions and will publish a release once it recovers if there's an outage.
Wasmtime as a project does not currently have the resources to dedicate to self-hosted runners, different CI providers, or maintaining escape hatches to perform releases locally instead of CI. If you maintain an embedding of Wasmtime and this caveat is unacceptable to you please feel free to reach out. We would be happy to talk about coordinating alternative CI architecture coupled with external investment in maintainership. For now, though, GitHub Actions is the best option available to us even with its unreliability.
Tiers of Support in Wasmtime
Wasmtime's support for platforms and features can be distinguished with three different tiers of support. The description of these tiers are intended to be inspired by the Rust compiler's support tiers for targets but are additionally tailored for Wasmtime. Wasmtime's tiered support additionally applies not only to platforms/targets themselves but additionally features implemented within Wasmtime itself.
The purpose of this document is to provide a means by which to evaluate the inclusion of new features and support for existing features within Wasmtime. This should not be used to "lawyer" a change into Wasmtime on a precise technical detail or similar since this document is itself not 100% precise and will change over time.
Current Tier Status
For explanations of what each tier means see below.
Tier 1
| Category | Description |
|---|---|
| Target | x86_64-apple-darwin |
| Target | x86_64-pc-windows-msvc |
| Target | x86_64-unknown-linux-gnu |
| Compiler | Cranelift 1 |
| Compiler | Winch 1 |
| WebAssembly Proposal | mutable-globals |
| WebAssembly Proposal | sign-extension-ops |
| WebAssembly Proposal | nontrapping-float-to-int-conversion |
| WebAssembly Proposal | multi-value |
| WebAssembly Proposal | bulk-memory |
| WebAssembly Proposal | reference-types |
| WebAssembly Proposal | simd |
| WebAssembly Proposal | component-model |
| WebAssembly Proposal | relaxed-simd |
| WebAssembly Proposal | multi-memory |
| WebAssembly Proposal | tail-call |
| WebAssembly Proposal | extended-const |
| WebAssembly Proposal | memory64 |
| WASI Proposal | wasi-io |
| WASI Proposal | wasi-clocks |
| WASI Proposal | wasi-filesystem |
| WASI Proposal | wasi-random |
| WASI Proposal | wasi-sockets |
| WASI Proposal | wasi-http |
| WASI Proposal | wasi_snapshot_preview1 |
| WASI Proposal | wasi_unstable |
| Embedding API | Rust |
| Embedding API | C |
Compiler support is further broken down below into finer-grained target/wasm proposal combinations. Compilers are not required to support the full matrix of all tier 1 targets/proposals.
Tier 2
| Category | Description | Missing Tier 1 Requirements |
|---|---|---|
| Target | aarch64-unknown-linux-gnu | Continuous fuzzing |
| Target | aarch64-apple-darwin | Continuous fuzzing |
| Target | s390x-unknown-linux-gnu | Continuous fuzzing |
| Target | x86_64-pc-windows-gnu | Clear owner of the target |
| Target | Support for #![no_std] | Support beyond CI checks |
| WebAssembly Proposal | custom-page-sizes | Unstable wasm proposal |
| WebAssembly Proposal | exception-handling | fuzzing, dependence on GC |
| WebAssembly Proposal | function-references | production quality |
| WebAssembly Proposal | gc | production quality |
| WebAssembly Proposal | threads | fuzzing, API quality |
| WebAssembly Proposal | wide-arithmetic | Unstable wasm proposal |
| Execution Backend | Pulley | More time fuzzing/baking |
| Embedding API | C++ | Full-time maintainer |
Tier 3
| Category | Description | Missing Tier 2 Requirements |
|---|---|---|
| Target | aarch64-apple-ios | CI testing, full-time maintainer |
| Target | aarch64-linux-android | CI testing, full-time maintainer |
| Target | aarch64-pc-windows-msvc | CI testing, full-time maintainer |
| Target | aarch64-unknown-linux-musl 2 | CI testing, full-time maintainer |
| Target | armv7-unknown-linux-gnueabihf | full-time maintainer |
| Target | i686-pc-windows-msvc | CI testing, full-time maintainer |
| Target | i686-unknown-linux-gnu | full-time maintainer |
| Target | powerpc64le-unknown-linux-gnu | CI testing, full-time maintainer |
| Target | riscv32imac-unknown-none-elf3 | CI testing, full-time maintainer |
| Target | riscv64gc-unknown-linux-gnu | full-time maintainer |
| Target | wasm32-wasip1 4 | Supported but not tested |
| Target | x86_64-linux-android | CI testing, full-time maintainer |
| Target | x86_64-unknown-freebsd | CI testing, full-time maintainer |
| Target | x86_64-unknown-illumos | CI testing, full-time maintainer |
| Target | x86_64-unknown-linux-musl 2 | CI testing, full-time maintainer |
| Target | x86_64-unknown-none 3 | CI testing, full-time maintainer |
| WASI Proposal | wasi-nn | More expansive CI testing |
| WASI Proposal | wasi-threads | More CI, unstable proposal |
| WASI Proposal | wasi-config | unstable proposal |
| WASI Proposal | wasi-keyvalue | unstable proposal |
| WASI Proposal | wasi-tls | unstable proposal |
| misc | Non-Wasmtime Cranelift usage 5 | CI testing, full-time maintainer |
| misc | DWARF debugging 6 | CI testing, full-time maintainer, improved quality |
This is intended to encompass features that Cranelift supports as a
general-purpose code generator such as integer value types other than i32 and
i64, non-Wasmtime calling conventions, code model settings, relocation
restrictions, etc. These features aren't covered by Wasmtime's usage of
Cranelift because the WebAssembly instruction set doesn't leverage them. This
means that they receive far less testing and fuzzing than the parts of Cranelift
exercised by Wasmtime.
Currently there is no active maintainer of DWARF debugging support and support is currently best-effort. Additionally there are known shortcomings and bugs. At this time there's no developer time to improve the situation here as well.
Wasmtime's cranelift and winch features can be compiled to WebAssembly
but not the runtime feature at this time. This means that
Wasmtime-compiled-to-wasm can itself compile wasm but cannot execute wasm.
Binary artifacts for MUSL are dynamically linked, not statically linked, meaning that they are not suitable for "run on any linux distribution" style use cases. Wasmtime does not have static binary artifacts at this time and that will require building from source.
Rust targets that are #![no_std] don't support the entire feature set of
Wasmtime. For example the threads Cargo feature requires the standard library.
For more information see the no_std documentation. Additionally these
targets are sound in the presence of multiple threads but will panic on
contention of data structures. If you're doing multithreaded things in no_std
please file an issue so we can help solve your use case.
Unsupported features and platforms
While this is not an exhaustive list, Wasmtime does not currently have support for the following features. Note that this is intended to document Wasmtime's current state and does not mean Wasmtime does not want to ever support these features; rather design discussion and PRs are welcome for many of the below features to figure out how best to implement them and at least move them to Tier 3 above.
- Target: AArch64 FreeBSD
- Target: NetBSD/OpenBSD
- Cranelift Target: i686 (32-bit Intel targets)
- Cranelift Target: ARM 32-bit
- Cranelift Target: MIPS
- Cranelift Target: SPARC
- Cranelift Target: PowerPC
- Cranelift Target: RISC-V 32-bit
- WebAssembly Proposals: see documentation here
- WASI proposal:
proxy-wasm - WASI proposal:
wasi-blob-store - WASI proposal:
wasi-crypto - WASI proposal:
wasi-data - WASI proposal:
wasi-distributed-lock-service - WASI proposal:
wasi-grpc - WASI proposal:
wasi-message-queue - WASI proposal:
wasi-parallel - WASI proposal:
wasi-pubsub - WASI proposal:
wasi-sql - WASI proposal:
wasi-url
Compiler Support
Compiler backends of Wasmtime, at this time Cranelift and Winch, are further refined in the below table in their support for various architectures and WebAssembly features. Tier 1 WebAssembly feature are required to be supported by at least one compiler on all Tier 1 targets, and similarly for Tier 2 features and so on. Note that architecture here is independent of OS, meaning that support is uniform across Wasmtime's supported target for each tier. The legend here is:
- ✅ - fully supported
- 🚧 - work-in-progress
- ❌ - not supported yet
x86_64
| Feature | Cranelift | Winch |
|---|---|---|
mutable-globals | ✅ | ✅ |
sign-extension-ops | ✅ | ✅ |
nontrapping-float-to-int-conversion | ✅ | ✅ |
multi-value | ✅ | ✅ |
bulk-memory | ✅ | ✅ |
reference-types | ✅ | ❌7 |
simd | ✅ | ✅ |
component-model | ✅ | ✅ |
relaxed-simd | ✅ | ❌ |
multi-memory | ✅ | ✅ |
threads | ✅ | ✅ |
tail-call | ✅ | ❌ |
extended-const | ✅ | ✅ |
memory64 | ✅ | ✅ |
function-references | ✅ | ❌ |
gc | ✅ | ❌ |
wide-arithmetic | ✅ | ✅ |
custom-page-sizes | ✅ | ✅ |
exception-handling | ✅ | ❌ |
stack-switching | 🚧 | ❌ |
aarch64
| Feature | Cranelift | Winch8 |
|---|---|---|
mutable-globals | ✅ | ✅ |
sign-extension-ops | ✅ | ✅ |
nontrapping-float-to-int-conversion | ✅ | ✅ |
multi-value | ✅ | ✅ |
bulk-memory | ✅ | ✅ |
reference-types | ✅ | ❌7 |
simd | ✅ | ❌ |
component-model | ✅ | ✅ |
relaxed-simd | ✅ | ❌ |
multi-memory | ✅ | ✅ |
threads | ✅ | ❌ |
tail-call | ✅ | ❌ |
extended-const | ✅ | ✅ |
memory64 | ✅ | ✅ |
function-references | ✅ | ❌ |
gc | ✅ | ❌ |
wide-arithmetic | ✅ | ❌ |
custom-page-sizes | ✅ | ✅ |
exception-handling | ✅ | ❌ |
stack-switching | ❌ | ❌ |
s390x
| Feature | Cranelift | Winch |
|---|---|---|
mutable-globals | ✅ | ❌ |
sign-extension-ops | ✅ | ❌ |
nontrapping-float-to-int-conversion | ✅ | ❌ |
multi-value | ✅ | ❌ |
bulk-memory | ✅ | ❌ |
reference-types | ✅ | ❌7 |
simd | ✅ | ❌ |
component-model | ✅ | ❌ |
relaxed-simd | ✅ | ❌ |
multi-memory | ✅ | ❌ |
threads | ✅ | ❌ |
tail-call | ✅ | ❌ |
extended-const | ✅ | ❌ |
memory64 | ✅ | ❌ |
function-references | ✅ | ❌ |
gc | ✅ | ❌ |
wide-arithmetic | ✅ | ❌ |
custom-page-sizes | ✅ | ❌ |
exception-handling | ✅ | ❌ |
stack-switching | ❌ | ❌ |
riscv64
| Feature | Cranelift | Winch |
|---|---|---|
mutable-globals | ✅ | ❌ |
sign-extension-ops | ✅ | ❌ |
nontrapping-float-to-int-conversion | ✅ | ❌ |
multi-value | ✅ | ❌ |
bulk-memory | ✅ | ❌ |
reference-types | ✅ | ❌7 |
simd | ✅ | ❌ |
component-model | ✅ | ❌ |
relaxed-simd | ✅ | ❌ |
multi-memory | ✅ | ❌ |
threads | ✅ | ❌ |
tail-call | ✅ | ❌ |
extended-const | ✅ | ❌ |
memory64 | ✅ | ❌ |
function-references | ✅ | ❌ |
gc | ✅ | ❌ |
wide-arithmetic | ✅ | ❌ |
custom-page-sizes | ✅ | ❌ |
exception-handling | ✅ | ❌ |
stack-switching | ❌ | ❌ |
Pulley
Note that the pulley "architecture" is a stand-in for Wasmtime's baseline support for all platforms. This is how Wasmtime's interpreter works and this is intended to work on all platforms. The columns here are for compiler support for emitting Pulley bytecode.
| Feature | Cranelift | Winch |
|---|---|---|
mutable-globals | ✅ | ❌ |
sign-extension-ops | ✅ | ❌ |
nontrapping-float-to-int-conversion | ✅ | ❌ |
multi-value | ✅ | ❌ |
bulk-memory | ✅ | ❌ |
reference-types | ✅ | ❌7 |
simd | ✅ | ❌ |
component-model | ✅ | ❌ |
relaxed-simd | ✅ | ❌ |
multi-memory | ✅ | ❌ |
threads | ❌9 | ❌ |
tail-call | ✅ | ❌ |
extended-const | ✅ | ❌ |
memory64 | ✅ | ❌ |
function-references | ✅ | ❌ |
gc | ✅ | ❌ |
wide-arithmetic | ✅ | ❌ |
custom-page-sizes | ✅ | ❌ |
exception-handling | ✅ | ❌ |
stack-switching | ❌ | ❌ |
Winch supports some features of the reference-types proposal such as
the change to support multiple tables and LEB-encoding table indices in
instructions, but it does not support GC types such as externref or the
new table opcodes in the reference-types proposal.
Pulley does not support the threads proposal because there is no known
safe way to implement this with Rust's memory model.
Winch's support for aarch64 is complete for Core Wasm.
Tier Details
Wasmtime's precise definitions of tiers are not guaranteed to be constant over time, so these descriptions are likely to change over time. Tier 1 is classified as the highest level of support, confidence, and correctness for a component. Each tier additionally encompasses all the guarantees of previous tiers.
Features classified under a particular tier may already meet the criteria for later tiers as well. In situations like this it's not intended to use these guidelines to justify removal of a feature at any one point in time. Guidance is provided here for phasing out unmaintained features but it should be clear under what circumstances work "can be avoided" for each tier.
Tier 3 - Not Production Ready
The general idea behind Tier 3 is that this is the baseline for inclusion of code into the Wasmtime project. This is not intended to be a catch-all "if a patch is sent it will be merged" tier. Instead the goal of this tier is to outline what is expected of contributors adding new features to Wasmtime which might be experimental at the time of addition. This is intentionally not a relaxed tier of restrictions but already implies a significant commitment of effort to a feature being included within Wasmtime.
Tier 3 features include:
-
Inclusion of a feature does not impose unnecessary maintenance overhead on other components/features. Some examples of additions to Wasmtime which would not be accepted are:
- An experimental feature doubles the time of CI for all PRs.
- A change which makes it significantly more difficult to architecturally change Wasmtime's internal implementation.
- A change which makes building Wasmtime more difficult for unrelated developers.
In general Tier 3 features are off-by-default at compile time but still tested-by-default on CI.
-
New features of Wasmtime cannot have major known bugs at the time of inclusion. Landing a feature in Wasmtime requires the feature to be correct and bug-free as best can be evaluated at the time of inclusion. Inevitably bugs will be found and that's ok, but anything identified during review must be addressed.
-
Code included into the Wasmtime project must be of an acceptable level of quality relative to the rest of the code in Wasmtime.
-
There must be a path to a feature being finished at the time of inclusion. Adding a new backend to Cranelift for example is a significant undertaking which may not be able to be done in a single PR. Partial implementations of a feature are acceptable so long as there's a clear path forward and schedule for completing the feature.
-
New components in Wasmtime must have a clearly identified owner who is willing to be "on the hook" for review, updates to the internals of Wasmtime, etc. For example a new backend in Cranelift would need to have a maintainer who is willing to respond to changes in Cranelift's interfaces and the needs of Wasmtime.
This baseline level of support notably does not require any degree of testing, fuzzing, or verification. As a result components classified as Tier 3 are generally not production-ready as they have not been battle-tested much.
Features classified as Tier 3 may be disabled in CI or removed from the repository as well. If a Tier 3 feature is preventing development of other features then the owner will be notified. If no response is heard from within a week then the feature will be disabled in CI. If no further response happens for a month then the feature may be removed from the repository.
Tier 2 - Almost Production Ready
This tier is meant to encompass features and components of Wasmtime which are well-maintained, tested well, but don't necessarily meet the stringent criteria for Tier 1. Features in this category may already be "production ready" and safe to use.
Tier 2 features, organized by category, include:
-
Target
-
Tests are run in CI for this platform with a compiler, either directly or via emulation. This ensures that all changes to Wasmtime are tested against this target, and this additionally means that all applicable Tier 1/2 features are tested on this target in CI.
-
Complete implementations for anything that's part of Tier 1. For example all Tier 2 targets must implement all of the applicable Tier 1 WebAssembly proposals, and all Tier 2 features must be implemented on all Tier 1 targets.
-
-
WebAssembly Proposal
- Must be fully tested on CI. This means that it must pass tests on all applicable Tier 1 and Tier 2 target/compiler combos. Note that only one compiler is required to implement the feature at this time, but it must run, via some compiler, on all targets.
- The upstream WebAssembly proposal is stage 3+.
-
WASI Proposal
- Similar to WebAssembly proposals this must be fully tested on CI. WASI proposals at Tier 2 must support all Tier 1/2 targets, however.
-
Maintenance
-
All existing developers are expected to handle minor changes which affect Tier 2 components. For example if Cranelift's interfaces change then the developer changing the interface is expected to handle the changes for Tier 2 architectures so long as the affected part is relatively minor. Note that if a more substantial change is required to a Tier 2 component then that falls under the next bullet.
-
Maintainers of a Tier 2 feature are responsive (reply to requests within a week) and are available to accommodate architectural changes that affect their component. For example more expansive work beyond the previous bullet where contributors can't easily handle changes are expected to be guided or otherwise implemented by Tier 2 maintainers.
-
Major changes otherwise requiring an RFC that affect Tier 2 components are required to consult Tier 2 maintainers in the course of the RFC. Major changes to Tier 2 components themselves do not require an RFC, however.
-
Features at this tier generally are not turned off or disabled for very long. Maintainers are already required to be responsive to changes and will be notified of any unrelated change which affects their component. It's recommended that if a component breaks for one reason or another due to an unrelated change that the maintainer either contributes to the PR-in-progress or otherwise has a schedule for the implementation of the feature.
Tier 1 - Production Ready
This tier is intended to be the highest level of support in Wasmtime for any particular feature, indicating that it is suitable for production environments. This conveys a high level of confidence in the Wasmtime project about the specified features.
Tier 1 features, broken down by category, include:
-
WebAssembly Proposal
-
Continuous fuzzing is required for at least one target. This means that any WebAssembly proposal must have support in the
wasm-smithcrate and existing fuzz targets must be running and exercising the new code paths. Where possible differential fuzzing should also be implemented to compare results with other implementations. -
Must meet all stabilization requirements.
-
-
Target
- A target's architecture must be continuously fuzzing via at least one
Rust target. For example currently there are three x86_64 targets that are
considered Tier 1 but only
x86_64-unknown-linux-gnuis fuzzed.
- A target's architecture must be continuously fuzzing via at least one
Rust target. For example currently there are three x86_64 targets that are
considered Tier 1 but only
-
Compiler
- A compiler, like a target, must be continuously fuzzed on at least one target to be considered Tier 1 for a particular target.
-
Maintenance
-
CVEs and security releases will be performed as necessary for any bugs found in features and targets.
-
Major changes affecting this component may require help from maintainers with specialized expertise, but otherwise it should be reasonable to expect most Wasmtime developers to be able to maintain Tier 1 features.
-
Major changes affecting Tier 1 features require an RFC and prior agreement on the change before an implementation is committed.
-
A major inclusion point for this tier is intended to be the continuous fuzzing of Wasmtime. This implies a significant commitment of resources for fixing issues, hardware to execute Wasmtime, etc. Additionally this tier comes with the broadest expectation of "burden on everyone else" in terms of what changes everyone is generally expected to handle.
Features classified as Tier 1 are rarely, if ever, turned off or removed from Wasmtime.
Platform Support
This page is intended to give a high-level overview of Wasmtime's platform support along with some aspirations of Wasmtime. For more details see the documentation on tiers of stability which has specific information about what's supported in Wasmtime on a per-matrix-combination basis.
Wasmtime strives to support hardware that anyone wants to run WebAssembly on. Wasmtime is intended to work out-of-the-box on most platforms by having platform-specific defaults for the runtime. For example the native Cranelift backend is enabled by default if supported, but otherwise the Pulley interpreter backend is used if it's not supported.
Compiler Support
Cranelift supports x86_64, aarch64, s390x, and riscv64. No 32-bit platform is currently supported. Building a new backend for Cranelift is a relatively large undertaking which maintainers are willing to help with but it's recommended to reach out to Cranelift maintainers first to discuss this.
Winch supports x86_64. The aarch64 backend is in development. Winch is built on Cranelift's support for emitting instructions so Winch's possible backend list is currently limited to what Cranelift supports.
Usage of the Cranelift or Winch requires a host operating system which supports creating executable memory pages on-the-fly. Support for statically linking in a single precompiled module is not supported at this time.
Both Cranelift and Winch can be used either in AOT or JIT mode. In AOT mode one process precompiles a module/component and then loads it into another process. In JIT mode this is all done within the same process.
Neither Cranelift nor Winch support tiering at this time in the sense of having a WebAssembly module start from a Winch compilation and automatically switch to a Cranelift compilation. Modules are either entirely compiled with Winch or Cranelift.
Interpreter support
The wasmtime crate provides an implementation of a WebAssembly interpreter
named "Pulley" which is a portable implementation of
executing WebAssembly code. Pulley uses a custom bytecode which is created from
input WebAssembly similarly to how native architectures are supported. Pulley's
bytecode is created via a Cranelift backend for Pulley, so compile times for
the interpreter are expected to be similar to natively compiled code.
The main advantage of Pulley is that the bytecode can be executed on any
platform with the same pointer-width and endianness. For example to execute
Pulley on a 32-bit ARM platform you'd use the target pulley32. Similarly if
you wanted to run Pulley on x86_64 you'd use the target pulley64 for
Wasmtime.
Pulley's platform requirements are no greater than that of Wasmtime itself, meaning that the goal is that if you can compile Wasmtime for a Rust target then Pulley can run on that target.
Finally, note that while Pulley is optimized to be an efficient interpreter it will never be as fast as native Cranelift backends. A performance penalty should be expected when using Pulley.
OS Support
Wasmtime with Pulley should work out-of-the-box on any Rust target, but for optimal runtime performance of WebAssembly OS integration is required. In the same way that Pulley is slower than a native Cranelift backend Wasmtime will be slower on Rust targets it has no OS support for. Wasmtime will for example use virtual memory when possible to implement WebAssembly linear memories to efficiently allocate/grow/deallocate.
OS support at this time primarily includes Windows, macOS, and Linux. Other OSes such as iOS, Android, and Illumos are supported but less well tested. PRs to the Wasmtime repository are welcome for new OSes for better native platform support of a runtime environment.
Support for #![no_std]
The wasmtime crate supports being build on no_std platforms in Rust, but
only for a subset of its compile-time Cargo features. Currently supported
Cargo features are:
runtimegccomponent-modelpulleyasyncdebugdebug-builtinsdemangleanyhow
This notably does not include the default feature which means that when
depending on Wasmtime you'll need to specify default-features = false. This
also notably does not include Cranelift or Winch at this time meaning that
no_std platforms must be used in AOT mode where the module is precompiled
elsewhere.
Wasmtime's support for no_std requires the embedder to implement the equivalent
of a C header file to indicate how to perform basic OS operations such as
allocating virtual memory. This API can be found as wasmtime-platform.h in
Wasmtime's release artifacts or at
examples/min-platform/embedding/wasmtime-platform.h in the source tree. Note
that this API is not guaranteed to be stable at this time, it'll need to be
updated when Wasmtime is updated.
Wasmtime's runtime will use the symbols defined in this file meaning that if they're not defined then a link-time error will be generated. Embedders are required to implement these functions in accordance with their documentation to enable Wasmtime to run on custom platforms.
Note that many functions in this header file are gated behind off-by-default
#ifdef directives indicating that Wasmtime doesn't require them by default.
The wasmtime crate features custom-{virtual-memory,native-signals} can be
used to enable usage of these APIs if desired.
Wasm Proposals
This document is intended to describe the current status of WebAssembly proposals in Wasmtime. For information about implementing a proposal in Wasmtime see the associated documentation.
WebAssembly proposals that want to be tier 1 are required to check all boxes in this matrix. An explanation of each matrix column is below.
The emoji legend is:
- ✅ - fully supported
- 🚧 - work-in-progress
- ❌ - not supported yet
Tier 1 WebAssembly Proposals
| Proposal | Phase 4 | Tests | Finished | Fuzzed | API | C API |
|---|---|---|---|---|---|---|
mutable-globals | ✅ | ✅ | ✅ | ✅ | ✅ | ✅ |
sign-extension-ops | ✅ | ✅ | ✅ | ✅ | ✅ | ✅ |
nontrapping-fptoint | ✅ | ✅ | ✅ | ✅ | ✅ | ✅ |
multi-value | ✅ | ✅ | ✅ | ✅ | ✅ | ✅ |
bulk-memory | ✅ | ✅ | ✅ | ✅ | ✅ | ✅ |
reference-types | ✅ | ✅ | ✅ | ✅ | ✅ | ✅ |
simd | ✅ | ✅ | ✅ | ✅ | ✅ | ✅ |
component-model | ❌1 | ✅ | ✅ | 🚧2 | ✅ | 🚧3 |
relaxed-simd | ✅ | ✅ | ✅ | ✅ | ✅ | ✅ |
multi-memory | ✅ | ✅ | ✅ | ✅ | ✅ | ✅ |
tail-call | ✅ | ✅ | ✅ | ✅ | ✅ | ✅ |
extended-const | ✅ | ✅ | ✅ | ✅ | ✅ | ✅ |
memory64 | ✅ | ✅ | ✅ | ✅ | ✅ | ✅ |
The component-model proposal is not at phase 4 in the standardization
process but it is still enabled-by-default in Wasmtime.
Various shapes of components are fuzzed but full-on fuzzing along the
lines of wasm-smith are not implemented for components.
The component model is mostly supported in the C API but gaps remain.
Tier 2 WebAssembly Proposals
| Proposal | Phase 4 | Tests | Finished | Fuzzed | API | C API |
|---|---|---|---|---|---|---|
custom-page-sizes | ❌ | ✅ | ✅ | ✅ | ✅ | ✅ |
exception-handling | ✅ | ✅ | ✅ | ✅ | ✅ | ✅ |
function-references | ✅ | ✅ | ✅ | 🚧 | ✅ | ❌ |
gc 4 | ✅ | ✅ | 🚧5 | 🚧6 | ✅ | ✅ |
threads | ✅ | ✅ | 🚧7 | ❌8 | ✅ | ✅ |
wide-arithmetic | ❌ | ✅ | ✅ | ✅ | ✅ | ✅ |
Fuzzing with threads is an open implementation question that is expected
to get fleshed out as the shared-everything-threads proposal advances.
There is also a tracking issue for the GC proposal.
The implementation of Wasm GC is feature complete from a specification perspective, however a number of quality-of-implementation tasks remain, notably a tracing collector that can reclaim garbage cycles.
The GC proposal is lightly fuzzed via wasm-smith and our usual
whole-module fuzz targets like differential, but we would like to
additionally extend the table_ops fuzz target to exercise more of the GC
proposal.
There are known
issues with
shared memories and the implementation/API in Wasmtime, for example they
aren't well integrated with resource-limiting features in Store.
Additionally shared memories aren't supported in the pooling allocator.
Tier 3 WebAssembly Proposals
| Proposal | Phase 4 | Tests | Finished | Fuzzed | API | C API |
|---|---|---|---|---|---|---|
stack-switching 9 | ❌ | 🚧 | 🚧 | ❌ | ❌ | ❌ |
The stack-switching proposal is a work-in-progress being tracked at #9465. Currently the implementation is only for x86_64 Linux.
Unimplemented proposals
| Proposal | Tracking Issue |
|---|---|
branch-hinting | #9463 |
flexible-vectors | #9464 |
memory-control | #9467 |
shared-everything-threads | #9466 |
Feature requirements
For each column in the above tables, this is a further explanation of its meaning:
-
Phase 4 - The proposal must be in phase 4, or greater, of the WebAssembly standardization process.
-
Tests - All spec tests must be passing in Wasmtime and where appropriate Wasmtime-specific tests, for example for the API, should be passing. Tests must pass at least for Cranelift on all tier 1 platforms, but missing other platforms is otherwise acceptable.
-
Finished - No open questions, design concerns, or serious known bugs. The implementation should be complete to the extent that is possible. Support must be implemented for all tier 1 targets and compiler backends.
-
Fuzzed - Has been fuzzed for at least a week minimum. We are also confident that the fuzzers are fully exercising the proposal's functionality. The
module_generation_uses_expected_proposalstest in thewasmtime-fuzzingcrate must be updated to include this proposal.For example, it would not have been enough to simply enable reference types in the
compilefuzz target to enable that proposal by default. Compiling a module that uses reference types but not instantiating it nor running any of its functions doesn't exercise any of the GC implementation and does not run the inline fast paths fortableoperations emitted by the JIT. Exercising these things was the motivation for writing the custom fuzz target fortable.{get,set}instructions.One indication of the status of fuzzing is this file which controls module configuration during fuzzing.
-
API - The proposal's functionality is exposed in the
wasmtimecrate's API. At minimum this isConfig::wasm_the_proposalbut proposals such asgcalso add new types to the API. -
C API - The proposal's functionality is exposed in the C API.
-
Enabled - Whether or not this feature is on-by-default. Off-by-default features require an opt-in on the CLI or via the embedding API to use, but on-by-default features require no explicit action to use the feature.
Security
One of WebAssembly (and Wasmtime's) main goals is to execute untrusted code in a safe manner inside of a sandbox. WebAssembly is inherently sandboxed by design (must import all functionality, etc). This document is intended to cover the various sandboxing implementation strategies that Wasmtime has as they are developed. This has also been documented in a historical blog post too.
At this time Wasmtime implements what's necessary for the WebAssembly specification, for example memory isolation between instances. Additionally the safe Rust API is intended to mitigate accidental bugs in hosts.
Different sandboxing implementation techniques will also come with different tradeoffs in terms of performance and feature limitations, and Wasmtime plans to offer users choices of which tradeoffs they want to make.
WebAssembly Core
The core WebAssembly spec has several features which create a unique sandboxed environment:
-
The callstack is inaccessible. Unlike most native execution environments, return addresses from calls and spilled registers are not stored in memory accessible to applications. They are stored in memory that only the implementation has access to, which makes traditional stack-smashing attacks targeting return addresses impossible.
-
Pointers, in source languages which have them, are compiled to offsets into linear memory, so implementations details such as virtual addresses are hidden from applications. And all accesses within linear memory are checked to ensure they stay in bounds.
-
All control transfers—direct and indirect branches, as well as direct and indirect calls—are to known and type-checked destinations, so it's not possible to accidentally call into the middle of a function or branch outside of a function.
-
All interaction with the outside world is done through imports and exports. There is no raw access to system calls or other forms of I/O; the only thing a WebAssembly instance can do is what is available through interfaces it has been explicitly linked with.
-
There is no undefined behavior. Even where the WebAssembly spec permits multiple possible behaviors, it doesn't permit arbitrary behavior.
Defense-in-depth
While WebAssembly is designed to be sandboxed bugs or issues inevitably arise so Wasmtime also implements a number of mitigations which are not required for correct execution of WebAssembly but can help mitigate issues if bugs are found:
-
Linear memories by default are preceded with a 2GB guard region. WebAssembly has no means of ever accessing this memory but this can protect against accidental sign-extension bugs in Cranelift where if an offset is accidentally interpreted as a signed 32-bit offset instead of an unsigned offset it could access memory before the addressable memory for WebAssembly.
-
Wasmtime uses explicit checks to determine if a WebAssembly function should be considered to stack overflow, but it still uses guard pages on all native thread stacks. These guard pages are never intended to be hit and will abort the program if they're hit. Hitting a guard page within WebAssembly indicates a bug in host configuration or a bug in Cranelift itself.
-
Where it can Wasmtime will zero memory used by a WebAssembly instance after it's finished. This is not necessary unless the memory is actually reused for instantiation elsewhere but this is done to prevent accidental leakage of information between instances in the face of other bugs. This applies to linear memories, tables, and the memory used to store instance information itself.
-
The choice of implementation language, Rust, for Wasmtime is also a defense in protecting the authors for Wasmtime from themselves in addition to protecting embedders from themselves. Rust helps catch mistakes when writing Wasmtime itself at compile time. Rust additionally enables Wasmtime developers to create an API that means that embedders can't get it wrong. For example it's guaranteed that Wasmtime won't segfault when using its public API, empowering embedders with confidence that even if the embedding has bugs all of the security guarantees of WebAssembly are still upheld.
-
Wasmtime is in the process of implementing control-flow-integrity mechanisms to leverage hardware state for further guaranteeing that WebAssembly stays within its sandbox. In the event of a bug in Cranelift this can help mitigate the impact of where control flow can go to.
Filesystem Access
Wasmtime implements the WASI APIs for filesystem access, which follow a capability-based security model, which ensures that applications can only access files and directories they've been given access to. WASI's security model keeps users safe today, and also helps us prepare for shared-nothing linking and nanoprocesses in the future.
Wasmtime developers are intimately engaged with the WASI standards process, libraries, and tooling development, all along the way too.
Terminal Output
If untrusted code is allowed to print text which is displayed to a terminal, it may emit ANSI-style escape sequences and other control sequences which, depending on the terminal the user is using and how it is configured, can have side effects including writing to files, executing commands, injecting text into the stream as if the user had typed it, or reading the output of previous commands. ANSI-style escape sequences can also confuse or mislead users, making other vulnerabilities easier to exploit.
Our first priority is to protect users, so Wasmtime now filters writes to output streams when they are connected to a terminal to translate escape sequences into inert replacement sequences.
Some applications need ANSI-style escape sequences, such as terminal-based editors and programs that use colors, so we are also developing a proposal for the WASI Subgroup for safe and portable ANSI-style escape sequence support, which we hope to post more about soon.
Spectre
Wasmtime implements a few forms of basic spectre mitigations at this time:
-
Bounds checks when accessing entries in a function table (e.g. the
call_indirectinstruction) are mitigated. -
The
br_tableinstruction is mitigated to ensure that speculation goes to a deterministic location. -
Wasmtime's default configuration for linear memory means that bounds checks will not be present for memory accesses due to the reliance on page faults to instead detect out-of-bounds accesses. When Wasmtime is configured with "dynamic" memories, however, Cranelift will insert spectre mitigation for the bounds checks performed for all memory accesses.
Mitigating Spectre continues to be a subject of ongoing research, and Wasmtime will likely grow more mitigations in the future as well.
Note that on aarch64 the csdb instruction is disabled by default due to its
significant performance penalty, but this can be additionally enabled through
the use_csdb Cranelift setting.
Disclosure Policy
The disclosure policy for security issues in Wasmtime is documented on the Bytecode Alliance website.
What is considered a security vulnerability?
If you are still unsure whether an issue you are filing is a security vulnerability or not after reading this page, always err on the side of caution and report it as a security vulnerability!
Bugs must affect a tier 1 platform or feature to be considered a security vulnerability.
The security of the host and integrity of the sandbox when executing Wasm is paramount. Anything that undermines the Wasm execution sandbox is a security vulnerability.
On the other hand, execution that diverges from Wasm semantics (such as computing incorrect values) are not considered security vulnerabilities so long as they remain confined within the sandbox. This has a couple repercussions that are worth highlighting:
-
Even though it is safe from the host's point of view, an incorrectly computed value could lead to classic memory unsafety bugs from the Wasm guest's point of view, such as corruption of its
malloc's free list or reading past the end of a source-level array. -
Wasmtime embedders should never blindly trust values from the guest — no matter how trusted the guest program is, even if it was written by the embedders themselves — and should always validate these values before performing unsafe operations on behalf of the guest.
Denials of service when executing Wasm (either originating inside compiled Wasm code or Wasmtime's runtime subroutines) are considered security vulnerabilities. For example, if you configure Wasmtime to run Wasm guests with the async fuel mechanism, and then executing the Wasm goes into an infinite loop that never yields, that is considered a security vulnerability.
Denials of service when compiling Wasm, however, are not considered security vulnerabilities. For example, an infinite loop during register allocation is not a security vulnerability.
Any kind of memory unsafety (e.g. use-after-free bugs, out-of-bounds memory accesses, etc...) in the host is always a security vulnerability.
Cheat Sheet: Is this bug considered a security vulnerability?
| Type of bug | At Wasm Compile Time | At Wasm Execution Time |
|---|---|---|
| Sandbox escape | - | Yes |
| - | Yes |
| - | Yes |
| - | Yes |
| - | Yes |
| - | Yes |
| - | Yes |
| Divergence from Wasm semantics (without escaping the sandbox) | - | No |
| - | No |
| - | No |
| - | No |
| Memory unsafety | Yes | Yes |
| Yes | Yes |
| Yes | Yes |
| Yes | Yes |
| Yes | Yes |
| Denial of service | No | Yes |
| No | Yes |
| No | Yes |
| No | Yes |
| No | Yes |
| No | Yes |
| No | Yes |
Note that we still want to fix every bug mentioned above even if it is not a security vulnerability! We appreciate when issues are filed for non-vulnerability bugs, particularly when they come with test cases and steps to reproduce!
Backports for non-security related fixes is documented here.
Vulnerability Runbook
This document outlines how Wasmtime maintainers should respond to a security vulnerability found in Wasmtime. This is intended to be a Wasmtime-specific variant of the runbook RFC originally created. More details are available in the RFC in some specific steps.
Vulnerabilities and advisories are all primarily coordinated online through GitHub Advisories on the Wasmtime repository. Anyone can make an advisory on Wasmtime, and once created anyone can be added to an advisory. Once an advisory is created these steps are followed:
-
An Incident Manager is selected. By default this is the Wasmtime maintainer that opened the advisory. If a contributor opened the advisory then it's by default the first responder on the advisory. The incident manager can, at any time, explicitly hand off this role to another maintainer.
-
Fill out the advisory details. This step involves filling out all the fields on the GitHub Advisory page such as:
- Description - the description field's initial placeholder has the various sections to fill out. At this point at least a brief description of the impact should be filled out. This will get fleshed out more later too.
- Affected versions - determine which previously released versions of Wasmtime are affected by this issue.
- Severity - use the CVSS calculator to determine the severity of this vulnerability.
-
Collaborate on a fix. This should be done in a private fork created for the security advisory. This is also when any collaborators who can help with the development of the fix should also be invited. At this time only the
mainbranch needs to have a fix. -
Finalize vulnerability details and patched versions. After a fix has been developed and the vulnerability is better understood at this point the description of the advisory should be fully filled out and be made ready to go to the public. This is also when the incident manager should determine the number of versions of Wasmtime to patch. All supported releases documented must be patched, but the incident manager may also elect to patch more releases if desired.
-
Request a CVE. Use the Big Green Button on the advisory to request a CVE number from GitHub staff.
-
Send advanced disclosure email. The incident manager will decide on a disclosure date, typically no more than a week away, and send mail to sec-announce@bytecodealliance.org about the upcoming security release. An example mail looks like this
-
Add more stakeholders (optional). Users interested in getting advanced notice about this vulnerability may respond to the mailing list post. The incident manager will add them to the security advisory.
-
Prepare PRs for patch releases. This will involve creating more pull requests in the private fork attached to the advisory. Each version of Wasmtime being patched should have a PR ready-to-go which cleanly applies. Be sure to write release notes on the PR for each release branch.
-
The full test suite should be run locally for
main. Locally try to run as much of the CI matrix as you can. You probably won't be able to run all of it, and that's ok, but try to get the ones that may have common failures. This is required because CI doesn't run on private forks. -
Release day: Open version bump PRs on the public repository. Use the online trigger for this workflow to open PRs for all versions that are going to be patched. Patch notes should be included with the private PRs, so no need to worry about that. Plan on merging these PRs after the PRs below are merged. Note that CI should be green as we test that it's green weekly for all supported branches, but if it's not you'll need to fix that. GitHub Actions has a nontrivial chance of having an outage during a release. If this is the case all that can be done is waiting for the outage to be resolved.
-
Release day: Manually make PRs to affected branches. DO NOT merge via the security advisory. This has generally not worked well historically because there's too many CI failures and branch protections. On the day of the release make public PRs from all of the previously-created PRs on the private fork. You'll need to push the changes to your own personal repository for this, but that's ok since it's time to make things public anyway. Merge all PRs (including to
main) once CI passes. -
Release day: Merge version bump PRs. Once the fixes have all been merged and CI is green merge all the version bump PRs. That will trigger the automatic release process which will automatically publish to crates.io and publish the release.
-
Release day: Publish the GitHub Advisories. Delete the private forks and hit that Big Green Button to publish the advisory.
-
Release day: Send mail about the security release. Send another around of mail to sec-announce@bytecodealliance.org describing the security release. This mail looks like this.
-
Add the advisory to the RustSec database. We mirror our advisories into the RustSec database for projects using Cargo-based tooling to check for security issue with their dependencies. An example of this is RUSTSEC-2024-0440. File a PR with the RustSec/advisory-db repository adding a new file in the
crates/wasmtimedirectory. You'll use the file nameRUSTSEC-0000-0000.mdand can copy metadata from a previous advisory. The description should just point to the GitHub advisory published prior.
You'll want to pay close attention to CI on release day. There's likely going to be CI failures with the fix for the vulnerability for some build configurations or platforms and such. It should be easy to fix though so mostly try to stay on top of it. Additionally be sure to carefully watch the publish process to crates.io. It's possible to hit rate limits in crate publication which necessitates a retry of the job later. You can also try publishing locally too from the release branch, but it's best to do it through CI.
Contributing
We're excited to work on Wasmtime and/or Cranelift together with you! This guide should help you get up and running with Wasmtime and Cranelift development. But first, make sure you've read the Code of Conduct!
Wasmtime and Cranelift are very ambitious projects with many goals, and while we're confident we can achieve some of them, we see many opportunities for people to get involved and help us achieve even more.
Join Our Chat
We chat about Wasmtime and Cranelift development on Zulip — join us!. You can also join specific streams:
If you're having trouble building Wasmtime or Cranelift, aren't sure why a test is failing, or have any other questions, feel free to ask on Zulip. Not everything we hope to do with these projects is reflected in the code or documentation yet, so if you see things that seem missing or that don't make sense, or even that just don't work the way you expect them to, we're also interested to hear about that!
As always, you're more than welcome to open an issue too!
Finally, we have biweekly project meetings, hosted on Zoom, for Wasmtime and Cranelift. For more information, see our meetings agendas/minutes repository. Please feel free to contact us via Zulip if you're interested in joining!
Finding Something to Hack On
If you're looking for something to do, these are great places to start:
-
Issues labeled "good first issue" — these issues tend to be simple, what needs to be done is well known, and are good for new contributors to tackle. The goal is to learn Wasmtime's development workflow and make sure that you can build and test Wasmtime.
-
Issues labeled "help wanted" — these are issues that we need a little help with!
If you're unsure if an issue is a good fit for you or not, feel free to ask in a comment on the issue, or in chat.
Mentoring
We're happy to mentor people, whether you're learning Rust, learning about compiler backends, learning about machine code, learning about wasm, learning about how Cranelift does things, or all together at once.
We categorize issues in the issue tracker using a tag scheme inspired by Rust's issue tags. For example, the E-easy marks good beginner issues, and E-rust marks issues which likely require some familiarity with Rust, though not necessarily Cranelift-specific or even compiler-specific experience. E-compiler-easy marks issues good for beginners who have some familiarity with compilers, or are interested in gaining some :-).
See also the full list of Cranelift labels.
Also, we encourage people to just look around and find things they're interested in. This a good time to get involved, as there aren't a lot of things set in stone yet.
Avoiding Trivial Pull Requests
Merging a Pull Request comes at a fundamental cost, from adding to the volume of notifications maintainers receive, to at least one maintainer having to review the proposed changes, to the many hours of machine time our CI consumes before greenlighting a PR.
As such, we request that contributors don't open Pull Requests with trivial changes, such as typo fixes in documentation. Instead, those changes should be included, as separate commits, in more substantive Pull Requests. Wasmtime maintainers will close Pull Requests containing only trivial changes with a reference to this section of the docs.
Architecture of Wasmtime
This document is intended to give an overview of the implementation of Wasmtime.
This will explain the purposes of the various wasmtime-* crates that the main
wasmtime crate depends on. For even more detailed information it's recommended
to review the code itself and find the comments contained within.
The wasmtime crate
The main entry point for Wasmtime is the wasmtime crate itself. Wasmtime is
designed such that the wasmtime crate is nearly a 100% safe API (safe in the
Rust sense) modulo some small and well-documented functions as to why they're
unsafe. The wasmtime crate provides features and access to WebAssembly
primitives and functionality, such as compiling modules, instantiating them,
calling functions, etc.
At this time the wasmtime crate is the first crate that is intended to be
consumed by users. First in this sense means that everything wasmtime depends
on is thought of as an internal dependency. We publish crates to crates.io but
put very little effort into having a "nice" API for internal crates or worrying
about breakage between versions of internal crates. This primarily means that
all the other crates discussed here are considered internal dependencies of
Wasmtime and don't show up in the public API of Wasmtime at all. To use some
Cargo terminology, all the wasmtime-* crates that wasmtime depends on are
"private" dependencies.
Additionally at this time the safe/unsafe boundary between Wasmtime's internal
crates is not the most well-defined. There are methods that should be marked
unsafe which aren't, and unsafe methods do not have exhaustive documentation
as to why they are unsafe. This is an ongoing matter of improvement, however,
where the goal is to have safe methods be actually safe in the Rust sense,
as well as having documentation for unsafe methods which clearly lists why
they are unsafe.
Important concepts
To preface discussion of more nitty-gritty internals, it's important to have a few concepts in the back of your head. These are some of the important types and their implications in Wasmtime:
-
wasmtime::Engine- this is a global compilation context which is sort of the "root context". AnEngineis typically created once per program and is expected to be shared across many threads (internally it's atomically reference counted). EachEnginestores configuration values and other cross-thread data such as type interning forModuleinstances. The main thing to remember forEngineis that any mutation of its internals typically involves acquiring a lock, whereas forStorebelow no locks are necessary. -
wasmtime::Store- this is the concept of a "store" in WebAssembly. While there's also a formal definition to go off of, it can be thought of as a bag of related WebAssembly objects. This includes instances, globals, memories, tables, etc. AStoredoes not implement any form of garbage collection of the internal items (there is agcfunction but that's just forexternrefvalues). This means that once you create anInstanceor aTablethe memory is not actually released until theStoreitself is deallocated. AStoreis sort of a "context" used for almost all wasm operations.Storealso contains instance handles which recursively refer back to theStore, leading to a good bit of aliasing of pointers within theStore. The important thing for now, though, is to know thatStoreis a unit of isolation. WebAssembly objects are always entirely contained within aStore, and at this time nothing can cross between stores (except scalars if you manually hook it up). In other words, wasm objects from different stores cannot interact with each other. AStorecannot be used simultaneously from multiple threads (almost all operations require&mut self). -
wasmtime::runtime::vm::InstanceHandle- this is the low-level representation of a WebAssembly instance. At the same time this is also used as the representation for all host-defined objects. For example if you callwasmtime::Memory::newit'll create anInstanceHandleunder the hood. This is a veryunsafetype that should probably have all of its functions markedunsafeor otherwise have more strict guarantees documented about it, but it's an internal type that we don't put much thought into for public consumption at this time. AnInstanceHandledoesn't know how to deallocate itself and relies on the caller to manage its memory. Currently this is either allocated on-demand (withmalloc) or in a pooling fashion (using the pooling allocator). Thedeallocatemethod is different in these two paths (as well as theallocatemethod).An
InstanceHandleis laid out in memory with some Rust-owned values first capturing the dynamic state of memories/tables/etc. Most of these fields are unused for host-defined objects that serve one purpose (e.g. awasmtime::Table::new), but for an instantiated WebAssembly module these fields will have more information. After anInstanceHandlein memory is aVMContext, which will be discussed next.InstanceHandlevalues are the main internal runtime representation and what thecrate::runtime::vmcode works with. Thewasmtime::Storeholds onto all theseInstanceHandlevalues and deallocates them at the appropriate time. From the runtime perspective it simplifies things so the graph of wasm modules communicating to each other is reduced to simplyInstanceHandlevalues all talking to themselves. -
crate::runtime::vm::VMContext- this is a raw pointer, within an allocation of anInstanceHandle, that is passed around in JIT code. AVMContextdoes not have a structure defined in Rust (it's a 0-sized structure) because its contents are dynamically determined based on theVMOffsets, or the source wasm module it came from. EachInstanceHandlehas a "shape" of aVMContextcorresponding with it. For example aVMContextstores all values of WebAssembly globals, but if a wasm module has no globals then the size of this array will be 0 and it won't be allocated. The intention of aVMContextis to be an efficient in-memory representation of all wasm module state that JIT code may access. The layout ofVMContextis dynamically determined by a module and JIT code is specialized for this one structure. This means that the structure is efficiently accessed by JIT code, but less efficiently accessed by native host code. A non-exhaustive list of purposes of theVMContextis to:- Store WebAssembly instance state such as global values, pointers to tables, pointers to memory, and pointers to other JIT functions.
- Separate wasm imports and local state. Imported values have pointers stored to their actual values, and local state has the state defined inline.
- Hold a pointer to the stack limit at which point JIT code will trigger a stack overflow.
- Hold a pointer to a
VMExternRefActivationsTablefor fast-path insertion ofexternrefvalues into the table. - Hold a pointer to a
*mut dyn crate::runtime::vm::Storeso store-level operations can be performed in libcalls.
A comment about the layout of a
VMContextcan be found in thevmoffsets.rsfile. -
wasmtime::Module- this is the representation of a compiled WebAssembly module. At this time Wasmtime always assumes that a wasm module is always compiled to native JIT code.Moduleholds the results of said compilation, and currently Cranelift can be used for compiling. It is a goal of Wasmtime to support other modes of representing modules but those are not implemented today just yet, only Cranelift is implemented and supported. -
wasmtime_environ::Module- this is a descriptor of a wasm module's type and structure without holding any actual JIT code. An instance of this type is created very early on in the compilation process, and it is not modified when functions themselves are actually compiled. This holds the internal type representation and state about functions, globals, etc. In a sense this can be thought of as the result of validation or typechecking a wasm module, although it doesn't have information such as the types of each opcode or minute function-level details like that.
Compiling a module
With a high-level overview and some background information of types, this will
next walk through the steps taken to compile a WebAssembly module. The main
entry point for this is the wasmtime::Module::from_binary API. There are a
number of other entry points that deal with surface-level details like
translation from text-to-binary, loading from the filesystem, etc.
Compilation is roughly broken down into a few phases:
-
First compilation walks over the WebAssembly module validating everything except function bodies. This synchronous pass over a wasm module creates a
wasmtime_environ::Moduleinstance and additionally prepares for function compilation. Note that with the module linking proposal one input module may end up creating a number of output modules to process. Each module is processed independently and all further steps are parallelized on a per-module basis. Note that parsing and validation of the WebAssembly module happens with thewasmparsercrate. Validation is interleaved with parsing, validating parsed values before using them. -
Next all functions within a module are validated and compiled in parallel. No inter-procedural analysis is done and each function is compiled as its own little island of code at this time. This is the point where the meat of Cranelift is invoked on a per-function basis.
-
The compilation results at this point are all woven into a
wasmtime_jit::CompilationArtifactsstructure. This holds module information (wasmtime_environ::Module), compiled JIT code (stored as an ELF image), and miscellaneous other information about functions such as platform-agnostic unwinding information, per-function trap tables (indicating which JIT instructions can trap and what the trap means), per-function address maps (mapping from JIT addresses back to wasm offsets), and debug information (parsed from DWARF information in the wasm module). These results are inert and can't actually be executed, but they're appropriate at this point to serialize to disk or begin the next phase... -
The final step is to actually place all code into a form that's ready to get executed. This starts from the
CompilationArtifactsof the previous step. Here a new memory mapping is allocated and the JIT code is copied into this memory mapping. This memory mapping is then switched from read/write to read/execute so it's actually executable JIT code at this point. This is where various hooks like loading debuginfo, informing JIT profilers of new code, etc, all happens. At this point awasmtime_jit::CompiledModuleis produced and this is itself wrapped up in awasmtime::Module. At this point the module is ready to be instantiated.
A wasmtime::Module is an atomically-reference-counted object where upon
instantiation into a Store, the Store will hold a strong reference to the
internals of the module. This means that all instances of a wasmtime::Module
share the same compiled code. Additionally a wasmtime::Module is one of the
few objects that lives outside of a wasmtime::Store. This means that
wasmtime::Module's reference counting is its own form of memory management.
Note that the property of sharing a module's compiled code across all
instantiations has interesting implications on what the compiled code can
assume. For example Wasmtime implements a form of type interning, but the
interned types happen at a few different levels. Within a module we deduplicate
function types, but across modules in a Store types need to be represented
with the same value. This means that if the same module is instantiated into
many stores its same function type may take on many values, so the compiled
code can't assume a particular value for a function type. (more on type
information later). The general gist though is that compiled code leans
relatively heavily on the VMContext for contextual input because the JIT code
is intended to be so widely reusable.
Trampolines
An important aspect to also cover for compilation is the creation of trampolines. Trampolines in this case refer to code executed by Wasmtime to enter WebAssembly code. The host may not always have prior knowledge about the signature of the WebAssembly function that it wants to call. Wasmtime JIT code is compiled with native ABIs (e.g. params/results in registers according to System V on Unix), which means that a Wasmtime embedding doesn't have an easy way to enter JIT code.
This problem is what the trampolines compiled into a module solve, which is to
provide a function with a known ABI that will call into a function with a
specific other type signature/ABI. Wasmtime collects all the exported functions
of a module and creates a set of their type signatures. Note that exported in
this context actually means "possibly exported" which includes things like
insertion into a global/function table, conversion to a funcref, etc. A
trampoline is generated for each of these type signatures and stored along with
the JIT code for the rest of the module.
These trampolines are then used with the wasmtime::Func::call API where in
that specific case because we don't know the ABI of the target function the
trampoline (with a known ABI) is used and has all the parameters/results passed
through the stack.
Another point of note is that trampolines are not deduplicated at this time. Each compiled module contains its own set of trampolines, and if two compiled modules have the same types then they'll have different copies of the same trampoline.
Type Interning and VMSharedSignatureIndex
One important point to talk about with compilation is the
VMSharedSignatureIndex type and how it's used. The call_indirect opcode in
wasm compares an actual function's signature against the function signature of
the instruction, trapping if the signatures mismatch. This is implemented in
Wasmtime as an integer comparison, and the comparison happens on a
VMSharedSignatureIndex value. This index is an intern'd representation of a
function type.
The scope of interning for VMSharedSignatureIndex happens at the
wasmtime::Engine level. Modules are compiled into an Engine. Insertion of a
Module into an Engine will assign a VMSharedSignatureIndex to all of the
types found within the module.
The VMSharedSignatureIndex values for a module are local to that one
instantiation of a Module (and they may change on each insertion of a
Module into a different Engine). These are used during the instantiation
process by the runtime to assign a type ID effectively to all functions for
imports and such.
Instantiating a module
Once a module has been compiled it's typically then instantiated to actually
get access to the exports and call wasm code. Instantiation always happens
within a wasmtime::Store and the created instance (plus all exports) are tied
to the Store.
Instantiation itself (crates/wasmtime/src/instance.rs) may look complicated,
but this is primarily due to the implementation of the Module Linking proposal.
The rough flow of instantiation looks like:
-
First all imports are type-checked. The provided list of imports is cross-referenced with the list of imports recorded in the
wasmtime_environ::Moduleand all types are verified to line up and match (according to the core wasm specification's definition of type matching). -
Each
wasmtime_environ::Modulehas a list of initializers that need to be completed before instantiation is finished. For MVP wasm this only involves loading the import into the correct index array, but for module linking this could involve instantiating other modules, handlingaliasfields, etc. In any case the result of this step is acrate::runtime::vm::Importsarray which has the values for all imported items into the wasm module. Note that in this case an import is typically some sort of raw pointer to the actual state plus theVMContextof the instance that was imported from. The final result of this step is anInstanceAllocationRequest, which is then submitted to the configured instance allocator, either on-demand or pooling. -
The
InstanceHandlecorresponding to this instance is allocated. How this is allocated depends on the strategy (malloc for on-demand, slab allocation for pooling). In addition to initialization of the fields ofInstanceHandlethis also initializes all the fields of theVMContextfor this handle (which as mentioned above is adjacent to theInstanceHandleallocation after it in memory). This does not process any data segments, element segments, or thestartfunction at this time. -
At this point the
InstanceHandleis stored within theStore. This is the "point of no return" where the handle must be kept alive for the same lifetime as theStoreitself. If an initialization step fails then the instance may still have had its functions, for example, inserted into an imported table via an element segment. This means that even if we fail to initialize this instance its state could still be visible to other instances/objects so we need to keep it alive regardless. -
The final step is performing wasm-defined instantiation. This involves processing element segments, data segments, the
startfunction, etc. Most of this is just translating from Wasmtime's internal representation to the specification's required behavior.
Another part worth pointing out for instantiating a module is that a
ModuleRegistry is maintained within a Store of all instantiated modules
into the store. The purpose of this registry is to retain a strong reference to
items in the module needed to run instances. This includes the JIT code
primarily but also has information such as the VMSharedSignatureIndex
registration, metadata about function addresses and such, etc. Much of this
data is stored into a GLOBAL_MODULES map for later access during traps.
Traps
Once instances have been created and wasm starts running most things are fairly standard. Trampolines are used to enter wasm and JIT code generally does what it does to execute wasm. An important aspect of the implementation to cover, however, is traps.
Wasmtime today implements traps with the support for exceptions in Cranelift. Notably the entry trampoline into WebAssembly sets up an "base handler" used to catch all traps, and when a trap happens this is resumed to. The exception handler itself takes care of, for example, restoring registers.
Traps can happen from a few different sources:
-
Explicit traps - these can happen when a host call returns a trap, for example. These bottom out in
raise_user_traporraise_lib_trap, both of which immediately calllongjmpto go back to the wasm starting point. Note that these, like when calling wasm, have to have callers be very careful to not have any destructors on the stack. -
Signals - this is the main vector for trap. Basically we use segfault and illegal instructions to implement traps in wasm code itself. Segfaults arise when linear memory accesses go out of bounds and illegal instructions are how the wasm
unreachableinstruction is implemented. In both of these cases Wasmtime installs a platform-specific signal handler to catch the signal, inspect the state of the signal, and then handle it. Note that Wasmtime tries to only catch signals that happen from JIT code itself as to not accidentally cover up other bugs. Exiting a signal handler happens vialongjmpto get back to the original wasm call-site.
The general idea is that Wasmtime has very tight control over the stack frames of wasm (naturally via Cranelift), and just after we reenter back into wasm (aka trampolines on entry/exit).
The signal handler for Wasmtime uses the GLOBAL_MODULES map populated during
instantiation to determine whether a program counter that triggered a signal is
indeed a valid wasm trap. This should be true except for cases where the host
program has another bug that triggered the signal.
A final note worth mentioning is that Wasmtime uses the Rust backtrace crate
to capture a stack trace when a wasm exception occurs. This forces Wasmtime to
generate native platform-specific unwinding information to correctly unwind the
stack and generate a stack trace for wasm code. This does have other benefits as
well such as improving generic sampling profilers when used with Wasmtime.
Linear Memory
Linear memory in Wasmtime is implemented effectively with mmap (or the
platform equivalent thereof), but there are some subtle nuances that are worth
pointing out here too. The implementation of linear memory is relatively
configurable which gives rise to a number of situations that both the runtime
and generated code need to handle.
First there are a number of properties about linear memory which can be configured:
wasmtime::Config::memory_reservationwasmtime::Config::memory_may_movewasmtime::Config::memory_guard_sizewasmtime::Config::memory_reservation_for_growthwasmtime::Config::memory_init_cowwasmtime::Config::guard_before_linear_memorywasmtime::Config::signals_based_traps
The methods on Config have a good bit of documentation to go over some
nitty-gritty. Wasmtime also has some #[cfg] directives which are calculated by
crates/wasmtime/build.rs which affects the defaults of various strategies. For
example has_native_signals means that segfaults are allowed to happen at
runtime and are caught in a signal handler. Additionally has_virtual_memory
means that mmap is available and will be used (otherwise a fallback to
malloc is implemented). The matrix of all of these combinations is then used
to implement a linear memory for a WebAssembly instance.
It's generally best to consult the documentation of Config for the most
up-to-date information. Additionally code comments throughout the codebase can
also be useful for understanding the impact of some of these options. Some
example scenarios though are:
-
(memory 1)on 64-bit platforms - by default this WebAssembly memory has unlimited size, meaning it's only limited by its index type (i32) meaning it can grow up to 4GiB if the host/embedder allows it. This is implemented with a 8GiB virtual memory reservation -- 2GiB unmapped before linear memory, 4GiB for linear memory itself (but only 1 wasm page, 64KiB, read/write at the start), and 2GiB unmapped afterwards. The guard region before linear memory is a defense-in-depth measure and should never be hit under any operation. The guard region after linear memory is present to eliminate bounds checks in the wasm module (WebAssembly addresses are effective 33-bit addresses when the staticoffsetis taken into account). -
(memory i64 1)on 64-bit platforms - this WebAssembly memory uses 64-bit indexes instead of 32-bit indexes. This means that the configuration looks similar to(memory 1)above except that growth beyond 4GiB will copy all the contents of linear memory to a new location. Embedders might want to raiseConfig::memory_reservationin this situation. This configuration mode cannot remove any bounds checks, but guard pages are still used to deduplicate bounds checks where possible (so segfaults may still be caught at runtime for out-of-bounds accesses). -
(memory 1)on 64-bit platforms with the pooling allocator - the pooling allocator has a few important differences than the default settings. First is that the pooling allocator is able to "overlap" the before/after guard regions meaning that the virtual memory cost per-linear-memory is 6GiB by default instead of 8GiB. Additionally the pooling allocator cannot resize memory so ifConfig::memory_reservationis less than 4GiB then that's a hard limit on the size of linear memory rather than being able to copy to a new location. -
(memory 1)on 64-bit platforms with a smaller reservation - if theConfig::memory_reservationoption is configured less than the default (the default is 4GiB) then the virtual memory allocated for all linear memories will be less than the 8GiB default. This means that linear memories may move over time if they grow beyond their initial limit (assuming such growth is allowed) and additionally bounds checks will be required for memory accesses. -
(memory 1)on 32-bit platforms - unlike 64-bit platforms this memory cannot have a 4GiB virtual memory reservation. Instead the linear memory is allocated withConfig::memory_reservation_for_growthunmapped bytes after it to amortize the reallocation overhead of copying bytes. Guard pages are still used and signals are used where available to deduplicate bounds checks. -
(memory 1 (pagesize 1))on any platforms - this WebAssembly linear memory, with a page size of 1 byte, means that virtual memory cannot be used to catch traps. Instead explicit bounds checks are always required on all accesses. This is still allocated with virtual memory where possible, however.
There's quite a few possible combinations for how all of these options interact
with each other. The high-level design goal of Wasmtime is such that each option
is independent from all the others and is a knob for just its behavior. In this
way it should be possible to customize the needs of embedders. Wasmtime
additionally has different default behavior across platforms, such as 32-bit and
64-bit platforms. Some platforms additionally don't have mmap by default and
Wasmtime will adapt to that as well. The intention, however, is that it should
be possible to mirror the default configuration on any platform into a
"full-featured" platform such as 64-bit to assist with testing, fuzzing, and
debugging.
Tables and externref
WebAssembly tables contain reference types, currently either funcref or
externref. A funcref in Wasmtime is represented as *mut VMCallerCheckedFuncRef and an externref is represented as VMExternRef
(which is internally *mut VMExternData). Tables are consequently represented
as vectors of pointers. Table storage memory management by default goes through
Rust's Vec which uses malloc and friends for memory. With the pooling
allocator this uses preallocated memory for storage.
As mentioned previously Store has no form of internal garbage
collection for wasm objects themselves so a funcref table in wasm is pretty
simple in that there's no lifetime management of any of the pointers stored
within, they're simply assumed to be valid for as long as the table is in use.
For tables of externref the story is more complicated. The VMExternRef is a
version of Arc<dyn Any> but specialized in Wasmtime so JIT code knows where
the offset of the reference count field to directly manipulate it is.
Furthermore tables of externref values need to manage the reference count
field themselves, since the pointer stored in the table is required to have a
strong reference count allocated to it.
GC and externref
Wasmtime implements the externref type of WebAssembly with an
atomically-reference-counted pointer. Note that the atomic part is not needed
by wasm itself but rather from the Rust embedding environment where it must be
safe to send ExternRef values to other threads. Wasmtime also does not
come with a cycle collector so cycles of host-allocated ExternRef objects
will leak.
Despite reference counting, though, a Store::gc method exists. This is an
implementation detail of how reference counts are managed while wasm code is
executing. Instead of managing the reference count of an externref value
individually as it moves around on the stack Wasmtime implements "deferred
reference counting" where there's an overly conservative list of ExternRef
values that may be in use, and periodically a GC is performed to make this
overly conservative list a precise one. This leverages the stack map support
of Cranelift plus the backtracing support of backtrace to determine live
roots on the stack. The Store::gc method forces the
possibly-overly-conservative list to become a precise list of externref
values that are actively in use on the stack.
Index of crates
The main Wasmtime internal crates are:
wasmtime- the safe public API ofwasmtime.wasmtime::runtime::vm- low-level runtime implementation of Wasmtime. This is whereVMContextandInstanceHandlelive. This module used to be a crate, but has since been folding intowasmtime.
wasmtime-environ- low-level compilation support. This is where translation of theModuleand its environment happens, although no compilation actually happens in this crate (although it defines an interface for compilers). The results of this crate are handed off to other crates for actual compilation.wasmtime-cranelift- implementation of function-level compilation using Cranelift.
Note that at this time Cranelift is a required dependency of wasmtime. Most of
the types exported from wasmtime-environ use cranelift types in their API. One
day it's a goal, though, to remove the required cranelift dependency and have
wasmtime-environ be a relatively standalone crate.
In addition to the above crates there are some other miscellaneous crates that
wasmtime depends on:
wasmtime-cache- optional dependency to manage default caches on the filesystem. This is enabled in the CLI by default but not enabled in thewasmtimecrate by default.wasmtime-fiber- implementation of stack-switching used byasyncsupport in Wasmtimewasmtime-debug- implementation of mapping wasm dwarf debug information to native dwarf debug information.wasmtime-profiling- implementation of hooking up generated JIT code to standard profiling runtimes.wasmtime-obj- implementation of creating an ELF image from compiled functions.
Building
This section describes everything required to build and run Wasmtime.
Prerequisites
Before we can actually build Wasmtime, we'll need to make sure these things are installed first.
Git Submodules
The Wasmtime repository contains a number of git submodules. To build Wasmtime and most other crates in the repository, you have to ensure that those are initialized with this command:
git submodule update --init
The Rust Toolchain
Install the Rust toolchain here. This
includes rustup, cargo, rustc, etc...
libclang (optional)
The wasmtime-fuzzing crate transitively depends on bindgen, which requires
that your system has a libclang installed. Therefore, if you want to hack on
Wasmtime's fuzzing infrastructure, you'll need libclang. Details on how to
get libclang and make it available for bindgen are
here.
Building the wasmtime CLI
To make an unoptimized, debug build of the wasmtime CLI tool, go to the root
of the repository and run this command:
cargo build
The built executable will be located at target/debug/wasmtime.
To make an optimized build, run this command in the root of the repository:
cargo build --release
The built executable will be located at target/release/wasmtime.
You can also build and run a local wasmtime CLI by replacing cargo build
with cargo run.
Building the Wasmtime C API
See
crates/c-api/README.md
for details.
Building Other Wasmtime Crates
You can build any of the Wasmtime crates by appending -p wasmtime-whatever to
the cargo build invocation. For example, to build the wasmtime-environ crate,
execute this command:
cargo build -p wasmtime-environ
Alternatively, you can cd into the crate's directory, and run cargo build
there, without needing to supply the -p flag:
cd crates/environ/
cargo build
Testing
This section describes how to run Wasmtime's tests and add new tests.
Before continuing, make sure you can build Wasmtime successfully. Can't run the tests if you can't build it!
Installing wasm32 Targets
To compile the tests, you'll need the wasm32-wasip1 and
wasm32-unknown-unknown targets installed, which, assuming you're using
rustup.rs to manage your Rust versions, can be done as
follows:
rustup target add wasm32-wasip1 wasm32-unknown-unknown
Running Tests
Depending on what you're modifying there's a few commands you may be the most interested:
cargo test- used to run thetests/*folder at the top-level. This tests the CLI and contains most tests for thewasmtimecrate itself. This will also run all spec tests. Note that this does not run all tests in the repository, but it's generally a good starting point.cargo test -p cranelift-tools- used if you're working on Cranelift and this will run all the tests atcranelift/filetests/filetests. You can also, within thecraneliftfolder, runcargo run test ./fileteststo run these tests.cargo test -p wasmtime-wasi- this will run all WASI tests for thewasmtime-wasicrate.
At this time not all of the crates in the Wasmtime workspace can be tested, so running all tests is a little non-standard. To match what CI does and run all tests you'll need to execute
./ci/run-tests.py
Testing a Specific Crate
You can test a particular Wasmtime crate with cargo test -p wasmtime-whatever. For example, to test the wasmtime-environ crate, execute
this command:
cargo test -p wasmtime-environ
Alternatively, you can cd into the crate's directory, and run cargo test
there, without needing to supply the -p flag:
cd crates/environ/
cargo test
Running the Wasm Spec Tests
The spec testsuite itself is in a git submodule, so make sure you've checked it out and initialized its submodule:
git submodule update --init
When the submodule is checked out, Wasmtime runs the Wasm spec testsuite as part
of testing the wasmtime-cli crate at the crate root, meaning in the root of
the repository you can execute:
cargo test --test wast
You can pass an additional CLI argument to act as a filter on which tests to run. For example to only run the spec tests themselves (excluding handwritten Wasmtime-specific tests) and only in Cranelift you can run:
cargo test --test wast Cranelift/tests/spec
Note that in general spec tests are executed regardless of whether they pass
or not. In tests/wast.rs there's a should_fail function which indicates the
expected result of the test. When adding new spec tests or implementing features
this function will need to be updated as tests change from failing to passing.
Running WASI Integration Tests
WASI integration tests can be run separately from all other tests which
can be useful when working on the wasmtime-wasi crate. This can be done by
executing this command:
cargo test -p wasmtime-wasi
Similarly if you're testing HTTP-related functionality you can execute:
cargo test -p wasmtime-wasi-http
Note that these tests will compile programs in crates/test-programs to run.
Adding New Tests
Adding Rust's #[test]-Style Tests
For very "unit-y" tests, we add test modules in the same .rs file as the
code that is being tested. These test modules are configured to only get
compiled during testing with #[cfg(test)].
#![allow(unused)]
fn main() {
// some code...

#[cfg(test)]
mod tests {
    use super::*;

    #[test]
    fn some_test_for_that_code() {
        // ...
    }
}
}
If you're writing a unit test and a test module doesn't already exist, you can
create one.
For more "integration-y" tests, each crate supports a separate tests directory
within the crate, and put the tests inside there. Most integration tests in
Wasmtime are located in the root tests/*.rs location, notably
tests/all/*.rs. This tests much of the wasmtime crate for example and
facilitates cargo test at the repository root running most tests.
Some tests make more sense to live per-crate, though. For example, many WASI
tests are at crates/wasi/tests/*.rs. For adding a test feel free to add it
wherever feels best, there's not really a strong reason to put it in one place
over another. While it's easiest to add to existing tests it's ok to add a new
tests directory with tests too.
Adding Specification-Style Wast Tests
We use the spec testsuite as-is and without custom patches or a forked
version via a submodule at tests/spec_testsuite. This probably isn't what you
want to modify when adding a new Wasmtime test!
When you have a Wasmtime-specific test that you'd like to write in Wast and use
the Wast-style assertions, you can add it to our "misc testsuite". The misc
testsuite uses the same syntax and assertions as the spec testsuite, but lives
in tests/misc_testsuite. Feel free to add new tests to existing
tests/misc_testsuite/*.wast files or create new ones as needed. These tests
are run from the crate root:
cargo test --test wast
If you have a new test that you think really belongs in the spec testsuite, make sure it makes sense for every Wasm implementation to run your test (i.e. it isn't Wasmtime-specific) and send a pull request upstream. Once it is accepted in the upstream repo, it'll make its way to the test-specific mirror at WebAssembly/testsuite and then we can update our git submodule and we'll start running the new tests.
Adding WASI Integration Tests
When you have a WASI-specific test program that you'd like to include as a
test case to run against our WASI implementation, you can add it to our
test-programs crate. In particular, you should drop a main-style Rust source
file into crates/test-programs/src/bin/PREFIX_some_new_test.rs. Here the
PREFIX indicates what test suite it's going to run as. For example
preview2_* tests are run as part of wasmtime-wasi crate tests. The cli_*
tests are run as part of tests/all/cli_tests.rs. It's probably easiest to use
a preexisting prefix. The some_new_test name is arbitrary and is selected as
appropriate by you.
One a test file is added you'll need to add some code to execute the tests as
well. For example if you added a new test
crates/test-programs/src/bin/cli_my_test.rs then you'll need to add a new
function to tests/all/cli_tests.rs such as:
#![allow(unused)]
fn main() {
#[test]
fn my_test() {
    // ...
}
}
The path to the compiled WebAssembly of your test case will be available in a
Rust-level const named CLI_MY_TEST. There is also a component version at
CLI_MY_TEST_COMPONENT. These are used to pass as arguments to
wasmtime-the-CLI for example or you can use Module::from_file.
When in doubt feel free to copy existing tests and then modify them to suit your needs.
Fuzzing
External Fuzzing Campaigns
The Wasmtime maintainers appreciate bug reports from external fuzzing campaigns — when done thoughtfully and responsibly. Triaging and diagnosing bug reports, particularly reports for bugs found by fuzzers, takes a lot of time and effort on the part of Wasmtime maintainers. We ask that you match that effort by following the guidelines below.
Talk To Us First
We would love to collaborate and help you find bugs in Wasmtime! We do lots of fuzzing already (see the docs below about our internal fuzzing infrastructure) but we always have ideas for new kinds of generators for directed fuzzing, new oracles that we wish we had, areas of code that we wish were better fuzzed, and etc... We can share which of Wasmtime's properties are most important to us and what kinds of bugs we value discovering the most. It is also good for us to know that an external fuzzing campaign is spinning up and that we should be on the look out for new issues being filed.
Come say hello on our Zulip and introduce yourself :)
If a Bug Might be a Security Vulnerability, Do Not File a Public Issue
When you find a new bug, first evaluate it against our guidelines for what constitutes a security vulnerability.
If you determine that the bug is not a security vulnerability, then file an issue on our public tracker.
If you think the bug might be considered a security vulnerability, do not open a public issue detailing the bug! Instead, follow the vulnerability reporting process documented here.
Write Good Bug Reports
The Wasmtime maintainers appreciate bug reports with the following:
- A minimal test case: You should integrate automatic test-case reduction into your fuzzing campaign.
-
Steps to reproduce: Simple, unambiguous steps that can be performed to reproduce the buggy behavior with the test case. These steps should include all options you configured Wasmtime with, such as CLI flags and
wasmtime::Configmethod calls. Ideally these steps are as simple for maintainers to execute as runningwasmtime [OPTIONS] testcase.wasmor a Rust#[test]that can be run viacargo test. -
Expected behavior: A description of the expected, non-buggy behavior, as well as your rationale for why that behavior is expected. For example, just because another Wasm engine or an alternative Wasmtime execution strategy produces a different result from default Wasmtime, that is not necessarily a bug. See the documentation below for examples of known divergent behavior of one module in two runtimes. If applicable, make sure to account for this in your rationale and analysis of the bug.
-
Actual behavior: A description of the actual, buggy behavior. This should include things various things like incorrect computation results, assertion failure messages, stack traces, signals raised, and etc... when applicable.
-
Wasmtime version and system information: Include the version of Wasmtime you are using (either the exact release or the git commit hash) and your ISA, operating system, distribution, and kernel version in the bug report.
Including the above information is extra important for bugs discovered mechanically, whether by fuzzing or other means, since the associated test cases will often be pseudo-random or otherwise unintuitive to debug.
Divergent WebAssembly behavior across runtimes
WebAssembly has a variety of sources of non-determinism which means that the exact same module is allowed to behave differently under the same inputs across multiple runtimes. These specifics don't often arise in "real world" modules but can quickly arise during fuzzing. Some example behaviors are:
-
NaN bit patterns - floating-point operations which produce NaN as a result are allowed to produce any one of a set of patterns of NaN. This means that the exact bit-representation of the result of a floating-point operation may diverge across engines. When fuzzing you can update your source-generation to automatically canonicalize NaN values after all floating point operations. Wasmtime has built-in options to curb this non-determinism as well.
-
Relaxed SIMD - the
relaxed-simdproposal to WebAssembly explicitly has multiple allowed results for instructions given particular inputs. These instructions are inherently non-deterministic across implementations. When fuzzing you can avoid these instructions entirely, canonicalize the results, or use Wasmtime's built-in options to curb the non-determinism. -
Call stack exhaustion - the WebAssembly specification requires that all function calls consume a nonzero-amount of some resource which can eventually be exhausted. This means that infinite recursion is not allowed in any WebAssembly engine. Bounded, but very large, recursion is allowed in WebAssembly but is not guaranteed to work across WebAssembly engines. One engine may have different stack settings than another engine and/or runtime parameters may tune how much stack space is taken (e.g. optimizations on/off). If one engine stack overflows and another doesn't then that's not necessarily a bug in either engine. Short of banning recursion there's no known great way to handle this apart from throwing out fuzz test cases that stack overflow.
-
Memory exhaustion - the
memory.growandtable.growinstructions in WebAssembly are not always guaranteed to either fail or succeed. This means that growth may succeed in one engine but fail in another depending on various settings. To handle this in fuzzing it's recommended to generate memories with a maximum size and ensure that each engine being fuzzed can grow memory all the way to the maximum size. -
WASIp1 API behavior - the initial specification of WASI, WASIp1 or
wasi_snapshot_preview1, effectively is not suitable for differential fuzzing across engines. The APIs are not thoroughly specified enough nor is there a rigorous enough test suite to codify what exactly should happen in all situations on all platforms. This means that exactly what kind of error arises or various other edge cases may behave differently across engines. The lack of specificity of WASIp1 means that there is no great oracle as to whether an engine is right or wrong. Development of WASIp1 has ceased and the Component Model is being worked on instead (e.g. WASIp2 and beyond) which is more suitable for differential fuzzing.
Do Not Report the Same Bug Multiple Times
Fuzzers will often trigger the same bug multiple times in multiple different ways. Do not just file an issue for every single test case where the fuzzer triggers an assertion failure. Many, or even most, of those test cases will trigger the exact same assertion failure, but perhaps with a slightly different stack trace. Spend some amount of effort deduplicating bugs before reporting them.
Do Not Report Too Many Issues At Once
Please do not clog up our issue tracker by filing dozens and dozens of bug reports all at the same time. Choose a handful of the bugs your fuzzer has discovered, prioritizing the ones that seem most serious, and file issues for those bugs first. As those issues are resolved, then file a few more issues, and so on.
Further Reading
Here are some more helpful resources to help your external fuzzing efforts succeed:
Wasmtime's Internal Fuzzing Infrastructure
The Wasmtime project leverages extensive fuzzing for its safety and correctness assurances, and therefore already has a fairly large amount of fuzzing infrastructure. Our fuzzers run continuously on OSS-Fuzz.
Test Case Generators and Oracles
Test case generators and oracles live in the wasmtime-fuzzing crate, located
in the crates/fuzzing directory.
A test case generator takes raw, unstructured input from a fuzzer and translates that into a test case. This might involve interpreting the raw input as "DNA" or pre-determined choices through a decision tree and using it to generate an in-memory data structure, or it might be a no-op where we interpret the raw bytes as if they were Wasm.
An oracle takes a test case and determines whether we have a bug. For example, one of the simplest oracles is to take a Wasm binary as an input test case, validate and instantiate it, and (implicitly) check that no assertions failed or segfaults happened. A more complicated oracle might compare the result of executing a Wasm file with and without optimizations enabled, and make sure that the two executions are observably identical.
Our test case generators and oracles strive to be fuzzer-agnostic: they can be reused with libFuzzer or AFL or any other fuzzing engine or driver.
libFuzzer and cargo fuzz Fuzz Targets
We combine a test case generator and one more oracles into a fuzz target. Because the target needs to pipe the raw input from a fuzzer into the test case generator, it is specific to a particular fuzzer. This is generally fine, since they're only a couple of lines of glue code.
Currently, all of our fuzz targets are written for
libFuzzer and cargo fuzz. They are defined in
the fuzz subdirectory.
See
fuzz/README.md
for details on how to run these fuzz targets and set up a corpus of seed inputs.
Continuous Integration (CI)
The Wasmtime and Cranelift projects heavily rely on Continuous Integration (CI) to ensure everything keeps working and keep the final end state of the code at consistently high quality. The CI setup for this repository is relatively involved and extensive, and so it's worth covering here how it's organized and what's expected of contributors.
All CI currently happens on GitHub Actions and is configured in the .github
directory of the repository.
PRs and CI
Currently on sample of the full CI test suite is run on every Pull Request. CI on PRs is intended to be relatively quick and catch the majority of mistakes and errors. By default the test suite is run on x86_64 Linux but this may change depending on what files the PR is modifying. The intention is to run "mostly relevant" CI on a PR by default.
PR authors are expected to fix CI failures in their PR, unless the CI failure is systemic and unrelated to the PR. In that case other maintainers should be alerted to ensure that the problem can be addressed. Some reviewers may also wait to perform a review until CI is green on the PR as otherwise it may indicate changes are needed.
The Wasmtime repository uses GitHub's Merge Queue feature to merge PRs which. Entry in to the merge queue requires green CI on the PR beforehand. Maintainers who have approved a PR will flag it for entry into the merge queue, and the PR will automatically enter the merge queue once CI is green.
When entering the merge queue a PR will have the full test suite executed which may include tests that weren't previously run on the PR. This may surface new failures, and contributors are expected to fix these failures as well.
To force PRs to execute the full test suite, which takes longer than the default test suite for PRs, then contributors can place the string "prtest:full" somewhere in any commit of the PR. From that point on the PR will automatically run the full test suite as-if it were in the merge queue. Note that when going through the merge queue this will rerun tests.
Tests run on CI
While this may not be fully exhaustive, the general idea of all the checks we run on CI looks like this:
-
Code formatting - we run
cargo fmt -- --checkon CI to ensure that all code in the repository is formatted with rustfmt. All PRs are expected to be formatted with the latest stable version of rustfmt. -
Book documentation tests - code snippets (Rust ones at least) in the book documentation (the
docsfolder) are tested on CI to ensure they are working. -
Crate tests - the moral equivalent of
cargo test --allandcargo test --all --releaseis executed on CI. This means that all workspace crates have their entire test suite run, documentation tests and all, in both debug and release mode. Additionally we execute all crate tests on macOS, Windows, and Linux, to ensure that everything works on all the platforms. -
Fuzz regression tests - we take a random sampling of the fuzz corpus and run it through the fuzzers. This is mostly intended to be a pretty quick regression test and testing the fuzzers still build, most of our fuzzing happens on oss-fuzz. Found issues are recorded in the oss-fuzz bug tracker
While we do run more tests here and there, this is the general shape of what you can be expected to get tested on CI for all commits and all PRs. You can of course always feel free to expand our CI coverage by editing the CI files themselves, we always like to run more tests!
Artifacts produced on CI
Our CI system is also responsible for producing all binary releases and documentation of Wasmtime and Cranelift. Currently this consists of:
-
Tarballs of the
wasmtimeCLI - produced for macOS, Windows, and Linux we try to make these "binary compatible" wherever possible, for example producing the Linux build in a really old CentOS container to have a very low glibc requirement. -
Tarballs of the Wasmtime C API - produced for the same set of platforms as the CLI above.
-
Book and API documentation - the book is rendered with
mdbookand we also build all documentation withcargo doc. -
A source code tarball which is entirely self-contained. This source tarball has all dependencies vendored so the network is not needed to build it.
-
WebAssembly adapters for the component model to translate
wasi_snapshot_preview1to WASI Preview 2.
Artifacts are produced as part of the full CI suite. This means that artifacts
are not produced on a PR by default but can be requested via "prtest:full". All
runs through the merge queue though, which means all merges to main, will
produce a full suite of artifacts. The latest artifacts are available through
Wasmtime's dev release and downloads are also available for recent CI
runs through the CI page in GitHub Actions.
Reducing Test Cases
When reporting a bug, or investing a bug report, in Wasmtime it is easier for everyone involved when there is a test case that reproduces the bug. It is even better when that test case is as small as possible, so that developers don't need to wade through megabytes of unrelated Wasm that isn't necessary to showcase the bug. The process of taking a large test case and stripping out the unnecessary bits is called test case reduction.
The wasm-tools shrink tool can
automatically reduce Wasm test cases when given
- the original, unreduced test case, and
- a predicate script to determine whether the bug reproduces on a given reduced test case candidate.
If the test case causes Wasmtime to segfault, the script can run Wasmtime and
check its exit code. If the test case produces a different result in Wasmtime vs
another Wasm engine, the script can run both engines and compare their
results. It is also often useful to grep through the candidate's WAT
disassembly to make sure that relevant features and instructions are present.
Note that there are also a few other test-case reducers that can operate on
Wasm. All of them, including wasm-shrink, work fairly similarly at a high
level, but often if one reducer gets stuck in a local minimum, another reducer
can pick up from there and reduce the test case further due to differences in
the details of their implementations. Therefore, if you find that wasm-shrink
isn't very effective on a particular test case, you can try continuing reduction
with one of the following:
- Binaryen's
wasm-reducetool creduce, which can be effective at reducing Wasm test cases when disassembled into their.wattext format
Case Study: Issue #7779
A bug was reported involving the memory.init instruction. The attached test
case was larger than it needed to be and contained a bunch of functions and
other things that were irrelevant. A perfect use case for wasm-tools shrink!
First, we needed a predicate script to identify the reported buggy behavior. The script is given the candidate test case as its first argument and must exit zero if the candidate exhibits the bug and non-zero otherwise.
#!/usr/bin/env bash

# Propagate failure: exit non-zero if any individual command exits non-zero.
set -e

# Disassembly the candidate into WAT. Make sure the `memory.init` instruction
# is present, since the bug report is about that instruction. Additionally, make
# sure it is referencing the same data segment.
wasm-tools print $1 | grep -q 'memory.init 2'

# Make sure that the data segment in question remains unchanged, as mutating its
# length can change the semantics of the `memory.init` instruction.
wasm-tools print $1 | grep -Eq '\(data \(;2;\) \(i32\.const 32\) "\\01\\02\\03\\04\\05\\06\\07\\08\\ff"\)'

# Make sure that the `_start` function that contains the `memory.init` is still
# exported, so that running the Wasm will run the `memory.init` instruction.
wasm-tools print $1 | grep -Eq '\(export "_start" \(func 0\)\)'

# Run the testcase in Wasmtime and make sure that it traps the same way as the
# original test case.
cargo run --manifest-path ~/wasmtime/Cargo.toml -- run $1 2>&1 \
    | grep -q 'wasm trap: out of bounds memory access'
Note that this script is a little fuzzy! It just checks for memory.init and a
particular trap. That trap can correctly occur according to Wasm semantics when
memory.init is given certain inputs! This means we need to double check that
the reduced test case actually exhibits a real bug and its inputs haven't been
transformed into something that Wasm semantics specify should indeed
trap. Sometimes writing very precise predicate scripts is difficult, but we do
the best we can and usually it works out fine.
With the predicate script in hand, we can automatically reduce the original test case:
$ wasm-tools shrink predicate.sh test-case.wasm
369 bytes (1.07% smaller)
359 bytes (3.75% smaller)
357 bytes (4.29% smaller)
354 bytes (5.09% smaller)
344 bytes (7.77% smaller)
...
118 bytes (68.36% smaller)
106 bytes (71.58% smaller)
94 bytes (74.80% smaller)
91 bytes (75.60% smaller)
90 bytes (75.87% smaller)

test-case.shrunken.wasm :: 90 bytes (75.87% smaller)
================================================================================
(module
  (type (;0;) (func))
  (func (;0;) (type 0)
    (local i32 f32 i64 f64)
    i32.const 0
    i32.const 9
    i32.const 0
    memory.init 2
  )
  (memory (;0;) 1 5)
  (export "_start" (func 0))
  (data (;0;) (i32.const 8) "")
  (data (;1;) (i32.const 16) "")
  (data (;2;) (i32.const 32) "\01\02\03\04\05\06\07\08\ff")
)
================================================================================
In this case, the arguments to the original memory.init instruction haven't
changed, and neither has the relevant data segment, so the reduced test case
should exhibit the same behavior as the original.
In the end, it was determined that Wasmtime was behaving as expected, but the presence of the reduced test case makes it much easier to make that determination.
Cross Compiling
When contributing to Wasmtime and Cranelift you may run into issues that only
reproduce on a different architecture from your development machine. Luckily,
cargo makes cross compilation and running tests under QEMU pretty easy.
This guide will assume you are on an x86-64 with Ubuntu/Debian as your OS. The basic approach (with commands, paths, and package names appropriately tweaked) applies to other Linux distributions as well.
On Windows you can install build tools for AArch64 Windows, but targeting platforms like Linux or macOS is not easy. While toolchains exist for targeting non-Windows platforms you'll have to hunt yourself to find the right one.
On macOS you can install, through Xcode, toolchains for iOS but the main
x86_64-apple-darwin is really the only easy target to install. You'll need to
hunt for toolchains if you want to compile for Linux or Windows.
Install Rust Targets
First, use rustup to install Rust targets for the other architectures that
Wasmtime and Cranelift support:
rustup target add \
    s390x-unknown-linux-gnu \
    riscv64gc-unknown-linux-gnu \
    aarch64-unknown-linux-gnu
Install GCC Cross-Compilation Toolchains
Next, you'll need to install a gcc for each cross-compilation target to serve
as a linker for rustc.
sudo apt install \
    gcc-s390x-linux-gnu \
    gcc-riscv64-linux-gnu \
    gcc-aarch64-linux-gnu
Install qemu
You will also need to install qemu to emulate the cross-compilation targets.
sudo apt install qemu-user
Configure Cargo
The final bit to get out of the way is to configure cargo to use the
appropriate gcc and qemu when cross-compiling and running tests for other
architectures.
You will need to set CARGO_TARGET_<triple>_RUNNER and CARGO_TARGET_<triple>_LINKER for the target.
- aarch64:
export CARGO_TARGET_AARCH64_UNKNOWN_LINUX_GNU_RUNNER='qemu-aarch64 -L /usr/aarch64-linux-gnu -E LD_LIBRARY_PATH=/usr/aarch64-linux-gnu/lib -E WASMTIME_TEST_NO_HOG_MEMORY=1'
export CARGO_TARGET_AARCH64_UNKNOWN_LINUX_GNU_LINKER='aarch64-linux-gnu-gcc'
- riscv64:
export CARGO_TARGET_RISCV64GC_UNKNOWN_LINUX_GNU_RUNNER='qemu-riscv64 -L /usr/riscv64-linux-gnu -E LD_LIBRARY_PATH=/usr/riscv64-linux-gnu/lib -E WASMTIME_TEST_NO_HOG_MEMORY=1'
export CARGO_TARGET_RISCV64GC_UNKNOWN_LINUX_GNU_LINKER='riscv64-linux-gnu-gcc'
- s390x:
export CARGO_TARGET_S390X_UNKNOWN_LINUX_GNU_RUNNER='qemu-s390x -L /usr/s390x-linux-gnu -E LD_LIBRARY_PATH=/usr/s390x-linux-gnu/lib -E WASMTIME_TEST_NO_HOG_MEMORY=1'
export CARGO_TARGET_S390X_UNKNOWN_LINUX_GNU_LINKER='s390x-linux-gnu-gcc'
Cross-Compile Tests and Run Them!
Now you can use cargo build, cargo run, and cargo test as you normally
would for any crate inside the Wasmtime repository, just add the appropriate
--target flag!
A few examples:
-
Build the
wasmtimebinary foraarch64:cargo build --target aarch64-unknown-linux-gnu -
Run the tests under
riscvemulation:cargo test --target riscv64gc-unknown-linux-gnu -
Run the
wasmtimebinary unders390xemulation:cargo run --target s390x-unknown-linux-gnu -- compile example.wasm
Coding guidelines
For the most part, Wasmtime and Cranelift follow common Rust conventions and pull request (PR) workflows, though we do have a few additional things to be aware of.
rustfmt
All PRs must be formatted according to rustfmt, and this is checked in the continuous integration tests. You can format code locally with:
cargo fmt
at the root of the repository. You can find more information about rustfmt online too, such as how to configure your editor.
Compiler Warnings and Lints
Wasmtime promotes all compiler warnings to errors in CI, meaning that the main
branch will never have compiler warnings for the version of Rust that's being
tested on CI. Compiler warnings change over time, however, so it's not always
guaranteed that Wasmtime will build with zero warnings given an arbitrary
version of Rust. If you encounter compiler warnings on your version of Rust
please feel free to send a PR fixing them.
During local development, however, compiler warnings are simply warnings and the build and tests can still succeed despite the presence of warnings. This can be useful because warnings are often quite prevalent in the middle of a refactoring, for example. By the time you make a PR, though, we'll require that all warnings are resolved or otherwise CI will fail and the PR cannot land.
Compiler lints are controlled through the [workspace.lints.rust] table in the
Cargo.toml at the root of the Wasmtime repository. A few allow-by-default
lints are enabled such as trivial_numeric_casts, and you're welcome to enable
more lints as applicable. Lints can additionally be enabled on a per-crate basis
such as placing this in a src/lib.rs file:
#![allow(unused)]
#![warn(trivial_numeric_casts)]
fn main() {
}
Using warn here will allow local development to continue while still causing
CI to promote this warning to an error.
Clippy
All PRs are gated on cargo clippy passing for all workspace crates and
targets. All clippy lints, however, are allow-by-default and thus disabled. The
Wasmtime project selectively enables Clippy lints on an opt-in basis. Lints can
be controlled for the entire workspace via [workspace.lints.clippy]:
[workspace.lints.clippy]
# ...
manual_strip = 'warn'
or on a per-crate or module basis by using attributes:
#![allow(unused)]
#![warn(clippy::manual_strip)]
fn main() {
}
In Wasmtime we've found that the default set of Clippy lints is too noisy to productively use other Clippy lints, hence the allow-by-default behavior. Despite this though there are numerous useful Clippy lints which are desired for all crates or in some cases for a single crate or module. Wasmtime encourages contributors to enable Clippy lints they find useful through workspace or per-crate configuration.
Like compiler warnings in the above section all Clippy warnings are turned into
errors in CI. This means that cargo clippy should always produce no warnings
on Wasmtime's main branch if you're using the same compiler version that CI
does (typically current stable Rust). This means, however, that if you enable a
new Clippy lint for the workspace you'll be required to fix the lint for all
crates in the workspace to land the PR in CI.
Clippy can be run locally with:
cargo clippy --workspace --all-targets
Contributors are welcome to enable new lints and send PRs for this. Feel free to reach out if you're not sure about a lint as well.
Minimum Supported rustc Version (MSRV)
Wasmtime and Cranelift support the latest three stable releases of Rust. This means that if the latest version of Rust is 1.72.0 then Wasmtime supports Rust 1.70.0, 1.71.0, and 1.72.0. CI will test by default with 1.72.0 and there will be one job running the full test suite on Linux x86_64 on 1.70.0.
Some of the CI jobs depend on nightly Rust, for example to run rustdoc with nightly features, however these use pinned versions in CI that are updated periodically and the general repository does not depend on nightly features.
Updating Wasmtime's MSRV is done by editing the rust-version field in the
workspace root's Cargo.toml
Note that this policy is subject to change over time (notably it might be extended to include more rustc versions). Current Wasmtime users don't require a larger MSRV window to justify the maintenance needed to have a larger window. If your use case requires a larger MSRV range though please feel free to contact maintainers to raise your use case (e.g. an issue, in a Wasmtime meeting, on Zulip, etc).
Dependencies of Wasmtime
Wasmtime and Cranelift have a higher threshold than default for adding
dependencies to the project. All dependencies are required to be "vetted"
through the cargo vet tool. This is
checked on CI and will run on all modifications to Cargo.lock.
A "vet" for Wasmtime is not a meticulous code review of a dependency for correctness but rather it is a statement that the crate does not contain malicious code and is safe for us to run during development and (optionally) users to run when they run Wasmtime themselves. Wasmtime's vet entries are used by other organizations which means that this isn't simply for our own personal use. Wasmtime additionally uses vet entries from other organizations as well which means we don't have to vet everything ourselves.
New vet entries are required to be made by trusted contributors to Wasmtime.
This is all configured in the supply-chain folder of Wasmtime. These files
generally aren't hand-edited though and are instead managed through the cargo vet tool itself. Note that our supply-chain/audits.toml additionally contains
entries which indicates that authors are trusted as opposed to vets of
individual crates. This lowers the burden of updating version of a crate from a
trusted author.
When put together this means that contributions to Wasmtime and Cranelift which update existing dependencies or add new dependencies will not be mergeable by default (CI will fail). This is expected from our project's configuration and this situation will be handled one of a few ways:
Note that this process is not in place to prevent new dependencies or prevent
updates, but rather it ensures that development of Wasmtime is done with a
trusted set of code that has been reviewed by trusted parties. We welcome
dependency updates and new functionality, so please don't be too alarmed when
contributing and seeing a failure of cargo vet on CI!
cargo vet for Contributors
If you're a contributor to Wasmtime and you've landed on this documentation, hello and thanks for your contribution! Here's some guidelines for changing the set of dependencies in Wasmtime:
-
If a new dependency is being added it might be worth trying to slim down what's required or avoiding the dependency altogether. Avoiding new dependencies is best when reasonable, but it is not always reasonable to do so. This is left to the judgement of the author and reviewer.
-
When updating dependencies this should be done for a specific purpose relevant to the PR-at-hand. For example if the PR implements a new feature then the dependency update should be required for the new feature. Otherwise it's best to leave dependency updates to their own PRs. It's ok to update dependencies "just for the update" but we prefer to have that as separate PRs.
Dependency additions or updates require action on behalf of project maintainers
so we ask that you don't run cargo vet yourself or update the supply-chain
folder yourself. Instead a maintainer will review your PR and perform the cargo vet entries themselves. Reviewers will typically make a separate pull request
to add cargo vet entries and once that lands yours will be added to the queue.
cargo vet for Maintainers
Maintainers of Wasmtime are required to explicitly vet and approve all
dependency updates and modifications to Wasmtime. This means that when reviewing
a PR you should ensure that contributors are not modifying the supply-chain
directory themselves outside of commits authored by other maintainers. Otherwise
though to add vet entries this is done through one of a few methods:
-
For a PR where maintainers themselves are modifying dependencies the
cargo vetentries can be included inline with the PR itself by the author. The reviewer knows that the author of the PR is themself a maintainer. -
PRs that "just update dependencies" are ok to have at any time. You can do this in preparation for a future feature or for a future contributor. This more-or-less is the same as the previous categories.
-
For contributors who should not add vet entries themselves maintainers should review the PR and add vet entries either in a separate PR or as part of the contributor's PR itself. As a separate PR you'll check out the branch, run
cargo vet, then rebase away the contributor's commits and push yourcargo vetcommit alone to merge. For pushing directly to the contributor's own PR be sure to read the notes below.
Note for the last case it's important to ensure that if you push directly to a contributor's PR any future updates pushed by the contributor either contain or don't overwrite your vet entries. Also verify that if the PR branch is rebased or force-pushed, the details of your previously pushed vetting remain the same: e.g., versions were not bumped and descriptive reasons remain the same. If pushing a vetting commit to a contributor's PR and also asking for more changes, request that the contributor make the requested fixes in an additional commit rather than force-pushing a rewritten history, so your existing vetting commit remains untouched. These guidelines make it easier to verify no tampering has occurred.
Policy for adding cargo vet entries
For maintainers this is intended to document the project's policy on adding
cargo vet entries. The goal of this policy is to not make dependency updates
so onerous that they never happen while still achieving much of the intended
benefit of cargo vet in protection against supply-chain style attacks.
-
For dependencies that receive at least 10,000 downloads a day on crates.io it's ok to add an entry to
exemptionsinsupply-chain/config.toml. This does not require careful review or review at all of these dependencies. The assumption here is that a supply chain attack against a popular crate is statistically likely to be discovered relatively quickly. Changes tomainin Wasmtime take at least 2 weeks to be released due to our release process, so the assumption is that popular crates that are victim of a supply chain attack would be discovered during this time. This policy additionally greatly helps when updating dependencies on popular crates that are common to see without increasing the burden too much on maintainers. -
For other dependencies a manual vet is required. The
cargo vettool will assist in adding a vet by pointing you towards the source code, as published on crates.io, to be browsed online. Manual review should be done to ensure that "nothing nefarious" is happening. For exampleunsafeshould be inspected as well as use of ambient system capabilities such asstd::fs,std::net, orstd::process, and build scripts. Note that you're not reviewing for correctness, instead only for whether a supply-chain attack appears to be present.
This policy intends to strike a rough balance between usability and security.
It's always recommended to add vet entries where possible, but the first bullet
above can be used to update an exemptions entry or add a new entry. Note that
when the "popular threshold" is used do not add a vet entry because the
crate is, in fact, not vetted. This is required to go through an
[[exemptions]] entry.
Crate Organization
The Wasmtime repository is a bit of a monorepo with lots of crates internally
within it. The Wasmtime project and wasmtime crate also consists of a variety
of crates intended for various purposes. As such not all crates are treated
exactly the same and so there are some rough guidelines here about adding new
crates to the repository and where to place/name them:
-
Wasmtime-related crates live in
crates/foo/Cargo.tomlwhere the crate name is typicallywasmtime-fooorwasmtime-internal-foo. -
Cranelift-related crates live in
cranelift/foo/Cargo.tomlwhere the crate is namedcranelift-foo. -
Some projects such as Winch, Pulley, and Wiggle are exceptions to the above rules and live in
winch/*,pulley/*andcrates/wiggle/*. -
Some crates are "internal" to Wasmtime. This means that they only exist for crate organization purposes (such as optional dependencies, or code organization). These crates are not intended for public consumption and are intended for exclusively being used by the
wasmtimecrate, for example, or other public crates. These crates should be namedwasmtime-internal-fooand live incrates/foo. The[workspace.dependencies]directive inCargo.tomlat the root of the repository should rename it towasmtime-fooin workspace-local usage, meaning that the "internal" part is only relevant on crates.io.
Adding Crates
Adding a new crate to the Wasmtime workspace takes a bit of care. Wasmtime uses crates.io trusted publishing meaning that all crates are published from CI in a specific workflow. This means that crates must exist on crates.io prior to their first publication from the Wasmtime workspace and be configured for trusted publishing.
The process for adding a new crate to the workspace looks like:
- In a PR a new crate is added and this documentation probably isn't read to start out with.
- CI will fail in the "verify-publish" job because this crate doesn't exist on crates.io.
- The PR author should publish a placeholder crate to crates.io.
- The PR author should go to "Settings" on crates.io, click on "Add" under
"Trusted Publishing", and enter the following:
fields:
- Publisher:
GitHub - Repository Owner:
bytecodealliance - Repository name:
wasmtime - Workflow filename:
publish-to-cratesio.yml - Environment name:
publish
- Publisher:
- The PR author should then check the box for requiring all publishes to use the trusted publishing workflow.
- The PR author should invite the
wasmtime-publishuser to this crate. - A Wasmtime maintainer, with access to the BA 1password vault, will log in to
crates.io as the
wasmtime-publishuser to accept the invite. Wasmtime maintainers should double-check all of the settings and remove the original owner of the crate so justwasmtime-publishowns the crate.
This ensures that when publication time rolls around the crate is already reserved on GitHub and the publication workflow will succeed. After the initial publication the crate is managed by Wasmtime maintainers.
Use of unsafe
Wasmtime is a project that contains unsafe Rust code. Wasmtime is also used in
security-critical contexts which means that it's extra-important that this
unsafe code is correct. The purpose of this section is to outline guidelines
and guidance for how to use unsafe in Wasmtime.
Ideally Wasmtime would have no unsafe code. For large components of Wasmtime
this is already true, for these components have little to no unsafe code:
- Cranelift - compiling WebAssembly modules.
- Winch - compiling WebAssembly modules.
- Wasmparser - validating WebAssembly.
wasmtime-wasi/wasmtime-wasi-http- implementation of WASI.
Without unsafe the likelihood of a security bug is greatly reduced with the
riskiest possibility being a DoS vector through a panic, generally considered a
low-severity issue. Inevitably though due to the nature of Wasmtime it's
effectively impossible to 100% remove unsafe code. The question then becomes
what is the right balance and how to work with unsafe?
Some unsafe blocks are effectively impossible to remove. For example somewhere
in Wasmtime we're going to take the output of Cranelift and turn it into a
function pointer to calling it. In doing so the correctness of the unsafe
block relies on the correctness of Cranelift as well as the translation from
WebAssembly to Cranelift. This is a fundamental property of the Wasmtime project
and thus can't really be mitigated.
Other unsafe blocks, however, ideally will be self-contained and isolated to a
small portion of Wasmtime. For this code Wasmtime tries to follow these
guidelines:
-
Users of the public API of the
wasmtimecrate should never needunsafe. The API ofwasmtimeshould be sound and safe no matter how its combined with other safe Rust code. Whileunsafeadditions are allowed they should be very clearly documented with a precise contract of what exactly is unsafe and what must be upheld by the caller. For exampleModule::deserializeclearly documents that it could allow arbitrary code execution and thus it's not safe to pass in arbitrary bytes, but previously serialized bytes are always safe to pass in. -
Declaring a function as
unsafeshould be accompanied with clear documentation on the function declaration indicating why the function isunsafe. This should clearly indicate all the contracts that need to be upheld by callers for the invocation to be safe. There is no way to verify that the documentation is correct but this is a useful flag to reviewers and readers alike to be more vigilant around such functions. -
An
unsafeblock within a function should be accompanied with a preceding comment explaining why it's safe to have this block. It should be possible to verify this comment with local reasoning, for example considering little code outside of the current function or module. This means that it should be almost trivial to connect the contracts required on the callee function (why theunsafeblock is there in the first place) to the surrounding code. This can include the current function beingunsafe(effectively "forwarding" the contract of the callee) or via local reasoning. -
Implementation of a feature within Wasmtime should not result in excessive amounts of
unsafefunctions or usage ofunsafefunctions. The goal here is that if two possible designs for a feature are being weighed it's not required to favor one with zero unsafe vs one with just a little unsafe, but one with a little unsafe should be favored over one that is entirely unsafe. An example of this is Wasmtime's implementation of the GC proposal with a sandboxed heap where the data on the heap is never trusted. This comes at a minor theoretical performance loss on the host but has the benefit of all functions within the implementation are all safe. These sorts of design tradeoffs are not really possible to codify in stone, but the general guideline is to try to favor safer implementations so long as the hypothetical sacrifice in performance isn't too great.
It should be noted that Wasmtime is a relatively large and old codebase and thus does not perfectly follow these guidelines for preexisting code. Code not following these guidelines is considered technical debt that must be paid down at one point. Wasmtime tries to keep track of known issues to burn down this list over time. New features to Wasmtime are allowed to add to this list, but it should be clear how to burn down the list in time for any new entries added.
Development Process
We use issues for asking questions (open one here!) and tracking bugs and unimplemented features, and pull requests (PRs) for tracking and reviewing code submissions. We triage new issues at each of our bi-weekly Wasmtime meetings.
Before submitting a PR
Consider opening an issue to talk about it. PRs without corresponding issues are appropriate for fairly narrow technical matters, not for fixes to user-facing bugs or for feature implementations, especially when those features might have multiple implementation strategies that usefully could be discussed. Changes that will significantly affect stakeholders should first be proposed in an RFC.
Our issue templates might help you through the process.
When submitting PRs
-
Please answer the questions in the pull request template. They are the minimum information we need to know in order to understand your changes.
-
Write clear commit messages that start with a one-line summary of the change (and if it's difficult to summarize in one line, consider splitting the change into multiple PRs), optionally followed by additional context. Good things to mention include which areas of the code are affected, which features are affected, and anything that reviewers might want to pay special attention to.
-
If there is code which needs explanation, prefer to put the explanation in a comment in the code, or in documentation, rather than in the commit message. Commit messages should explain why the new version is better than the old.
-
Please include new test cases that cover your changes, if you can. If you're not sure how to do that, we'll help you during our review process.
-
For pull requests that fix existing issues, use issue keywords. Note that not all pull requests need to have accompanying issues.
-
When updating your pull request, please make sure to re-request review if the request has been cancelled.
Focused commits or squashing
We are not picky about how your git commits are structured. When we merge your PR, we will squash all of your commits into one, so it's okay if you add fixes in new commits.
We appreciate it if you can organize your work into separate commits which each make one focused change, because then we can more easily understand your changes during review. But we don't require this.
Once someone has reviewed your PR, it's easier for us if you don't rebase it when making further changes. Instead, at that point we prefer that you make new commits on top of the already-reviewed work.
That said rebasing (or merging from main) may still be required in situations
such as:
- Your PR has a merge conflict with the
mainbranch. - CI on your PR is failing for unrelated reasons and a fix was applied to
mainwhich needs to be picked up on your branch. - Other miscellaneous technical reasons may cause us to ask for a rebase.
If you need help rebasing or merging, please ask!
Review and merge
Anyone may submit a pull request, and anyone may comment on or review others' pull requests. However, one approval from a maintainer is required before a PR can be merged. Maintainers must also create PRs and get review from another maintainer for every change, including minor work items such as version bumps, removing warnings, etc.
PR approvals may come with comments about additional minor changes that are
requested. Contributors and maintainers alike should address these comments, if
any, and then the PR is ready for merge. Wasmtime uses a merge queue to ensure
that all tests pass before pushing to main. Note that the merge queue will
run more tests than is run on PRs by default.
Contributors should expect Wasmtime maintainers to add the PR to the merge queue for them. If a PR hasn't been added, and it's approved with all comments addressed, feel free to leave a comment to notify maintainers that it's ready. Maintainers can add their own PRs to the merge queue. When approving a PR maintainers may also add the PR to the merge queue at that time if there are no remaining comments.
Note that if CI is failing on a PR then GitHub will automatically block adding a PR to the merge queue. PR authors will need to resolve PR CI before it can be added to the merge queue. If the merge queue CI fails then the PR will be removed from the merge queue and GitHub will leave a marker on the timeline and send a notification to the PR author. PR authors are expected to review CI logs and fix any failures in the PR itself. When ready maintainers can re-add their own PR for minor fixes and contributors can leave a comment saying that the PR is ready to be re-added to the queue.
To run full CI on the PR before the merge queue, include the string
prtest:full in any commit in the PR. That can help debug CI failures without
going through the merge queue if necessary.
RFC Process
For changes that will significantly affect Wasmtime's or Cranelift's internals, downstream projects, contributors, and other stakeholders, a Bytecode Alliance RFC should be used to gather feedback on the proposed change's design and implementation, and to build consensus.
It is recommended that regular Wasmtime and Cranelift contributors, as well as any other project stakeholders, subscribe to notifications in the RFC repository to stay up to date with significant change proposals.
Authoring New RFCs
The RFC repository has two templates that can help you author new proposals:
-
A draft RFC template, for seeking early feedback on ideas that aren't yet fully baked. It is expected that as the discussion evolves, these draft RFCs will grow into fully-formed RFCs.
-
A full RFC template, for building consensus around a mature proposal.
You can also look at historical Wasmtime RFCs in the repository's accepted
subdirectory and
their associated discussions in its merged pull
requests
to gather inspiration for your new RFC. A few good examples include:
- Add a Long Term Support (LTS) Channel of Releases for Wasmtime - RFC - Discussion
- Pulley: A Portable, Optimizing Interpreter for Wasmtime - RFC - Discussion
- Debugging Support in Wasmtime - RFC - Discussion
- Redesign Wasmtime's API - RFC - Discussion
After creating a pull request for your new RFC, advertise its existence by
creating a new thread in the relevant
Zulip channels (e.g. #wasmtime or
#cranelift).
Implementing WebAssembly Proposals
Adding New Support for a Wasm Proposal
The following checkboxes enumerate the steps required to add support for a new WebAssembly proposal to Wasmtime. They can be completed over the course of multiple pull requests.
-
Implement support for the proposal in the
wasm-toolsrepository. (example)-
wast- text parsing -
wasmparser- binary decoding and validation -
wasmprinter- binary-to-text -
wasm-encoder- binary encoding -
wasm-smith- fuzz test case generation
-
-
Update Wasmtime to use these
wasm-toolscrates, but leave the new proposal unimplemented for now (implementation comes in subsequent PRs). (example) -
Add
Config::wasm_your_proposalto thewasmtimecrate. -
Implement the proposal in
wasmtime, gated behind this flag. -
Add
-Wyour-proposalto thewasmtime-cli-flagscrate. -
Update
tests/wast.rsto spec tests should pass for this proposal. -
Write custom tests in
tests/misc_testsuite/*.wastfor this proposal. -
Enable the proposal in the fuzz targets.
-
Write a custom fuzz target, oracle, and/or test case generator for fuzzing this proposal in particular.
For example, we wrote a custom generator, oracle, and fuzz target for exercising
table.{get,set}instructions and their interaction with GC while implementing the reference types proposal.
-
-
Expose the proposal's new functionality in the
wasmtimecrate's API.For example, the bulk memory operations proposal introduced a
table.copyinstruction, and we exposed its functionality as thewasmtime::Table::copymethod. -
Expose the proposal's new functionality in the C API.
This may require extensions to the standard C API, and if so, should be defined in
wasmtime.hand prefixed withwasmtime_. -
Update
docs/stability-tiers.mdwith an implementation status of the proposal.
For information about the status of implementation of various proposals in Wasmtime see the associated documentation.
Adding component functionality to WASI
The cap-std repository contains crates which implement the capability-based version of the Rust standard library and extensions to that functionality. Once the functionality has been added to the relevant crates of that repository, they can be added into wasmtime by including them in the preview2 directory of the wasi crate.
Currently, WebAssembly modules which rely on preview2 ABI cannot be directly executed by the wasmtime command. The following steps allow for testing such changes.
-
Build wasmtime with the changes
cargo build --release -
Create a simple Webassembly module to test the new component functionality by compiling your test code to the
wasm32-wasip1build target. -
Build the wasi-preview1-component-adapter as a command adapter.
cargo build -p wasi-preview1-component-adapter --target wasm32-wasip1 --release --features command --no-default-features -
Use wasm-tools to convert the test module to a component.
wasm-tools component new --adapt wasi_snapshot_preview1=wasi_snapshot_preview1.command.wasm -o component.wasm path/to/test/module -
Run the test component created in the previous step with the locally built wasmtime.
wasmtime -W component-model=y -S preview2=y component.wasm
Maintainer Guidelines
This section describes procedures and expectations for Core Team members. It may be of interest if you just want to understand how we work, or if you are joining the Core Team yourself.
Code Review
We only merge changes submitted as GitHub Pull Requests, and only after they've been approved by at least one Core Team reviewer who did not author the PR. This section covers expectations for the people performing those reviews. These guidelines are in addition to expectations which apply to everyone in the community, such as following the Code of Conduct.
It is our goal to respond to every contribution in a timely fashion. Although we make no guarantees, we aim to usually provide some kind of response within about one business day.
That's important because we appreciate all the contributions we receive, made by a diverse collection of people from all over the world. One way to show our appreciation, and our respect for the effort that goes into contributing to this project, is by not keeping contributors waiting. It's no fun to submit a pull request and then sit around wondering if anyone is ever going to look at it.
That does not mean we will review every PR promptly, let alone merge them. Some contributions have needed weeks of discussion and changes before they were ready to merge. For some other contributions, we've had to conclude that we could not merge them, no matter how much we appreciate the effort that went into them.
What this does mean is that we will communicate with each contributor to set expectations around the review process. Some examples of good communication are:
-
"I intend to review this but I can't yet. Please leave me a message if I haven't responded by (a specific date in the near future)."
-
"I think (a specific other contributor) should review this."
-
"I'm having difficulty reviewing this PR because of (a specific reason, if it's something the contributor might reasonably be able to help with). Are you able to change that? If not, I'll ask my colleagues for help (or some other concrete resolution)."
If you are able to quickly review the PR, of course, you can just do that.
You can find open Wasmtime pull requests for which your review has been requested with this search:
https://github.com/bytecodealliance/wasmtime/pulls?q=is:open+type:pr+user-review-requested:@me
Auto-assigned reviewers
We automatically assign a reviewer to every newly opened pull request. We do this to avoid the problem of diffusion of responsibility, where everyone thinks somebody else will respond to the PR, so nobody does.
To be in the pool of auto-assigned reviewers, a Core Team member must commit to following the above goals and guidelines around communicating in a timely fashion.
We don't ask everyone to make this commitment. In particular, we don't believe it's fair to expect quick responses from unpaid contributors, although we gratefully accept any review work they do have time to contribute.
If you are in the auto-assignment pool, remember: You are not necessarily expected to review the pull requests which are assigned to you. Your only responsibility is to ensure that contributors know what to expect from us, and to arrange that somebody reviews each PR.
We have several different teams that reviewers may be auto-assigned from. You
should be in teams where you are likely to know who to re-assign a PR to, if you
can't review it yourself. The teams are determined by the CODEOWNERS file at
the root of the Wasmtime repository. But despite the name, membership in these
teams is not about who is an authority or "owner" in a particular area. So
rather than creating a team for each fine-grained division in the repository
such as individual target architectures or WASI extensions, we use a few
coarse-grained teams:
- wasmtime-compiler-reviewers: Cranelift and Winch
- wasmtime-core-reviewers: Wasmtime, including WASI
- wasmtime-fuzz-reviewers: Fuzz testing targets
- wasmtime-default-reviewers: Anything else, including CI and documentation
Ideally, auto-assigned reviewers should be attending the regular Wasmtime or Cranelift meetings, as appropriate for the areas they're reviewing. This is to help these reviewers stay aware of who is working on what, to more easily hand off PRs to the most relevant reviewer for the work. However, this is only advice, not a hard requirement.
If you are not sure who to hand off a PR review to, you can look at GitHub's
suggestions for reviewers, or look at git log for the paths that the PR
affects. You can also just ask other Core Team members for advice.
General advice
This is a collection of general advice for people who are reviewing pull requests. Feel free to take any that you find works for you and ignore the rest. You can also open pull requests to suggest more references for this section.
The Gentle Art of Patch Review suggests a "Three-Phase Contribution Review" process:
- Is the idea behind the contribution sound?
- Is the contribution architected correctly?
- Is the contribution polished?
Phase one should be a quick check for whether the pull request should move forward at all, or needs a significantly different approach. If it needs significant changes or is not going to be accepted, there's no point reviewing in detail until those issues are addressed.
On the other end, it's a good idea to defer reviewing for typos or bikeshedding about variable names until phase three. If there need to be significant structural changes, entire paragraphs or functions might disappear, and then any minor errors that were in them won't matter.
The full essay has much more advice and is recommended reading.
Release Process
This is intended to serve as documentation for Wasmtime's release process. It's largely an internal checklist for those of us performing a Wasmtime release, but others might be curious in this as well!
Releasing a major version
Major versions of Wasmtime are released once-a-month. Most of this is automatic and all that needs to be done is to merge GitHub PRs that CI will generate. At a high-level the structure of Wasmtime's release process is:
- On the 5th of every month a new
release-X.Y.Zbranch is created with the current contents ofmain. - On the 20th of every month this release branch is published to crates.io and release artifacts are built.
This means that Wasmtime releases are always at least two weeks behind
development on main and additionally happen once a month. The lag time behind
main is intended to give time to fuzz changes on main as well as allow
testing for any users using main. It's expected, though, that most consumers
will likely use the release branches of wasmtime.
A detailed list of all the steps in the release automation process are below. The steps requiring interactions are bolded, otherwise everything else is automatic and this is documenting what automation does.
- On the 5th of every month, (configured via
.github/workflows/release-process.yml) a CI job will run and do these steps:- Download the current
mainbranch - Push the
mainbranch torelease-X.Y.Z - Run
./scripts/publish.rswith thebumpargument - Commit the changes
- Push these changes to a temporary
ci/*branch - Open a PR with this branch against
main - This step can also be triggered manually with the
mainbranch and thecutargument.
- Download the current
- A maintainer of Wasmtime merges this PR
- It's intended that this PR can be immediately merged as the release branch has been created and all it's doing is bumping the version.
- Time passes and the
release-X.Y.Zbranch is maintained- All changes land on
mainfirst, then are backported torelease-X.Y.Zas necessary.
- All changes land on
- On the 20th of every month (same CI job as before) another CI job will run
performing:
- Reset to
release-X.Y.Z - Update the release date of
X.Y.Zto today inRELEASES.md - Add a special marker to the commit message to indicate a tag should be made.
- Open a PR against
release-X.Y.Zfor this change - This step can also be triggered manually with the
mainbranch and therelease-latestargument.
- Reset to
- A maintainer of Wasmtime merges this PR
- When merged, will trigger the next steps due to the marker in the commit message. A maintainer should double-check there are no open security issues, but otherwise it's expected that all other release issues are resolved by this point.
- The main CI workflow at
.github/workflow/main.ymlhas special logic at the end such that pushes to therelease-*branch will scan the git logs of pushed changes for the special marker added byrelease-process.yml. If found and CI passes a tag is created and pushed. - Once a tag is created the
.github/workflows/publish-*workflows run. One publishes all crates as-is to crates.io and the other will download all artifacts from themain.ymlworkflow and then upload them all as an official release.
If all goes well you won't have to read up much on this and after hitting the Big Green Button for the automatically created PRs everything will merrily carry on its way.
Releasing a patch version
Wasmtime does not currently have a cadence for patch version nor a strict set of criteria. It's done on an as-needed basis. Requirements, however, are:
-
All changes must land on
mainfirst (if applicable) and then get backported to an older branch. Release branches should already exist from the above major release steps. -
When a patch release is made it must be applied to all supported versions that need the patch. Wasmtime will not release a patch release until all versions have been equally patched to ensure that releases remain consistent.
-
Patch releases must not contain API-breaking changes in public crates. The list of
PUBLIC_CRATESinscripts/publish.rsis the list of crates to worry about in terms of breaking changes. -
Wasm-level ABI-breaking changes are by default not allowed in patch releases. Users are expected to, for example, be able to load
*.cwasmartifacts from before the patch release is made. If an ABI-breaking change is necessary then be sure to updatecrates/wasmtime/src/engine/serialization.rsand theWasmtimeVersionmatching strategy to modify the string to ensure older artifacts cannot be loaded.
Making a patch release is somewhat more manual than a major version, but like before there's automation to help guide the process as well and take care of more mundane bits.
This is a list of steps taken to perform a patch release for 2.0.1 for example. Like above human interaction is indicated with bold text in these steps.
- Necessary changes are backported to the
release-2.0.0branch frommain- CI for supported branches is run weekly, even after release, to ensure that
it's at most broken for a week. Nevertheless issues come up, so be aware
that CI may be green on
mainbut red on a release branch. - When merging backports maintainers need to double-check that the
PUBLIC_CRATESlisted inscripts/publish.rsdo not have semver-API-breaking changes (in the strictest sense). All security fixes must be done in such a way that the API doesn't break between the patch version and the original version. - Don't forget to write patch notes in
RELEASES.mdfor backported changes.
- CI for supported branches is run weekly, even after release, to ensure that
it's at most broken for a week. Nevertheless issues come up, so be aware
that CI may be green on
- The patch release process is triggered manually with
the
release-2.0.0branch and therelease-patchargument- This will run the
release-process.ymlworkflow. Thescripts/publish.rsscript will be run with thebump-patchargument. - The changes will be committed with a special marker indicating a release needs to be made.
- A PR will be created from a temporary
ci/*branch to therelease-2.0.0branch which, when merged, will trigger the release process.
- This will run the
- Review the generated PR and merge it
- This will resume from step 6 above in the major release process where the special marker in the commit message generated by CI will trigger a tag to get pushed which will further trigger the rest of the release process.
- Please make sure to update the
RELEASES.mdat this point to include theReleased ondate by pushing directly to the branch associated with the PR.
Releasing a security patch
For security releases see the documentation of the vulnerability runbook.
Releasing Notes
Release notes for Wasmtime are written in the RELEASES.md file in the root of
the repository. Management of this file looks like:
- (theoretically) All changes on
mainbundle an appropriate update ofRELEASES.md. In practice this almost never happens. - When the
mainbranch gets a version bump theRELEASES.mdfile is emptied and replaced withci/RELEASES-template.md. An entry for the upcoming release is added to the bulleted list at the bottom. - (realistically) After a
release-X.Y.Zbranch is created release notes are updated and edited on the release branch directly.
This means that RELEASES.md only has release notes for the release branch that
it is on. Historical release notes can be found through links at the bottom to
previous copies of RELEASES.md
Keeping Old release branch CI up-to-date
Over time CI configuration goes out of date and may need to be updated. The Wasmtime repository has a cron job via GitHub Actions to run release CI on all supported release branches on a weekly basis to try to weed out these problems. If a release branch CI fails it'll open an issue and maintainers should resolve it expediently.
Where possible old release branch CI should not update software to fix CI. Try to pin to older versions if something wasn't pinned already for example. Sometimes though updates are inevitable and may be required.
Conditional Compilation in Wasmtime
The wasmtime crate and workspace is both quite configurable in terms of
runtime configuration (e.g. Config::*) and compile-time configuration (Cargo
features). Wasmtime also wants to take advantage of native hardware features on
specific CPUs and operating systems to implement optimizations for executing
WebAssembly. This overall leads to the state where the source code for Wasmtime
has quite a lot of #[cfg] directives and is trying to wrangle the
combinatorial explosion of:
- All possible CPU architectures that Wasmtime (or Rust) supports.
- All possible operating systems that Wasmtime (or Rust) supports.
- All possible feature combinations of the
wasmtimecrate.
Like any open source project one of the goals of Wasmtime is to have readable
and understandable code and to that effect we ideally don't have #[cfg]
everywhere throughout the codebase in confusing combinations. The goal of this
document is to explain the various guidelines we have for conditional
compilation in Rust and some recommended styles for working with #[cfg] in a
maintainable and scalable manner.
Rust's #[cfg] attribute
If you haven't worked with Rust much before or if you'd like a refresher, Rust's
main ability to handle conditional compilation is the #[cfg] attribute. This
is semantically and structurally different from #ifdef in C/C++ and gives rise
to alternative patterns which look quite different as well.
One of the more common conditional compilation attributes in Rust is
#[cfg(test)] which enables including a module or a piece of code only when
compiled with cargo test (or rustc's --test flag). There are many other
directives you can put in #[cfg], however, for example:
#[cfg(target_arch = "...")]- this can be used to detect the architecture that the code was compiled for.#[cfg(target_os = "...")]- this can be used to detect the operating system that the code was compiled for.#[cfg(feature = "...")]- these correspond to Cargo features and are enabled when depending on crates inCargo.toml.#[cfg(has_foo)]- completely custom directives can be emitted by build scripts such ascrates/wasmtime/build.rs.
To explore built-in #[cfg] directives you can use rustc --print cfg for your
host target. This also supports rustc --print cfg --target ....
Finally, #[cfg] directive support internal "functions" such as all(...),
any(...), and not(..).
Attributes in Rust can be applied to syntactic items in Rust, not fragments of lexical tokens like C/C++. This means that conditional compilation happens at the AST level rather than the lexical level. For example:
#[cfg(foo)]
fn the_function() { /* ... */ }

#[cfg(not(foo))]
fn the_function() { /* ... */ }
This can additionally be applied to entire expressions in Rust too:
fn the_function() {
    #[cfg(foo)]
    {
        // ...
    }
    #[cfg(not(foo))]
    {
        // ...
    }
}
The Rust compiler doesn't type-check or analyze anything in conditionally-omitted code. It is only required to be syntactically valid.
Hazards with #[cfg]
Conditional compilation in any language can get hairy quickly and Rust is no
exception. The venerable "#ifdef soup" one might have seen in C/C++ is very
much possible to have in Rust too in the sense that it won't look the same but
it'll still taste just as bad. In that sense it's worth going over some of the
downsides of #[cfg] in Rust and some hazards to watch out for.
Unused Imports
Conditional compilation can be great for quickly excluding an entire function in one line, but this might have ramifications if that function was the only use of an imported type for example:
use std::ptr::NonNull; //~ WARNING: unused import when `foo` is turned off

#[cfg(foo)]
fn my_function() -> NonNull<u8> {
    // ...
}
Repetitive Attributes
Enabling a Cargo feature can add features to existing types which means it can
lead to repetitive #[cfg] annotations such as:
#[cfg(feature = "async")]
use std::future::Future;

impl<T> Store<T> {
    #[cfg(feature = "async")]
    async fn some_new_async_api(&mut self) {
        // ...
    }

    #[cfg(feature = "async")]
    async fn some_other_new_async_api(&mut self) {
        // ...
    }
}

#[cfg(feature = "async")]
struct SomeAsyncHelperType {
    // ...
}

#[cfg(feature = "async")]
impl SomeAsyncHelperType {
    // ...
}
Boilerplate throughout an implementation
In addition to being repetitive when defining conditionally compiled code there's also a risk of being quite repetitive when using conditionally compiled code as well. In its most basic form any usage of a conditionally compiled piece of code must additionally be gated as well.
#[cfg(feature = "gc")]
fn gc() {
    // ...
}

fn call_wasm() {
    #[cfg(feature = "gc")]
    gc();

    // do the call ...

    #[cfg(feature = "gc")]
    gc();
}
Interactions with ecosystem tooling
Conditionally compiled code does not always interact well with ecosystem tooling
in Rust. An example of this is the cfg_if! macro where rustfmt is unable to
format the contents of the macro. If there are conditionally defined modules in
the macro then it means rustfmt won't format any modules internally in the
macro either. Not a great experience!
Here neither gc.rs nor gc_disabled.rs will be formatted by cargo fmt.
cfg_if::cfg_if! {
    if #[cfg(feature = "gc")] {
        mod gc;
        use gc::*;
    } else {
        mod gc_disabled;
        use gc_disabled::*;
    }
}
Combinatorial explosion in testing complexity
Each crate feature can be turned on and off. Wasmtime supports a range of platforms and architectures. It's practically infeasible to test every single possible combination of these. This means that inevitably there are going to be untested configurations as well as bugs within these configurations.
Conditional Compilation Style Guide
With some of the basics out of the way, this is intended to document the rough current state of Wasmtime and some various principles for writing conditionally compiled code. Much of these are meant to address some of the hazards above. These guidelines are not always religiously followed throughout Wasmtime's repository but PRs to improve things are always welcome!
The main takeaway is that the main goal is to minimize the number of #[cfg]
attributes necessary in the repository. Conditional compilation is required no
matter what so this number can never be zero, but that doesn't mean every other
line should have #[cfg] on it. Otherwise these guidelines need to be applied
with some understanding that each one is fallible. There's no always-right
answer unfortunately and style will still differ from person to person.
-
Separate files - try to put conditionally compiled code into separate files. By placing
#[cfg]at the module level you can drastically cut down on annotations by removing the entire module at once. An example of this is that Wasmtime's internalruntimemodule is feature gated at the top-level. -
Only
#[cfg]definitions, not uses - try to only use#[cfg]when a type or function is defined, not when it's used. Functions and types can be used all over the place and putting a#[cfg]everywhere can be quite annoying an brittle to maintain.-
This isn't a problem if a use-site is already contained in a
#[cfg]item, such as a module. This can be assisted by lifting#[cfg]up "as high as possible". An example of this is Wasmtime'scomponentmodule which uses#[cfg(feature = "component-model")]at the root of all component-related functionality. That means that conditionally included dependencies used withincomponent::*don't need extra#[cfg]annotations. -
Another common pattern for this is to conditionally define a "dummy" shim interface. The real implementation would live in
foo.rswhile the dummy implementation would live infoo_disabled.rs. That means that "foo" is always available but the dummy implementation doesn't do anything. This makes heavy use of zero-sized-types (e.g.struct Foo;) and uninhabited types (e.g.enum Foo {}) to ensure there is no runtime overhead. An example of this isshared_memory.rsandshared_memory_disabled.rswhere the disabled version returns an error on construction and otherwise has trivial implementations of each method.
-
-
Off-by-default code should be trivial - described above it's not possible to test Wasmtime in every possible configuration of
#[cfg], so to help reduce the risk of lurking bugs try to ensure that all off-by-default code is trivially correct-by-construction. For "dummy" shims described above this means that methods do nothing or return an error. If off-by-default code is nontrivial then it should have a dedicated CI job to ensure that all conditionally compiled parts are tested one way or another. -
Absolute paths are useful, but noisy - described above it's easy to get into a situation where a conditionally compiled piece of code is the only users of a
usestatement. One easy fix is to remove theuseand use the fully qualified path (e.g.param: core::ptr::NonNull) in the function instead. This reduces the#[cfg]to one, just the function in question, as opposed to one on the function and one on theuse. Beware though that this can make function signatures very long very quickly, so if that ends up happening one of the above points may help instead. -
Use
#[cfg]for anything that requires a new runtime dependency - one of the primary use cases for#[cfg]in Wasmtime is to conditionally remove dependencies at runtime on pieces of functionality. For example if theasyncfeature is disabled then stack switching is not necessary to implement. This is a lynchpin of Wasmtime's portability story where we don't guarantee all features compile on all platforms, but the "major" features should compile on all platforms. An example of this is thatthreadsrequires the standard library, butruntimedoes not. -
Don't use
#[cfg]for compiler features - in contrast to the previous point it's generally not necessary to plumb#[cfg]features to Wasmtime's integration with Cranelift. The runtime size or runtime features required to compile WebAssembly code is generally much larger than just running code itself. This means that conditionally compiled compiler features can just add lots of boilerplate to manage internally without much benefit. Ideally#[cfg]is only use for WebAssembly runtime features, not compilation of WebAssembly features.
Note that it's intentional that these guidelines are not 100% comprehensive.
Additionally they're not hard-and-fast rules in the sense that they're checked
in CI somewhere. Instead try to follow them if you can, but if you have any
questions or feel that #[cfg] is overwhelming feel free to reach out on Zulip
or on GitHub.
Governance
... more coming soon
Contributor Covenant Code of Conduct
Note: this Code of Conduct pertains to individuals' behavior. Please also see the Organizational Code of Conduct. Additionally, individuals must also adhere to the Bytecode Alliance Code of Conduct.
Our Pledge
In the interest of fostering an open and welcoming environment, we as contributors and maintainers pledge to making participation in our project and our community a harassment-free experience for everyone, regardless of age, body size, disability, ethnicity, gender identity and expression, level of experience, nationality, personal appearance, race, religion, or sexual identity and orientation.
Our Standards
Examples of behavior that contributes to creating a positive environment include:
- Using welcoming and inclusive language
- Being respectful of differing viewpoints and experiences
- Gracefully accepting constructive criticism
- Focusing on what is best for the community
- Showing empathy towards other community members
Examples of unacceptable behavior by participants include:
- The use of sexualized language or imagery and unwelcome sexual attention or advances
- Trolling, insulting/derogatory comments, and personal or political attacks
- Public or private harassment
- Publishing others' private information, such as a physical or electronic address, without explicit permission
- Other conduct which could reasonably be considered inappropriate in a professional setting
Our Responsibilities
Project maintainers are responsible for clarifying the standards of acceptable behavior and are expected to take appropriate and fair corrective action in response to any instances of unacceptable behavior.
Project maintainers have the right and responsibility to remove, edit, or reject comments, commits, code, wiki edits, issues, and other contributions that are not aligned to this Code of Conduct, or to ban temporarily or permanently any contributor for other behaviors that they deem inappropriate, threatening, offensive, or harmful.
Scope
This Code of Conduct applies both within project spaces and in public spaces when an individual is representing the project or its community. Examples of representing a project or community include using an official project e-mail address, posting via an official social media account, or acting as an appointed representative at an online or offline event. Representation of a project may be further defined and clarified by project maintainers.
Enforcement
Instances of abusive, harassing, or otherwise unacceptable behavior may be reported by contacting the Bytecode Alliance CoC team at report@bytecodealliance.org. The CoC team will review and investigate all complaints, and will respond in a way that it deems appropriate to the circumstances. The CoC team is obligated to maintain confidentiality with regard to the reporter of an incident. Further details of specific enforcement policies may be posted separately.
Project maintainers who do not follow or enforce the Code of Conduct in good faith may face temporary or permanent repercussions as determined by other members of the Bytecode Alliance's leadership.
Attribution
This Code of Conduct is adapted from the Contributor Covenant, version 1.4, available at http://contributor-covenant.org/version/1/4